Exception handling exists in both C++ and Python, but the style and ergonomics are different. Understanding those differences helps engineers write cleaner and more predictable code when working across multiple languages.
The Shared Idea
In both languages, exceptions represent runtime problems that interrupt the normal flow of execution. Instead of returning error codes everywhere, a function can raise an exception and let another part of the program decide how to respond.
Python Example
def divide(a, b):
    if b == 0:
        raise ValueError("Division by zero")
    return a / b

try:
    print(divide(10, 0))
except ValueError as exc:
    print(exc)
C++ Example
#include <iostream>
#include <stdexcept>
using namespace std;

int divide(int a, int b) {
    if (b == 0) {
        throw runtime_error("Division by zero");
    }
    return a / b;
}

int main() {
    try {
        cout << divide(10, 0) << endl;
    } catch (const exception& e) {
        cout << e.what() << endl;
    }
}
The Practical Difference
Python makes exception handling feel lightweight and natural for many application tasks. C++ gives more control, but also requires more discipline around object lifetime, destructors, and performance-sensitive design.
Good Practices in Both Languages
Do not hide important failures silently.
Raise or throw meaningful exception types.
Catch errors where you can actually recover or add useful context.
Keep normal control flow separate from exceptional failure flow.
Final Thoughts
Exception handling is not about making code look advanced. It is about making failure understandable and manageable. Whether you write in C++ or Python, good error handling is part of writing reliable software.
Python too supports file handling and allows users to handle files i.e., to read and write files, along with many other file handling options, to operate on files. The concept of file handling has stretched over various other languages, but the implementation is either complicated or lengthy, but alike other concepts of Python, this concept here is also easy and short. Python treats file differently as text or binary and this is important. Each line of code includes a sequence of characters and they form text file. Each line of a file is terminated with a special character, called the EOL or End of Line characters like comma {,} or newline character. It ends the current line and tells the interpreter a new one has begun. Let’s start with Reading and Writing files.
Working of open() function
We use open () function in Python to open a file in read or write mode. As explained above, open ( ) will return a file object. To return a file object we use open() function along with two arguments, that accepts file name and the mode, whether to read or write. So, the syntax being: open(filename, mode). There are three kinds of mode, that Python provides and how files can be opened:
“ r “, for reading.
“ w “, for writing.
“ a “, for appending.
“ r+ “, for both reading and writing
One must keep in mind that the mode argument is not mandatory. If not passed, then Python will assume it to be “ r ” by default. Let’s look at this program and try to analyze how the read mode works:
#a file named "thanh", will be opened with the reading mode.
 file = open('thanh.txt', 'r')
 This will print every line one by one in the file
 for each in file:
     print (each)
Working of read() mode
There is more than one way to read a file in Python. If you need to extract a string that contains all characters in the file then we can use file.read(). The full code would work like this:
Let’s see how to create a file and how write mode works: To manipulate the file, write the following in your Python environment:
#Python code to create a file
 file = open('geek.txt','w')
 file.write("This is the write command")
 file.write("It allows us to write in a particular file")
 file.close()
Input and output are among the first concepts every C++ learner meets. They seem simple at first, but they are fundamental because nearly every real program needs to read something, display something, or store something in a file.
Console Output with cout
The standard output stream is usually accessed through cout.
#include <iostream>
using namespace std;

int main() {
    cout << "Hello, world!" << endl;
    return 0;
}
Console Input with cin
You can read user input with cin.
#include <iostream>
using namespace std;

int main() {
    string name;
    cin >> name;
    cout << "Hello, " << name << endl;
    return 0;
}
A Common Beginner Mistake
Using cin >> name only reads input until the first space. If you want a full line such as Thanh Nguyen, use getline instead.
File Output
C++ also supports file streams for reading and writing files.
#include <fstream>
using namespace std;

int main() {
    ofstream file("output.txt");
    file << "Stored text" << endl;
}
Why This Matters
Once you understand input and output, you can start building tools that interact with users, process data files, or write logs. That is the point where a learning exercise starts becoming a real program.
Final Thoughts
C++ input and output are simple to begin with, but they open the door to practical programming. Mastering these basics makes it much easier to move on to file processing, configuration handling, and larger applications.
C++ is a general-purpose programming language known for performance, control over memory, and strong support for systems programming. Even today, it remains one of the most important languages in robotics, game engines, real-time systems, embedded software, and high-performance applications.
Why C++ is still relevant
Excellent runtime performance
Fine-grained control over memory and resources
Strong support for object-oriented and generic programming
Huge adoption in performance-sensitive domains
Where C++ is commonly used
Robotics and ROS
Autonomous driving software stacks
Game engines
Operating systems and embedded software
High-frequency and low-latency systems
A simple example
#include <iostream>
#include <vector>

int main() {
    std::vector<int> values = {1, 2, 3, 4};
    for (int v : values) {
        std::cout << v << std::endl;
    }
    return 0;
}
Why learning C++ helps engineers
C++ teaches important ideas about memory, object lifetime, abstraction cost, compilation, and performance trade-offs. Even if you later spend more time in Python, knowing C++ often makes you a stronger engineer.
Final thoughts
C++ is not always the easiest language to learn, but it is one of the most valuable languages if you want to build fast and robust software close to the system level.
Learning Python becomes much easier when you build things that solve real problems. Tutorials help, but projects are what turn syntax into skill. The best beginner and intermediate projects are small enough to finish and useful enough to teach good habits.
Project Ideas That Are Worth Building
1. Log Analyzer
Read a log file, count error messages, group them by level, and export a short report. This teaches file I/O, loops, string processing, and simple data structures.
2. API Data Fetcher
Call a public API, store selected fields, and print a summary. This teaches HTTP requests, JSON parsing, and error handling.
import requests

response = requests.get("https://api.github.com/repos/python/cpython")
data = response.json()
print(data["stargazers_count"])
3. CSV Cleaner
Take messy CSV input, normalize column names, remove invalid rows, and write a cleaned file. This is very close to real engineering work.
4. Deployment Helper Script
Build a CLI tool that runs tests, tags a release, or validates environment variables before deployment.
What Good Projects Teach
how to structure code into functions,
how to handle bad input,
how to log useful information,
and how to make tools that others can actually use.
A Good Rule
Do not chase huge project ideas too early. A finished 150-line script that solves one real problem is often more valuable than a half-built web app that never works.
Final Thoughts
If you want to learn Python seriously, build small tools with clear outcomes. Practical projects create momentum, and momentum is what turns learning into engineering ability.
The Standard Template Library (STL) is a set of C++ template classes to provide common programming data structures and functions such as lists, stacks, arrays, etc. It is a library of container classes, algorithms, and iterators. It is a generalized library and so, its components are parameterized. A working knowledge of template classes is a prerequisite for working with STL.
STL has four components
Algorithms
Containers
Functions
Iterators
Algorithms
The header algorithm defines a collection of functions especially designed to be used on ranges of elements.They act on containers and provide means for various operations for the contents of the containers.
Containers or container classes store objects and data. There are in total seven standard “first-class” container classes and three container adaptor classes and only seven header files that provide access to these containers or container adaptors.
Sequence Containers: implement data structures which can be accessed in a sequential manner.
The STL includes classes that overload the function call operator. Instances of such classes are called function objects or functors. Functors allow the working of the associated function to be customized with the help of parameters to be passed.
Pointers store address of variables or a memory location.
// General syntax
datatype *var_name;

// An example pointer "ptr" that holds
// address of an integer variable or holds
// address of a memory whose value(s) can
// be accessed as integer values through "ptr"
int *ptr;
Using a Pointer:
To use pointers in C, we must understand below two operators.
To access address of a variable to a pointer, we use the unary operator & (ampersand) that returns the address of that variable. For example &x gives us address of variable x.
// The output of this program can be different
// in different runs. Note that the program
// prints address of a variable and a variable
// can be assigned different address in different
// runs.
#include <stdio.h>

int main()
// Prints address of x
printf("%p", &x);

return 0;
}
One more operator is unary * (Asterisk) which is used for two things :
To declare a pointer variable: When a pointer variable is declared in C/C++, there must be a * before its name.
// C program to demonstrate declaration of
// pointer variables.
#include <stdio.h>
int main()
{
    int x = 10;
// 1) Since there is * in declaration, ptr
// becomes a pointer varaible (a variable
// that stores address of another variable)
// 2) Since there is int before *, ptr is
// pointer to an integer type variable
int *ptr;

// & operator before x is used to get address
// of x. The address of x is assigned to ptr.
ptr = &x;

return 0;
}
To access the value stored in the address we use the unary operator (*) that returns the value of the variable located at the address specified by its operand. This is also called Dereferencing.
What are the main principles of Object-Oriented Programming?
The four principles of object-oriented programming are encapsulation, abstraction, inheritance,and polymorphism.
These words may sound scary for a junior developer. And the complex, excessively long explanations in Wikipedia sometimes double the confusion.
That’s why I want to give a simple, short, and clear explanation for each of these concepts. It may sound like something you explain to a child, but I would actually love to hear these answers when I conduct an interview.
Encapsulation
Say we have a program. It has a few logically different objects which communicate with each other — according to the rules defined in the program.
Encapsulation is achieved when each object keeps its state private, inside a class. Other objects don’t have direct access to this state. Instead, they can only call a list of public functions — called methods.
So, the object manages its own state via methods — and no other class can touch it unless explicitly allowed. If you want to communicate with the object, you should use the methods provided. But (by default), you can’t change the state.
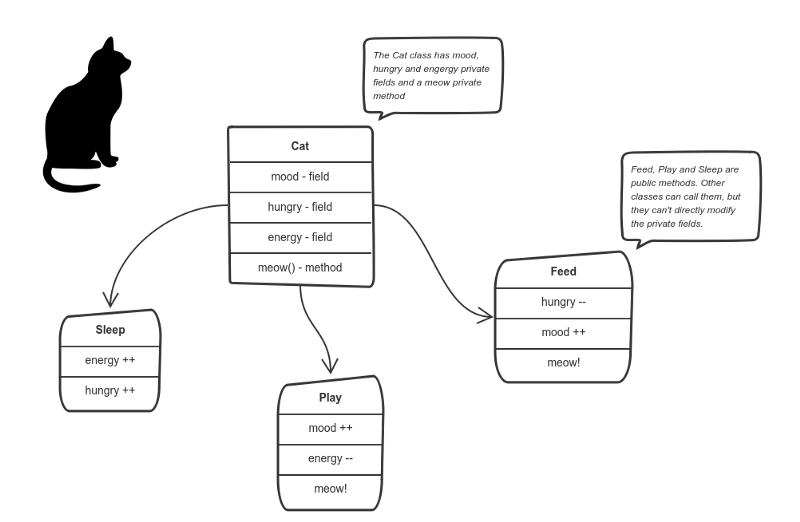
Let’s say we’re building a tiny Sims game. There are people and there is a cat. They communicate with each other. We want to apply encapsulation, so we encapsulate all “cat” logic into a Catclass. It may look like this:
You can feed the cat. But you can’t directly change how hungry the cat is.
Here the “state” of the cat is the private variablesmood, hungry and energy. It also has a private method meow(). It can call it whenever it wants, the other classes can’t tell the cat when to meow.
What they can do is defined in the public methodssleep(), play() and feed(). Each of them modifies the internal state somehow and may invoke meow(). Thus, the binding between the private state and public methods is made.
This is encapsulation.
Abstraction
Abstraction can be thought of as a natural extension of encapsulation.
In object-oriented design, programs are often extremely large. And separate objects communicate with each other a lot. So maintaining a large codebase like this for years — with changes along the way — is difficult.
Abstraction is a concept aiming to ease this problem.
Applying abstraction means that each object should only expose a high-level mechanism for using it.
This mechanism should hide internal implementation details. It should only reveal operations relevant for the other objects.
Think — a coffee machine. It does a lot of stuff and makes quirky noises under the hood. But all you have to do is put in coffee and press a button.
Preferably, this mechanism should be easy to use and should rarely change over time. Think of it as a small set of public methods which any other class can call without “knowing” how they work.
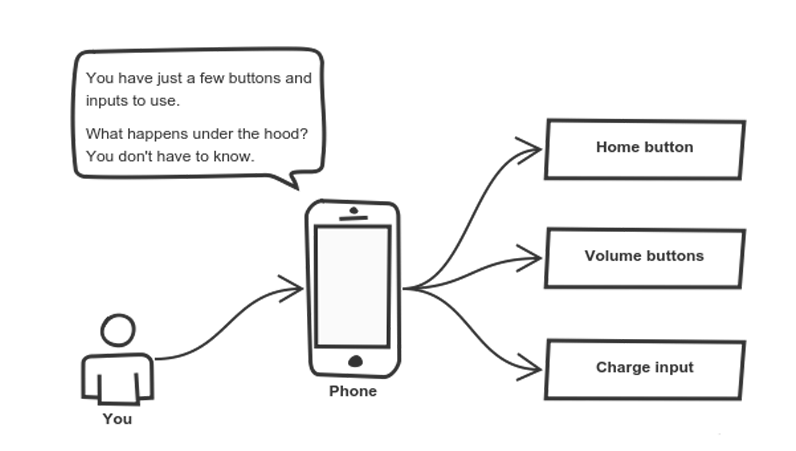
Another real-life example of abstraction? Think about how you use your phone:
Cell phones are complex. But using them is simple.
You interact with your phone by using only a few buttons. What’s going on under the hood? You don’t have to know — implementation details are hidden. You only need to know a short set of actions.
Implementation changes — for example, a software update — rarely affect the abstraction you use.
Inheritance
OK, we saw how encapsulation and abstraction can help us develop and maintain a big codebase.
But do you know what is another common problem in OOP design?
Objects are often very similar. They share common logic. But they’re not entirely the same. Ugh…
So how do we reuse the common logic and extract the unique logic into a separate class? One way to achieve this is inheritance.
It means that you create a (child) class by deriving from another (parent) class. This way, we form a hierarchy.
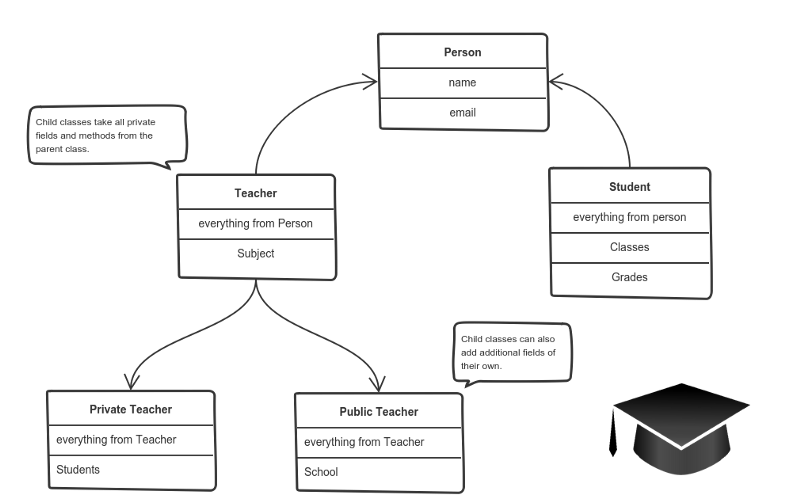
The child class reuses all fields and methods of the parent class (common part) and can implement its own (unique part).
For example:
A private teacher is a type of teacher. And any teacher is a type of Person.
If our program needs to manage public and private teachers, but also other types of people like students, we can implement this class hierarchy.
This way, each class adds only what is necessary for it while reusing common logic with the parent classes.
Polymorphism
We’re down to the most complex word! Polymorphism means “many shapes” in Greek.
So we already know the power of inheritance and happily use it. But there comes this problem.
Say we have a parent class and a few child classes which inherit from it. Sometimes we want to use a collection — for example a list — which contains a mix of all these classes. Or we have a method implemented for the parent class — but we’d like to use it for the children, too.
This can be solved by using polymorphism.
Simply put, polymorphism gives a way to use a class exactly like its parent so there’s no confusion with mixing types.But each child class keeps its own methods as they are.
This typically happens by defining a (parent) interface to be reused. It outlines a bunch of common methods. Then, each child class implements its own version of these methods.
Any time a collection (such as a list) or a method expects an instance of the parent (where common methods are outlined), the language takes care of evaluating the right implementation of the common method — regardless of which child is passed.
Take a look at a sketch of geometric figures implementation. They reuse a common interface for calculating surface area and perimeter:
Triangle, Circle, and Rectangle now can be used in the same collection
Having these three figures inheriting the parent Figure Interface lets you create a list of mixed triangles, circles, and rectangles. And treat them like the same type of object.
Then, if this list attempts to calculate the surface for an element, the correct method is found and executed. If the element is a triangle, triangle’s CalculateSurface()is called. If it’s a circle — then cirlce’s CalculateSurface()is called. And so on.
If you have a function which operates with a figure by using its parameter, you don’t have to define it three times — once for a triangle, a circle, and a rectangle.
You can define it once and accept a Figureas an argument. Whether you pass a triangle, circle or a rectangle — as long as they implement CalculateParamter(), their type doesn’t matter.
I hope this helped. You can directly use these exact same explanations at job interviews.
If you find something still difficult to understand — don’t hesitate to ask in the comments below.
What’s next?
Being prepared to answer one of the all-time interview question classics is great — but sometimes you never get called for an interview.
Next, I’ll focus on what employers want to see in a junior developer and how to stand out from the crowd when job hunting.
What is constructor? A constructor is a member function of a class which initializes objects of a class. In C++, Constructor is automatically called when object(instance of class) create. It is special member function of the class. How constructors are different from a normal member function?
A constructor is different from normal functions in following ways:
Constructor has same name as the class itself
Constructors don’t have return type
A constructor is automatically called when an object is created.
If we do not specify a constructor, C++ compiler generates a default constructor for us (expects no parameters and has an empty body).
Let us understand the types of constructors in C++ by taking a real-world example. Suppose you went to a shop to buy a marker. When you want to buy a marker, what are the options? The first one you go to a shop and say give me a marker. So just saying give me a marker mean that you did not set which brand name and which color, you didn’t mention anything just say you want a marker. So when we said just I want a marker so whatever the frequently sold marker is there in the market or in his shop he will simply hand over that. And this is what a default constructor is! The second method you go to a shop and say I want a marker a red in color and XYZ brand. So you are mentioning this and he will give you that marker. So in this case you have given the parameters. And this is what a parameterized constructor is! Then the third one you go to a shop and say I want a marker like this(a physical marker on your hand). So the shopkeeper will see that marker. Okay, and he will give a new marker for you. So copy of that marker. And that’s what copy constructor is! Types of Constructors
Default Constructors: Default constructor is the constructor which doesn’t take any argument. It has no parameters.
// Cpp program to illustrate the
// concept of Constructors

include

using namespace std;

class construct
{
  public:
    int a, b;
    // Default Constructor
    construct()
   {
     a = 10;
     b = 20;
    }
};

int main()
{
// Default constructor called automatically
// when the object is created
Exception handling in C++ is a way to respond to runtime errors without mixing error logic directly into every normal code path. When used carefully, exceptions help separate the main flow of a program from exceptional failure cases.
The Basic Mechanism
C++ exception handling is built around three keywords:
try for code that may fail,
throw for signaling an error,
catch for handling the error.
#include <iostream>
#include <stdexcept>
using namespace std;

int divide(int a, int b) {
    if (b == 0) {
        throw runtime_error("Division by zero");
    }
    return a / b;
}

int main() {
    try {
        cout << divide(10, 2) << endl;
    } catch (const exception& e) {
        cout << "Error: " << e.what() << endl;
    }
}
Why Exceptions Exist
Without exceptions, code often becomes full of repeated error checks. Exceptions let you report failure from deep inside a call stack and handle it at a higher level where the program can make a sensible decision.
Good Practices
Throw meaningful exception types.
Catch by reference, especially for standard exceptions.
Use exceptions for exceptional situations, not routine control flow.
Write code that remains resource-safe if an exception occurs.
Resource Safety and RAII
One of the reasons RAII is so important in C++ is that destructors still run during stack unwinding. That makes smart pointers and scoped resource management essential companions to exception-safe code.
Final Thoughts
Exception handling is not only about avoiding crashes. It is about making error handling explicit, maintainable, and safer. Used with discipline, it helps C++ programs fail in cleaner and more understandable ways.