There is no native “string” data type in C++ but its <string> library class provides a string object that emulates a string data type. To make this available to a program, the library must be added with an #include <string> directive at the start of the program.
#include<iostream>
#include<string.h>using namespace std;
int main()
{
    char str[50];
    int len;
    cout << "Enter an array or string : ":
    gets(str);
    len = strlen(str);
    cout << "Length of the string is : " << len;
    return 0;
}
Like the <iostream> class library, the <string> library is part of the std namespace that is used by the C++ standard library classes. That means that a string object can be referred to as std::string, or more simply as string when using namespace std; again the directive must be at the start of the program.
Initializing Strings
A string “variable” can be declared in the same way as other variables. The declaration may optionally initialized the variable using the = assignment operator, or it may be initialized later in the program. Additionally a string variable may be initialized by including a text string between parentheses after the variable name.
Text strings in C++ must always be enclosed with double quotes(“”). Single quotes (‘’) are only used for character values of the char data type.
Any numeric values that are assigned to a string variable, are no longer a numeric data type, so attempting to add string values of “4” and “5” with the addition operator(+) would add up to “45” instead of 9.
Converting Strings to other Data Types
Arithmetic cannot be performed on numeric values assigned to string variables until they are converted to a numeric data type. Luckily, there is a C++ <sstream> library provides a “stringstream” object that acts as an intermediary to convert strings to other data types.
Other features of a string variable can be revealed by calling its size(), capacity(), and empty() functions. Written below is short summary of other features.
a string variable can be emptied by assigning it an empty string (=“”) or by calling its clear() function.
Multiple string values can be concatenated by the + operator
A string can be can be appended to another string by the += operator or by calling its append() function.
A string can be compared to another string by the == operator or by calling its append() function.
A string can be assigned to a stringvariable using the = operator or by calling its assign() function.
The swap() function swaps the values of two string variables.
Substrings of a string can be sought with the find() function, or specialized functions such as find_first_of(), and a character retrieved from a specified index position by the at() function.
Next we will be focusing more on control structure of the flow such as while loops, do-while loops, and for loops in addition to using the switch case for complex conditional tests.
An array is a variable that can store multiple items of data unlike a regular variable that stores one pierce of data. Just like any variable, arrays must be declared before they can be accessed.
Initializing Arrays
You can initialize a simple array of built-in types, like integers (int) or characters (char), when you first declare the array. After the array name, put an equal sign and a list of comma separated values enclosed in the braces.
This declared nums to be an array of 10 integers. Remember that the data are stored sequentially in array are elements that are numbered starting at zero. So nums[0] equals to 0, nums[1] equals to 10, and so on.
Arrays can be created for any data type but each element may only contain data of the same data type.
Inserting and Printing Elements
int mike[5] = {19, 10, 8, 17, 9}// change 4th element to 9
mike[3] = 9;// take input from the user and insert in third element
cin >> mike[2];// take input from the user and insert in (i+1)th element
cin >> mike[i];// print first element of the array
cout << mike[0];// print ith element of the array
cout >> mike[i-1];
Character Arrays
An array of characters can be used to store a string of text if the final elements contains the special \0 null character. For example:
char name[5] = {'p', 'n', 'o', 'p', '\0'};
Because this character-by-character approach is difficult to type and admits too many opportunities for error, C++ enables a shorthand form of string initialization using a literal:
char name[] = "pnop";
This form of initialization doesn’t require the null character; the compiler adds it automatically. The string “pnop” is 5 bytes including null.
Multidimensial Arrays
Collectively elements in an array is known as an index. Arrays can have more than one index. Arrays are suitable for data that consists of a known number of elements like a chessboard or coordinates which would be good examples in need of a two dimensional array.
C++ supports a wide range of functions that can manipulate null-terminated strings. The header file <cstring> defines several functions to manipulate C strings and arrays.
╔═════════════════╦════════════════════════════════════════════╗
║ Keyword         ║ Functions and Purpose                      ║
╠═════════════════╬════════════════════════════════════════════╣
║ strcpy(s1,s2)   ║ copies string s2 into string s1.           ║        ╠═════════════════╬════════════════════════════════════════════╣
║ strcat(s1,s2)   ║ concatenates string s2 onto the end of     ║
║                 ║ string s1.                                 ║
╠═════════════════╬════════════════════════════════════════════╣
║ strlen(s1)      ║ Returns the length of string s1;           ║             ╠═════════════════╬════════════════════════════════════════════╣
║ strcmp(s1,s2)   ║ Returns 0 if s1 and s2 are the same;       ║
║                 ║ less than 0 if s1<s2; greater than 0 if    ║                                       ║                 ║ if s1>s2.                                  ║
╠═════════════════╬════════════════════════════════════════════╣
║ strchr(s1,ch)   ║ Returns a pointer to the first occurrence  ║            ║                 ║ of character ch in string s1.              ║
╠═════════════════╬════════════════════════════════════════════╣
║ strstr(s1,s2)   ║ Returns a pointer to the first string s2   ║
║                 ║ in string s1.                              ║
╚═════════════════╩════════════════════════════════════════════╝
The header file <cstring> defines several functions to manipulate C strings and arrays.
Operators are the foundation of any programming language. Thus the functionality of C/C++ programming language is incomplete without the use of operators. We can define operators as symbols that help us to perform specific mathematical and logical computations on operands. In other words, we can say that an operator operates the operands. For example, consider the below statement:
c = a + b;
Here, ‘+’ is the operator known as addition operator and ‘a’ and ‘b’ are operands. The addition operator tells the compiler to add both of the operands ‘a’ and ‘b’.
C/C++ has many built-in operator types and they are classified as follows:
Arithmetic Operators: These are the operators used to perform arithmetic/mathematical operations on operands. Examples: (+, -, *, /, %,++,–). Arithmetic operator are of two types:
Unary Operators: Operators that operates or works with a single operand are unary operators. For example: (++ , –)
Binary Operators: Operators that operates or works with two operands are binary operators. For example: (+ , – , * , /)
To learn Arithmetic Operators in details visit this link.
Relational Operators: These are used for comparison of the values of two operands. For example, checking if one operand is equal to the other operand or not, an operand is greater than the other operand or not etc. Some of the relational operators are (==, >= , <= ). To learn about each of these operators in details go to this link.
Logical Operators: Logical Operators are used to combine two or more conditions/constraints or to complement the evaluation of the original condition in consideration. The result of the operation of a logical operator is a boolean value either true or false. For example, the logical AND represented as ‘&&’ operator in C or C++ returns true when both the conditions under consideration are satisfied. Otherwise it returns false. Therfore, a && b returns true when both a and b are true (i.e. non-zero). To learn about different logical operators in details please visit this link.
Bitwise Operators: The Bitwise operators is used to perform bit-level operations on the operands. The operators are first converted to bit-level and then the calculation is performed on the operands. The mathematical operations such as addition, subtraction, multiplication etc. can be performed at bit-level for faster processing. For example, the bitwise AND represented as & operator in C or C++ takes two numbers as operands and does AND on every bit of two numbers. The result of AND is 1 only if both bits are 1. To learn bitwise operators in details, visit this link.
Assignment Operators: Assignment operators are used to assign value to a variable. The left side operand of the assignment operator is a variable and right side operand of the assignment operator is a value. The value on the right side must be of the same data-type of variable on the left side otherwise the compiler will raise an error. Different types of assignment operators are shown below:
“=”: This is the simplest assignment operator. This operator is used to assign the value on the right to the variable on the left. For example:a = 10; b = 20; ch = ‘y’;
“+=”: This operator is combination of ‘+’ and ‘=’ operators. This operator first adds the current value of the variable on left to the value on right and then assigns the result to the variable on the left. Example:(a += b) can be written as (a = a + b) If initially value stored in a is 5. Then (a += 6) = 11.
“-=”: This operator is combination of ‘-‘ and ‘=’ operators. This operator first subtracts the value on right from the current value of the variable on left and then assigns the result to the variable on the left. Example:(a -= b) can be written as (a = a – b) If initially value stored in a is 8. Then (a -= 6) = 2.
“*=”: This operator is combination of ‘*’ and ‘=’ operators. This operator first multiplies the current value of the variable on left to the value on right and then assigns the result to the variable on the left. Example:(a *= b) can be written as (a = a * b) If initially value stored in a is 5. Then (a *= 6) = 30.
“/=”: This operator is combination of ‘/’ and ‘=’ operators. This operator first divides the current value of the variable on left by the value on right and then assigns the result to the variable on the left. Example:(a /= b) can be written as (a = a / b) If initially value stored in a is 6. Then (a /= 2) = 3.
Other Operators: Apart from the above operators there are some other operators available in C or C++ used to perform some specific task. Some of them are discussed here:
sizeof operator: sizeof is a much used in the C/C++ programming language. It is a compile time unary operator which can be used to compute the size of its operand. The result of sizeof is of unsigned integral type which is usually denoted by size_t. Basically, sizeof operator is used to compute the size of the variable. To learn about sizeof operator in details you may visit this link.
Comma Operator: The comma operator (represented by the token ,) is a binary operator that evaluates its first operand and discards the result, it then evaluates the second operand and returns this value (and type). The comma operator has the lowest precedence of any C operator. Comma acts as both operator and separator. To learn about comma in details visit this link.
Conditional Operator: Conditional operator is of the form Expression1 ? Expression2 : Expression3 . Here, Expression1 is the condition to be evaluated. If the condition(Expression1) is True then we will execute and return the result of Expression2 otherwise if the condition(Expression1) is false then we will execute and return the result of Expression3. We may replace the use of if..else statements by conditional operators. To learn about conditional operators in details, visit this link.
Operator precedence chart
The below table describes the precedence order and associativity of operators in C / C++ . Precedence of operator decreases from top to bottom.
For Example to redirect the stdout to say a textfile, we could write
freopen ("text_file.txt", "w", stdout);
While this method is still supported in C++, this article discusses another way to redirect I/O streams.
C++ being an object-oriented programming language gives us the ability to not only define our own streams but also redirect standard streams. Thus in C++, a stream is an object whose behavior is defined by a class. Thus anything that behaves like a stream is also a stream.
Streams Objects in C++ are mainly of three types :
istream : Stream object of this type can only perform input operations from the stream
ostream : These objects can only be used for output operations.
iostream : Can be used for both input and output operations
All these classes, as well as file stream classes, derive from the classes: ios and streambuf. Thus filestream and IO stream objects behave similarly.
All stream objects also have an associated data member of class streambuf. Simply put streambuf object is the buffer for the stream. When we read data from a stream, we don’t read it directly from the source, but instead, we read it from the buffer which is linked to the source. Similarly, output operations are first performed on the buffer, and then the buffer is flushed (written to the physical device) when needed.
C++ allows us to set the stream buffer for any stream. So the task of redirecting the stream simply reduces to changing the stream buffer associated with the stream. Thus the to redirect a Stream A to Stream B we need to do
Get the stream buffer of A and store it somewhere
Set the stream buffer of A to the stream buffer of B
If needed reset the stream buffer of A to its previous stream buffer
We can use the function ios::rdbuf() to perform two opeations.
1) stream_object.rdbuf(): Returns pointer to the stream buffer of stream_object
2) stream_object.rdbuf(streambuf * p): Sets the stream buffer to the object pointed by p
Using industrial robot, industrial robot arm in production is an optimal solution to help businesses improve labor productivity and increase competitiveness. The following article, together with TPA, learn about the concept and benefits of Industrial Robots
According to inventor and artist Leonardo Da Vinci ‘Learning Never Exhausts the Mind’ and over the past decade here at SoftBank Robotics we have found that to be consistently true.
NAO History
In 2004 Aldebaran Robotics (Now SoftBank Robotics) launched project NAO which over time has come to revolutionize the way humans and robots interact with each other. NAO is a 58cm tall humanoid robot that is continuously evolving to help support humans in all their endeavors.
Capabilities
NAO’s abilities range from facial recognition, learning from past conversations to automated movement. NAO has already shown his more advanced capabilities through concierging at hotels, aided researchers in over 70 different institutions.
In Education
Most recently, NAO has been put to use in multiple South Australian schools; there NAO supports teachers, challenges students and is changing the way they interact. Monica Williams, a researcher from The Association of Independent Schools of South Australia noted that “What surprised the director was the depth of the students’ understanding and that once the teachers opened up to working with the students on the robot they continually saw things that surprised all of us as to what students were capable of”. Additionally, these schools found that both boys and girls were equally captivated by NAO and even began learning how to code for NAO using Python, an industry standard. Similarly, with the help of Choreographe and multiple licenses provided for schools, students can work with a virtual NAO as they take turns working with the actual NAO which encourages each student to learn at their own pace.
NAO has also been hard at work in the special education field, supporting students in developing skills like turn taking, spontaneous communication and social interaction with NAO and others.
Through the years, NAO has proven that whether you are a teacher wanting to empower your students, a hotel in need of a concierge or a student who could use a helping hand, NAO will be there for you, with capabilities that surprise and engage people.
NAO is more than just a robot, NAO can connect with real people and has the ability to become a core part of a community. Like us, NAO will keep developing and learning and if his time in Australia shows us anything, it is that NAO’s mind is far from exhausted.
Up till now, we have looked in Terraform for infrastructure provisioning and initial setup using provisioners. Now let’s look at ansible which is an open source automation platform. Ansible does configuration management, application deployment, along with infrastructure orchestration. Ansible is procedural rather than declarative. In ansible, we define what we want to do and ansible go through each and every step for that. In terraform, we specify what state we want to achieve and it makes sure we are at that state by creating, modifying or destroying needed resources. Ansible doesn’t manage any state so we need to define how we want to keep track of created resources using tags or other properties while terraform keeps the state of infrastructure so we don’t need to worry about duplicate resource creation. Personally, I recommend terraform for provisioning the infrastructure, and Ansible for configuring the software as terraform is much more intuitive for infrastructure orchestration.
Once upon a time, managing servers reliably and efficiently was a challenge. System administrators managed server by hand, installing software manually, changing configuration and managing services on servers. As managed servers grew and managed services become more complex, scaling manual process was time-consuming and hard. Then came Ansible which is helpful in creating the group of machines, define how to configure them, what action to be taken on them. All these configurations and actions can be triggered from a central location which can be your local system (named controller machine). Ansible uses SSH to connect to remote hosts and do the setup, no software needed to be installed beforehand on a remote host. It’s simple, agentless, powerful and flexible. It uses YAML in form of ansible playbook. Playbook is a file where automation is defined through tasks. A task is a single step to be performed like installing a package.
Ansible works by connecting to remote hosts (using SSH) defined in inventory file, which contains information about servers to be managed. Ansible then executes defined modules or tasks inside a playbook. Execution of playbook which is called the play. We can use predefined organised playbook called roles, which are used for sharing and reusing a provisioning.
Let’s have a look at some of the terminology used in ansible:
Controller Machine: Machine where Ansible is installed
Inventory: Information regarding servers to be managed
Playbook: Automation is defined using tasks defined in YAML format
Task: Procedure to be executed
Module: Predefined commands executed directly on remote hosts
Play: Execution of a playbook
Role: a Pre-defined way for organizing playbooks
Handlers: Tasks with unique names that will only be executed if notified by another task
As I am using Mac OS, so will be installing pip first using easy_install and then ansible using pip. Please look here to install for other platforms.
sudo easy_install pipsudo pip install ansible
Once above command executed, run command below to make sure that ansible is installed properly.
Ansible reads the ssh keys form ~/.ssh/id_rsa. We need to make sure we have public key setup on all remote hosts as we already done using terraform while creation of a remote EC2 instance.
For running ansible command, we need inventory file which is expected to be at a specified path: “/etc/ansible/hosts”. We can change its path using ansible config file (ansible.cfg file) in ansible workspace and define inventory file path there. We need to define username which we are going to use during ssh in ansible config file.
We can even create groups in the inventory file and execute ansible commands by replacing all with a group name. In below example, the server is our group name specified in the inventory file.
ansible server -m ping
Let’s look at playbooks to execute a series of actions. We need to make sure we define playbooks as idempotent so that they can run more than once without having any side effects. Ansible executes playbook in a sequential manner from top to bottom.
We are going to create a directory on our remote node using playbook for all hosts. Below mentioned playbook will create test directory in /home/ec2-user path.
When we execute above playbook using command “ansible-playbook playbook.yml” we get below result. In this, the first result is gathering facts. This happens as ansible executes a special module named “setup” before executing any task. This module connects to a remote host and gathers all kinds of information like IP address, disk space, CPU etc. Once this is done, our create directory task is executed to create the test directory.
There are many modules and commands available to be executed on remote hosts. With ansible, we can do a server setup, software installation and lot more tasks.
Welcome to the intro guide to Terraform! This guide is the best place to start with Terraform. We cover what Terraform is, what problems it can solve, how it compares to existing software, and contains a quick start for using Terraform.
If you are already familiar with the basics of Terraform, the documentation provides a better reference guide for all available features as well as internals.
What is Terraform?
Terraform is a tool for building, changing, and versioning infrastructure safely and efficiently. Terraform can manage existing and popular service providers as well as custom in-house solutions.
Configuration files describe to Terraform the components needed to run a single application or your entire datacenter. Terraform generates an execution plan describing what it will do to reach the desired state, and then executes it to build the described infrastructure. As the configuration changes, Terraform is able to determine what changed and create incremental execution plans which can be applied.
The infrastructure Terraform can manage includes low-level components such as compute instances, storage, and networking, as well as high-level components such as DNS entries, SaaS features, etc…
Examples work best to showcase Terraform. Please see the use cases.
The key features of Terraform are:
Infrastructure as Code
Infrastructure is described using a high-level configuration syntax. This allows a blueprint of your datacenter to be versioned and treated as you would any other code. Additionally, infrastructure can be shared and re-used.
Execution Plans
Terraform has a “planning” step where it generates an execution plan. The execution plan shows what Terraform will do when you call apply. This lets you avoid any surprises when Terraform manipulates infrastructure.
Resource Graph
Terraform builds a graph of all your resources, and parallelizes the creation and modification of any non-dependent resources. Because of this, Terraform builds infrastructure as efficiently as possible, and operators get insight into dependencies in their infrastructure.
Change Automation
Complex changesets can be applied to your infrastructure with minimal human interaction. With the previously mentioned execution plan and resource graph, you know exactly what Terraform will change and in what order, avoiding many possible human errors.
Thiết lập dự án Dự án sẽ yêu cầu sử dụng Ubuntu Linux (hệ điều hành của Carla) và một trình mô phỏng mới. Để giảm bớt khó khăn khi cài đặt, chúng tôi đã cung cấp Không gian làm việc trong trình duyệt để bạn làm việc. Bạn có thể tìm thấy hướng dẫn cho Workspace và chính Workspace sau trong bài học này. Nếu bạn không muốn sử dụng Không gian làm việc, hãy làm theo các bước bên dưới để thiết lập: Bởi vì ROS được sử dụng, bạn sẽ cần sử dụng Ubuntu để phát triển và kiểm tra mã dự án của mình. Bạn có thể sử dụng Ubuntu 14.04 với ROS Indigo Ubuntu 16.04 với ROS Kinetic Bạn có thể sử dụng cài đặt Ubuntu hoặc máy ảo của riêng mình (không được hỗ trợ) hoặc bạn có thể sử dụng VM được cung cấp trong Máy ảo của bạn trong bài học “Giới thiệu về ROS”. Máy ảo được cung cấp đã cài đặt sẵn ROS và Dataspeed DBW. Người dùng Windows 10 – những sinh viên đồng nghiệp của bạn đã gợi ý rằng lựa chọn cục bộ tốt nhất là sử dụng VM cho ROS, trong khi chạy trình mô phỏng nguyên bản (và đảm bảo mở các cổng giữa hai để giao tiếp). Bạn có thể tìm thấy repo của dự án tại đây. Sao chép hoặc tải xuống mã dự án trước các phần tiếp theo để bạn có thể theo dõi cùng với các mô tả mã! Trong README, bạn sẽ có thể tìm thấy bất kỳ phụ thuộc bổ sung nào cần thiết cho dự án. Dự án tích hợp hệ thống sử dụng trình mô phỏng của riêng nó sẽ giao diện với mã ROS của bạn và có tính năng phát hiện đèn giao thông. Bạn có thể tải xuống trình mô phỏng tại đây. Để cải thiện hiệu suất khi sử dụng máy ảo, chúng tôi khuyên bạn nên tải xuống trình mô phỏng cho hệ điều hành máy chủ của bạn và sử dụng trình mô phỏng này bên ngoài máy ảo. Bạn sẽ có thể chạy mã dự án trong máy ảo trong khi chạy trình mô phỏng nguyên bản trong máy chủ sử dụng chuyển tiếp cổng trên cổng 4567. Để biết thêm thông tin về cách thiết lập chuyển tiếp cổng, hãy xem phần cuối của khái niệm lớp học tại đây. Điểm đánh giá cho dự án này khá đơn giản – chiếc xe có điều hướng thành công đường đua không? Nếu bạn đang sử dụng phiên bản ba kỳ hạn, hãy kiểm tra phiếu tự đánh giá tại đây hoặc đối với phiên bản hai kỳ hạn, hãy xem phiếu đánh giá tại đây.
Wikipedia defines Robot as a machine capable of carrying out complex series of actions automatically. The advantages and importance of Robots are contentious, the robotics field is evolving every day and the benefits of robots are becoming inevitable. This article is not meant to discuss the advantages of robots, but to get you started with ROS(Robot Operating System).
This article describes ROS installation, file system, packages, nodes, topics, messages, service, publishers, subscribers, and ROS GUI tools. The programming language used in this article is Python. Refer to this github repo for the codes in this article.
ROS is an open-source meta operating system or a middleware used in programming Robots. It consists of packages, software, building tools for distributed computing, architecture for distributed communication between machines and applications. It also provides tools and libraries for obtaining, building, writing, and running code across multiple computers. It can be programmed using python, c++, and lisp.
ROS vs Framework vs OS(Operating System)
Operating System(OS) manages communication between computer software and hardware. In the process of managing this communication, it allocates resources like the central processing unit(CPU), memory, and storage. Examples are windows, Linux, android, mac OS, etc.
Framework in computer programming is an abstraction in which software providing generic functionality can be selectively changed by additional user-written code, thus providing application-specific software. Software frameworks may include support programs, compilers, code libraries, toolsets, and application programming interfaces(APIs) that bring together all the different components to enable the development of a project or system. Examples are Django, Laravel, Tensorflow, Flutter, etc.
Robot Operating System(ROS) is not a full-fledged operating system, it is a “meta operating system”. It is built on top of a full operating system. It is called an OS because it also provides the services you would expect from an operating system, including hardware abstraction, low-level device control, implementation of commonly-used functionality, message-passing between processes, and package management. It is a series of packages that can be installed on a full operating system like Ubuntu.
ROS level of concepts
Filesystem level — these are resources located on the disk. For example, packages, package manifests (package.xml), repositories, messages types, service types, etc.
Computation level — these involve the communications between peer to peer networks of ROS. Examples are nodes, master, parameter server, messages, topics, services, bags.
Community level — these involve the exchange of software and knowledge between members of the community. Examples are distributions, repositories, ROS wiki.
catkin is the new build system (generate executable files from source files) for ROS while rosbuild was the build system used in the past. catkin uses CMake more cleanly and only enhances CMake where it falls short on features, while rosbuild uses CMake but invokes it from Makefiles and builds each package separately and in-source. catkin was designed to be more conventional than rosbuild, allowing for better distribution of packages, better cross-compiling support, and better portability.
ROS Distributions, Installation, and File System
ROS distributions are named alphabetically. For instance, the last 3 distributions are Lunar Loggerhead, Melodic Morenia, and Noetic Ninjemys. ROS can be officially built on Linux distributions but it also supports other operating systems. This article uses ROS Melodic distribution on Ubuntu 18 Linux distribution.
You can install other distributions by changing the distribution name. For instance, you can change melodic to noetic but note noetic support Ubuntu Focal Fossa(20.04). This installation installs the full version, you can install smaller versions for instance:
This installation does not contain the GUI tools.
After proper installation, you need to source the ROS setup script. source command reads and executes commands from the file specified as its argument in the current shell environment.
To avoid sourcing the setup file every time a new terminal is opened, you can add the command to the .bashrc file. It will automatically run when you open a new terminal.
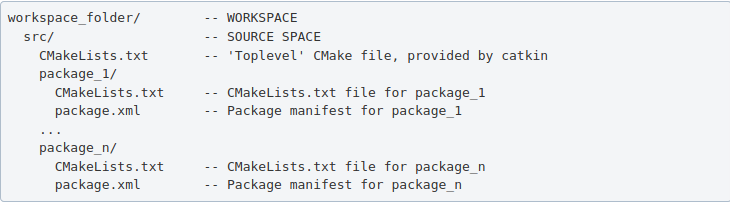
ROS packages are saved in a catkin “workspace” folder. The package folders are saved in the “src” folder in the catkin “workspace”.
The catkin_make command builds all packages located in “catkin_ws/src” folder. After running catkin_make command, two new folders “build” and “devel” will be created. Note, you should always run catkin_make command when you are in the “catkin_ws” directory. The “build” folder is where CMake and Make are invoked, while the “devel” folder contains any generated files and targets, including setup.sh files. A “CMackeLists.txt” file is also created in the src folder(I explained more about this file below).
Ros Package — contains libraries, executables, scripts, and other artifacts for a specific ROS program. Packages are used for structuring specific programs. Files in a package also have a specific structure. A ROS package folder could contain:
launch folder — it contains the launch files(launch files are used to run multiple nodes).
src folder — it contains the source files for instance python or c++ files.
package.xml — also called manifest file, contains package metadata, dependencies, and other metadata related to the package.
CMakeLists.txt -it contains executables, libraries, etc. it is catkin metapackage.
A ROS package must be in the parent “catkin_ws/src” folder, its folder, and must contain package.xml and CmakeList.txt.
Creating a ros package
This command creates a package called “bio_data_package” with dependencies std_msgs, rospy, and roscpp. This command automatically creates a folder named the package name, this package folder contains the “package.xml”, “CMakeLists.txt”, “include” folder and “src” folder. The “src” folder in the workspace folder is different from the “src” folder created in the package folder. Build all the packages in “catkin/src” by running catkin_make, source the “setup.bash” in the “devel” folder to add new environment variables.
ROS Package command-line tool — rospack
rospack is used to get information about packages. Note: Tab completion, press the tab key once to complete a command, and twice to show you suggestions. For instance, you press tab twice after rospack.
rospack list — list all the ROS packages in your workspace rospack find bio_data_package — to output the path of package “bio_data_package”
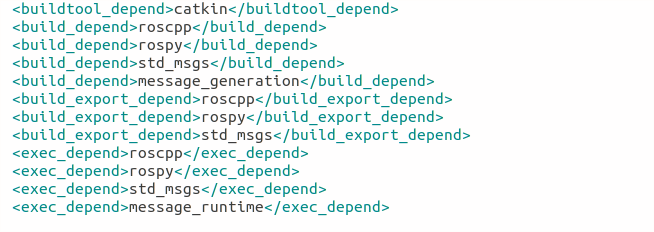
The package.xml contains tags that describe the package. The required tags are name, version, description, maintainer and license.
<name> – the name of the package.
<version> – the version of the package, usually it should be three integers separated by dots.
<description> – a description of the package.
<maintainer> – information about the maintainer i.e someone you can contact if you need more information about the package.
<license> – the license to the package.
<buildtool_depend>(build tool dependency) – the build system required to build the package, this is usually catkin or rosbuild.
<build_depend>(build dependency) – the dependencies of the package, each dependency is enclosed in a build_depend tag.
<build_export_depend>(build export dependency) – a dependency that is included in the headers in public headers in the package.
<exec_depend>(Execution Dependency) – a dependency that is among the shared libraries.
<test_depend>(Test Dependency) – a dependency required for unit test.
<doc depend>(Documentation Tool Dependency) – a dependency required to generate documentation.
A ROS node is an executable that uses ROS to communicate with other nodes. The concept of ros node helps in fault tolerance as each node does not depend on another node.
ROS Master — provides naming and registration services to the rest of the nodes in the ROS system. Publishers and Subscribers register to the master, then ROS Master tracks ROS topics being published by the publisher and ROS Topics being subscribed to by the subscribers. It also provides the Parameter Server.
rosout — rosout is the name of the console log reporting mechanism in ROS. rosout subscribes to /rosout topic.
Parameter Server — is a shared, multi-variate dictionary that is accessible via network APIs. Nodes use this server to store and retrieve parameters at runtime.
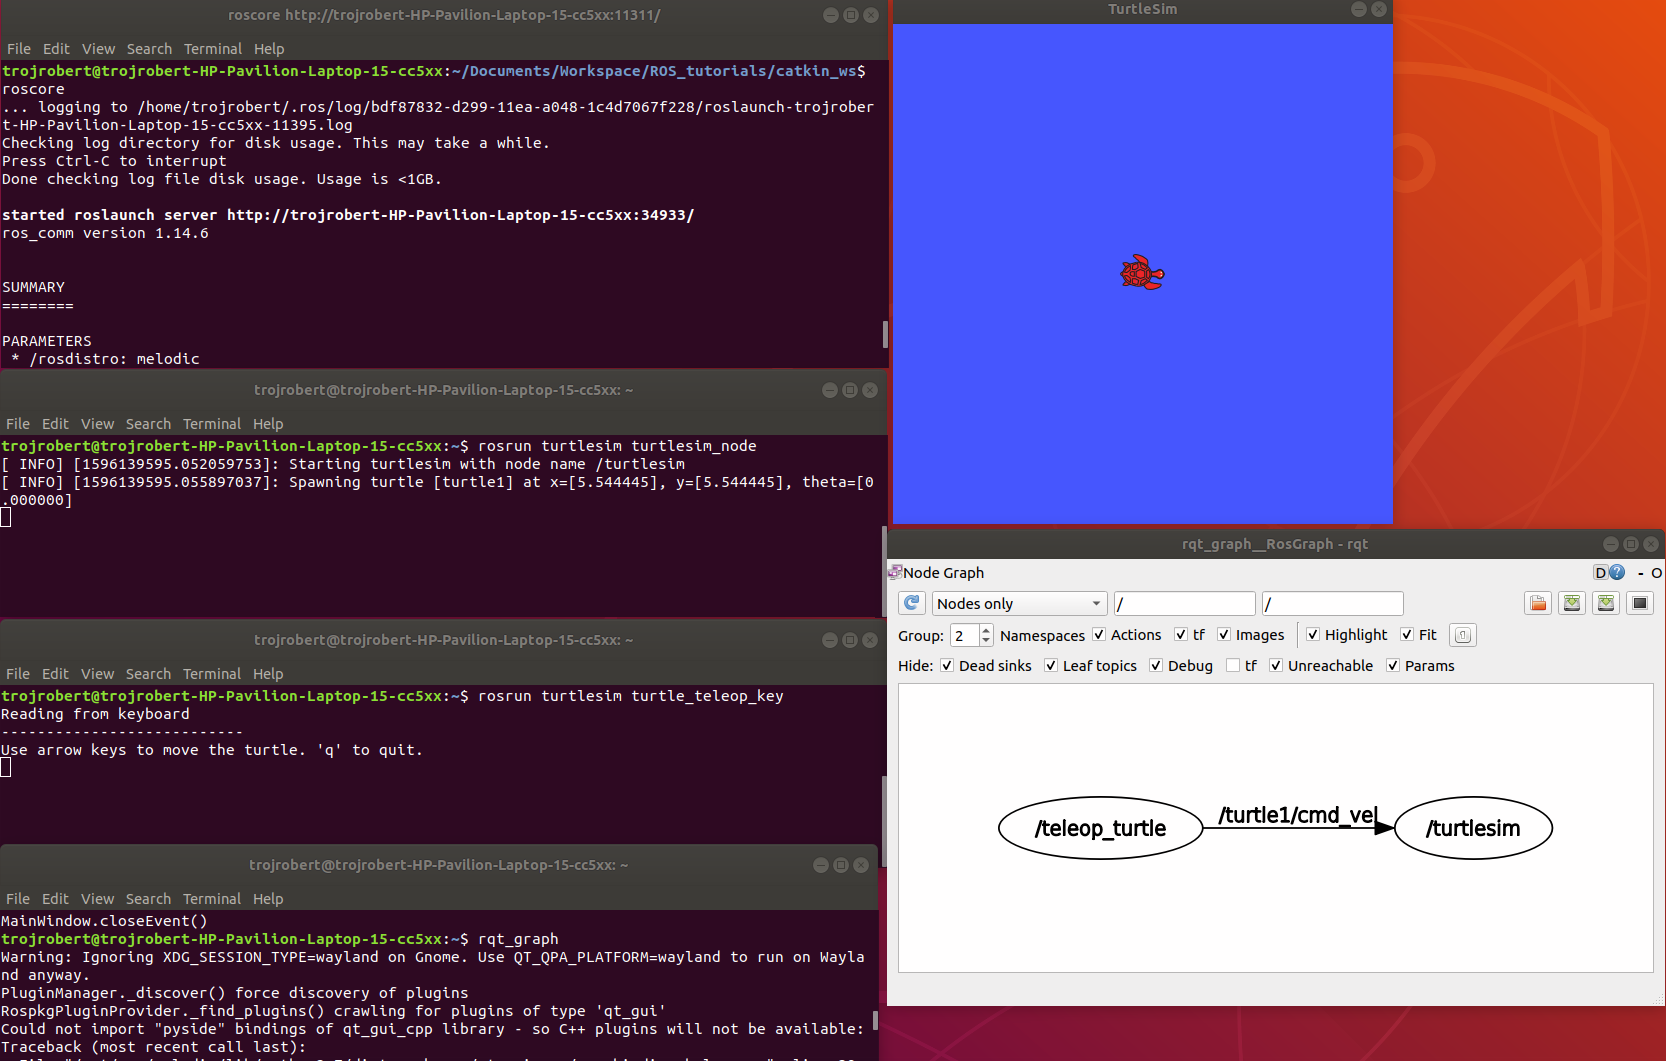
roscore — master + rosout + parameter server. It controls the entire ROS system. It must be running to enable ROS nodes to communicate. It is a collection of nodes and programs that are pre-requisites of a ROS-based system.
Once roscore is running, you can open a new terminal to run other ros nodes.
ROS node command-line tool — rosnode
ROS Run
rosrun — this is used to run a node in a package
turtlesim_node display a GUI with a turtle.
Run the command on a different terminal
The turtle_teleop_key node provides a way to control the turtle with a keyboard. Click on the terminal where you ran rosrun turtlesim turtle_teleop_key, then press the arrow keys, the turtle moves in the direction of the arrow key pressed.
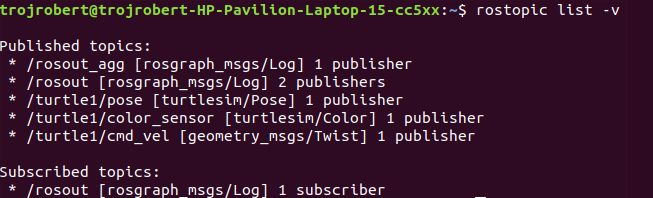
Ros Topics are the buses used by ROS nodes to exchange messages. Imagine a ROS Topic as a water pipe and ROS Message as the water, the two ends of the pipe are where the nodes are located. Topic transport message between a publisher node and a subscriber node. Ros Topics have anonymous publish/subscribe semantics. Nodes that generate message/ data publish to a specific topic, and nodes that consume or need data subscribed to a specific topic. The relationship between publishers and subscribers is many to many.
In the example above, the turtle_teleop_key node publishes the key pressed to the /turtle/cmd_vel topic and the turtlesim node subscribes to that same topic.
ROS topic command-line tool — rostopic
rostopic hz [topic] (shows how fast the messages are publishing) rostopic hz /turtle/cmd_vel
Nodes communicate by sending ROS messages to each other using ROS Topic. A message can be of primitive type integer, floating-point, boolean, etc. A publisher and subscriber should communicate using the same topic type. The topic type is determined by the message type.
Creating a ROS message
Create a msg folder in your package folder. We created a new package call bio_data_package in the example above. Inside this newly created “msg” folder, create a msg file called name.msg
Step 1
Copy the following command into the “name.msg” file. You can also check on github
Now you should have something like this, please don’t modify other lines.
Step 3
Open the CmakeList.txt file for the bio_data_package package in a text editor. This is needed for steps 3 to 6. Check a sample file on github
Modify the find_package call by adding message generation to its components. Now you should have something similar to this.
Step 4
Modify the catkin_package by adding message_runtine
Step 5
Modify add_message_files by adding the name.msg, this enable CMake to reconfigure the project with the new msg file.
Step 6
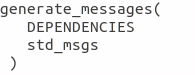
Modify generate_message by removing the # symbols to uncomment it.
Step 7
ROS message command-line tool — rosmsg
Show the description of the new message created
ROS service is one to one two way transport, it is suitable for request/reply interactions. A ROS node(server) offers a service, while another ROS node(client) requests for the service. The server sends a response back to the client. Services are defined using srv files. srv files are just like msg files, except they contain two parts: a request and a response. Services also have types like topics.
Creating a ROS Service
Create a srv folder in your package folder. You created a new package call bio_data_package in the example above. Inside this newly created “srv” folder, create a srv file called full_name.srv. A srv file is used to describe a service, srv files are stored in the “srv” folder.
Copy the following command into the “full_name.srv” file. A sample is on github
A srv file has two parts separated by -, the first part is the request while the second part is the response.
Do the steps required in creating a ROS message, but instead of Step 5, do thhe following. Please don’t repeat all the steps if you have done them before.
Step 5(specific for ROS service)
Modify add_service_files by adding the “full_name.srv”, this enables CMake to reconfigure the project with the new srv file.
ROS service command-line tool — rossrv
Show the description of the new service created
ROS Services vs ROS Topic
Involves the communication between any two nodes
Involves the communication between Publishers and Subscribers
It is a two way transport
It is a one way transport
It is one to one
It is many to many
Involves a request/ reply pattern
Does not involves a Request/reply pattern
ROS Publisher and Subscriber
Publisher and subscriber is many to many but one way transport. A node sends out a message by publishing it to a given topic. The topic is a name that is used to identify the content of the message. A node that is interested in a certain kind of data will subscribe to the appropriate topic.
Creating a Publisher
A publisher is a node that publishes messages into a topic. Create a scripts folder in your package folder, we created a new package call bio_data_package in the example above, inside this newly created “script” created folder, create a python file called writer_pub.py
Copy the following code into the “writer_pub.py” file. Sample is on github
Creating a Subscriber
A subscriber is a node that gets messages from a topic. Create a python file called reader_sub.py in the “scripts” folder.
Copy the following code into the “reader_sub.py” file. A sample is on github
Modify the caktin_install_python() call in CMameLists.txt
roswtf is a tool for diagnosing issues with a running ROS file system. It evaluates ROS setup like environment variables, packages , stacks, launch files and configuration issues.
rqt_console is a tool that displays messages being published to rosout. These messages have different level of severity like debug, info, warn, error, fatal.
Terminal 2rosrun turtlesim turtlesim_node
Terminal 3rosrun turtlesim turtle
Now move the turtle to the wall
rqt _graph
This shows nodes and the topics the nodes are communicating on.
rqt _plot
Display the scrolling time plot of data published on a topic
rqt
rqt contain most ROS GUI tools, you can select the on you want in the Plugib tab.
Other ROS concepts
ROS Launch — is used for starting and stopping multiple ros nodes. It is used to execute a ros program which is a .launch file.
ROS Stack — this contain several packages.
rosbag — published topics are saved as .bag file, rosbag command line tool is used to work with bag files.