Pointers store address of variables or a memory location.
// General syntax
datatype *var_name;

// An example pointer "ptr" that holds
// address of an integer variable or holds
// address of a memory whose value(s) can
// be accessed as integer values through "ptr"
int *ptr;
Using a Pointer:
To use pointers in C, we must understand below two operators.
To access address of a variable to a pointer, we use the unary operator & (ampersand) that returns the address of that variable. For example &x gives us address of variable x.
// The output of this program can be different
// in different runs. Note that the program
// prints address of a variable and a variable
// can be assigned different address in different
// runs.
#include <stdio.h>

int main()
// Prints address of x
printf("%p", &x);

return 0;
}
One more operator is unary * (Asterisk) which is used for two things :
To declare a pointer variable: When a pointer variable is declared in C/C++, there must be a * before its name.
// C program to demonstrate declaration of
// pointer variables.
#include <stdio.h>
int main()
{
    int x = 10;
// 1) Since there is * in declaration, ptr
// becomes a pointer varaible (a variable
// that stores address of another variable)
// 2) Since there is int before *, ptr is
// pointer to an integer type variable
int *ptr;

// & operator before x is used to get address
// of x. The address of x is assigned to ptr.
ptr = &x;

return 0;
}
To access the value stored in the address we use the unary operator (*) that returns the value of the variable located at the address specified by its operand. This is also called Dereferencing.
What are the main principles of Object-Oriented Programming?
The four principles of object-oriented programming are encapsulation, abstraction, inheritance,and polymorphism.
These words may sound scary for a junior developer. And the complex, excessively long explanations in Wikipedia sometimes double the confusion.
That’s why I want to give a simple, short, and clear explanation for each of these concepts. It may sound like something you explain to a child, but I would actually love to hear these answers when I conduct an interview.
Encapsulation
Say we have a program. It has a few logically different objects which communicate with each other — according to the rules defined in the program.
Encapsulation is achieved when each object keeps its state private, inside a class. Other objects don’t have direct access to this state. Instead, they can only call a list of public functions — called methods.
So, the object manages its own state via methods — and no other class can touch it unless explicitly allowed. If you want to communicate with the object, you should use the methods provided. But (by default), you can’t change the state.
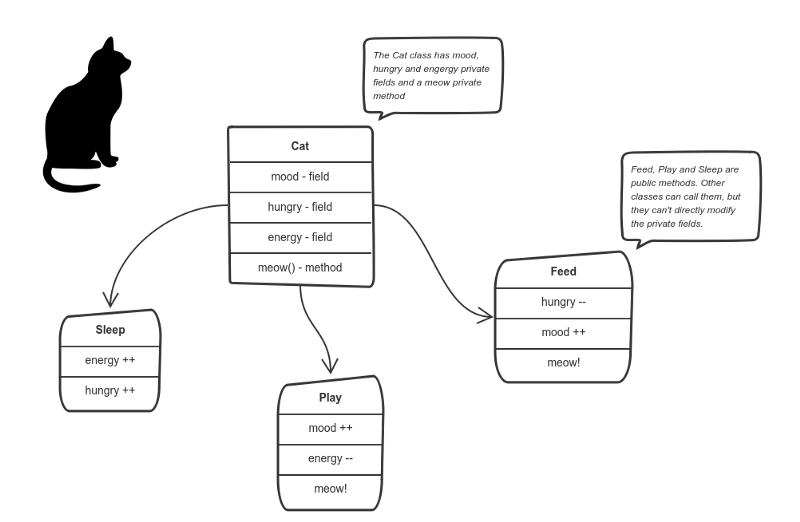
Let’s say we’re building a tiny Sims game. There are people and there is a cat. They communicate with each other. We want to apply encapsulation, so we encapsulate all “cat” logic into a Catclass. It may look like this:
You can feed the cat. But you can’t directly change how hungry the cat is.
Here the “state” of the cat is the private variablesmood, hungry and energy. It also has a private method meow(). It can call it whenever it wants, the other classes can’t tell the cat when to meow.
What they can do is defined in the public methodssleep(), play() and feed(). Each of them modifies the internal state somehow and may invoke meow(). Thus, the binding between the private state and public methods is made.
This is encapsulation.
Abstraction
Abstraction can be thought of as a natural extension of encapsulation.
In object-oriented design, programs are often extremely large. And separate objects communicate with each other a lot. So maintaining a large codebase like this for years — with changes along the way — is difficult.
Abstraction is a concept aiming to ease this problem.
Applying abstraction means that each object should only expose a high-level mechanism for using it.
This mechanism should hide internal implementation details. It should only reveal operations relevant for the other objects.
Think — a coffee machine. It does a lot of stuff and makes quirky noises under the hood. But all you have to do is put in coffee and press a button.
Preferably, this mechanism should be easy to use and should rarely change over time. Think of it as a small set of public methods which any other class can call without “knowing” how they work.
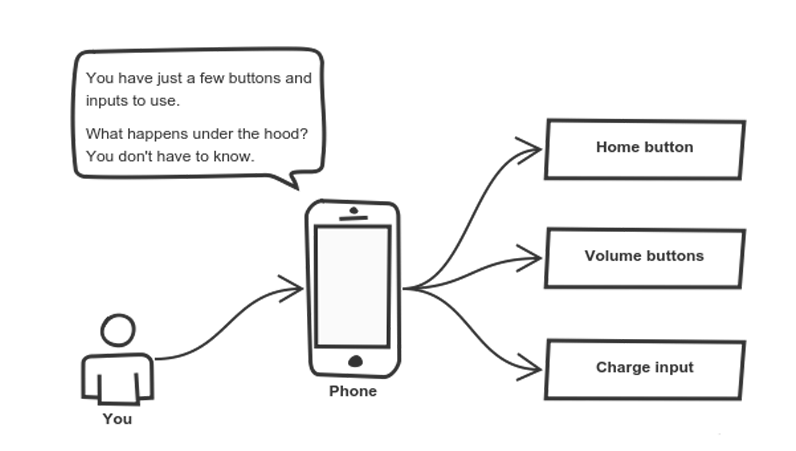
Another real-life example of abstraction? Think about how you use your phone:
Cell phones are complex. But using them is simple.
You interact with your phone by using only a few buttons. What’s going on under the hood? You don’t have to know — implementation details are hidden. You only need to know a short set of actions.
Implementation changes — for example, a software update — rarely affect the abstraction you use.
Inheritance
OK, we saw how encapsulation and abstraction can help us develop and maintain a big codebase.
But do you know what is another common problem in OOP design?
Objects are often very similar. They share common logic. But they’re not entirely the same. Ugh…
So how do we reuse the common logic and extract the unique logic into a separate class? One way to achieve this is inheritance.
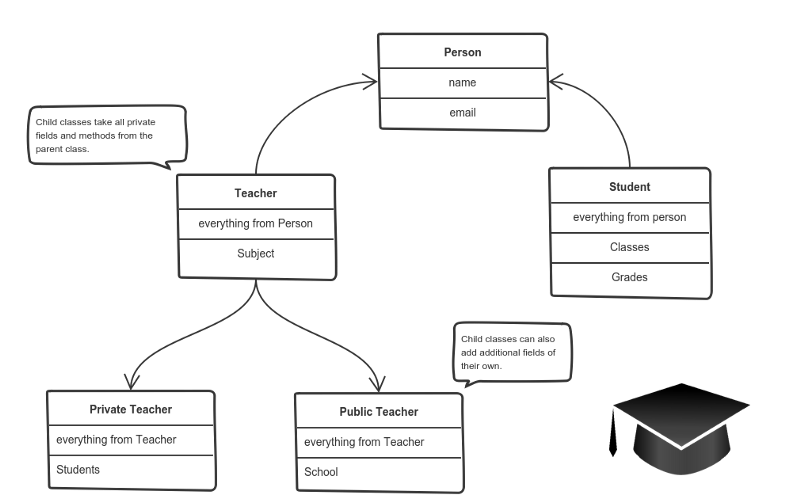
It means that you create a (child) class by deriving from another (parent) class. This way, we form a hierarchy.
The child class reuses all fields and methods of the parent class (common part) and can implement its own (unique part).
For example:
A private teacher is a type of teacher. And any teacher is a type of Person.
If our program needs to manage public and private teachers, but also other types of people like students, we can implement this class hierarchy.
This way, each class adds only what is necessary for it while reusing common logic with the parent classes.
Polymorphism
We’re down to the most complex word! Polymorphism means “many shapes” in Greek.
So we already know the power of inheritance and happily use it. But there comes this problem.
Say we have a parent class and a few child classes which inherit from it. Sometimes we want to use a collection — for example a list — which contains a mix of all these classes. Or we have a method implemented for the parent class — but we’d like to use it for the children, too.
This can be solved by using polymorphism.
Simply put, polymorphism gives a way to use a class exactly like its parent so there’s no confusion with mixing types.But each child class keeps its own methods as they are.
This typically happens by defining a (parent) interface to be reused. It outlines a bunch of common methods. Then, each child class implements its own version of these methods.
Any time a collection (such as a list) or a method expects an instance of the parent (where common methods are outlined), the language takes care of evaluating the right implementation of the common method — regardless of which child is passed.
Take a look at a sketch of geometric figures implementation. They reuse a common interface for calculating surface area and perimeter:
Triangle, Circle, and Rectangle now can be used in the same collection
Having these three figures inheriting the parent Figure Interface lets you create a list of mixed triangles, circles, and rectangles. And treat them like the same type of object.
Then, if this list attempts to calculate the surface for an element, the correct method is found and executed. If the element is a triangle, triangle’s CalculateSurface()is called. If it’s a circle — then cirlce’s CalculateSurface()is called. And so on.
If you have a function which operates with a figure by using its parameter, you don’t have to define it three times — once for a triangle, a circle, and a rectangle.
You can define it once and accept a Figureas an argument. Whether you pass a triangle, circle or a rectangle — as long as they implement CalculateParamter(), their type doesn’t matter.
I hope this helped. You can directly use these exact same explanations at job interviews.
If you find something still difficult to understand — don’t hesitate to ask in the comments below.
What’s next?
Being prepared to answer one of the all-time interview question classics is great — but sometimes you never get called for an interview.
Next, I’ll focus on what employers want to see in a junior developer and how to stand out from the crowd when job hunting.
One of the advantages of C++ over C is Exception Handling. Exceptions are run-time anomalies or abnormal conditions that a program encounters during its execution. There are two types of exceptions: a)Synchronous, b)Asynchronous(Ex:which are beyond the program’s control, Disc failure etc). C++ provides following specialized keywords for this purpose. try: represents a block of code that can throw an exception. catch: represents a block of code that is executed when a particular exception is thrown. throw: Used to throw an exception. Also used to list the exceptions that a function throws, but doesn’t handle itself.
Why Exception Handling? Following are main advantages of exception handling over traditional error handling.
1) Separation of Error Handling code from Normal Code: In traditional error handling codes, there are always if else conditions to handle errors. These conditions and the code to handle errors get mixed up with the normal flow. This makes the code less readable and maintainable. With try catch blocks, the code for error handling becomes separate from the normal flow.
2) Functions/Methods can handle any exceptions they choose: A function can throw many exceptions, but may choose to handle some of them. The other exceptions which are thrown, but not caught can be handled by caller. If the caller chooses not to catch them, then the exceptions are handled by caller of the caller. In C++, a function can specify the exceptions that it throws using the throw keyword. The caller of this function must handle the exception in some way (either by specifying it again or catching it)
Xử lý ngoại lệ trong C ++
Một trong những ưu điểm của C ++ so với C là Xử lý ngoại lệ. Các trường hợp ngoại lệ là các bất thường về thời gian chạy hoặc các điều kiện bất thường mà một chương trình gặp phải trong quá trình thực thi. Có hai loại ngoại lệ: a) Đồng bộ, b) Không đồng bộ (Ví dụ: nằm ngoài tầm kiểm soát của chương trình, Lỗi đĩa, v.v.). C ++ cung cấp các từ khóa chuyên dụng sau đây cho mục đích này. try: đại diện cho một khối mã có thể ném một ngoại lệ. catch: đại diện cho một khối mã được thực thi khi một ngoại lệ cụ thể được ném ra. ném: Dùng để ném một ngoại lệ. Cũng được sử dụng để liệt kê các ngoại lệ mà một hàm ném ra, nhưng không tự xử lý.
Tại sao phải xử lý ngoại lệ? Sau đây là những ưu điểm chính của xử lý ngoại lệ so với xử lý lỗi truyền thống.
1) Tách mã Xử lý lỗi khỏi Mã Thông thường: Trong các mã xử lý lỗi truyền thống, luôn có các điều kiện nếu khác để xử lý lỗi. Các điều kiện này và mã để xử lý lỗi bị trộn lẫn với quy trình bình thường. Điều này làm cho mã ít dễ đọc và dễ bảo trì hơn. Với khối try catch, mã để xử lý lỗi trở nên tách biệt với quy trình bình thường.
2) Các hàm / phương thức có thể xử lý bất kỳ ngoại lệ nào mà chúng chọn: Một hàm có thể đưa ra nhiều ngoại lệ, nhưng có thể chọn xử lý một số ngoại lệ. Người gọi có thể xử lý các trường hợp ngoại lệ khác được ném nhưng không bắt được. Nếu người gọi chọn không bắt chúng, thì các trường hợp ngoại lệ sẽ được xử lý bởi người gọi của người gọi. Trong C ++, một hàm có thể chỉ định các ngoại lệ mà nó ném bằng từ khóa ném. Người gọi hàm này phải xử lý ngoại lệ theo một cách nào đó (bằng cách chỉ định lại hoặc bắt nó)
3) Nhóm các loại lỗi: Trong C ++, cả các loại cơ bản và các đối tượng đều có thể được ném ra như một ngoại lệ. Chúng ta có thể tạo một hệ thống phân cấp các đối tượng ngoại lệ, nhóm các ngoại lệ trong không gian tên hoặc lớp, phân loại chúng theo các kiểu.
3) Grouping of Error Types: In C++, both basic types and objects can be thrown as exception. We can create a hierarchy of exception objects, group exceptions in namespaces or classes, categorize them according to types.
An array is a variable that can store multiple items of data unlike a regular variable that stores one pierce of data. Just like any variable, arrays must be declared before they can be accessed.
Initializing Arrays
You can initialize a simple array of built-in types, like integers (int) or characters (char), when you first declare the array. After the array name, put an equal sign and a list of comma separated values enclosed in the braces.
This declared nums to be an array of 10 integers. Remember that the data are stored sequentially in array are elements that are numbered starting at zero. So nums[0] equals to 0, nums[1] equals to 10, and so on.
Arrays can be created for any data type but each element may only contain data of the same data type.
Inserting and Printing Elements
int mike[5] = {19, 10, 8, 17, 9}// change 4th element to 9
mike[3] = 9;// take input from the user and insert in third element
cin >> mike[2];// take input from the user and insert in (i+1)th element
cin >> mike[i];// print first element of the array
cout << mike[0];// print ith element of the array
cout >> mike[i-1];
Character Arrays
An array of characters can be used to store a string of text if the final elements contains the special \0 null character. For example:
char name[5] = {'p', 'n', 'o', 'p', '\0'};
Because this character-by-character approach is difficult to type and admits too many opportunities for error, C++ enables a shorthand form of string initialization using a literal:
char name[] = "pnop";
This form of initialization doesn’t require the null character; the compiler adds it automatically. The string “pnop” is 5 bytes including null.
Multidimensial Arrays
Collectively elements in an array is known as an index. Arrays can have more than one index. Arrays are suitable for data that consists of a known number of elements like a chessboard or coordinates which would be good examples in need of a two dimensional array.
C++ supports a wide range of functions that can manipulate null-terminated strings. The header file <cstring> defines several functions to manipulate C strings and arrays.
╔═════════════════╦════════════════════════════════════════════╗
║ Keyword         ║ Functions and Purpose                      ║
╠═════════════════╬════════════════════════════════════════════╣
║ strcpy(s1,s2)   ║ copies string s2 into string s1.           ║        ╠═════════════════╬════════════════════════════════════════════╣
║ strcat(s1,s2)   ║ concatenates string s2 onto the end of     ║
║                 ║ string s1.                                 ║
╠═════════════════╬════════════════════════════════════════════╣
║ strlen(s1)      ║ Returns the length of string s1;           ║             ╠═════════════════╬════════════════════════════════════════════╣
║ strcmp(s1,s2)   ║ Returns 0 if s1 and s2 are the same;       ║
║                 ║ less than 0 if s1<s2; greater than 0 if    ║                                       ║                 ║ if s1>s2.                                  ║
╠═════════════════╬════════════════════════════════════════════╣
║ strchr(s1,ch)   ║ Returns a pointer to the first occurrence  ║            ║                 ║ of character ch in string s1.              ║
╠═════════════════╬════════════════════════════════════════════╣
║ strstr(s1,s2)   ║ Returns a pointer to the first string s2   ║
║                 ║ in string s1.                              ║
╚═════════════════╩════════════════════════════════════════════╝
The header file <cstring> defines several functions to manipulate C strings and arrays.
There is no native “string” data type in C++ but its <string> library class provides a string object that emulates a string data type. To make this available to a program, the library must be added with an #include <string> directive at the start of the program.
#include<iostream>
#include<string.h>using namespace std;
int main()
{
    char str[50];
    int len;
    cout << "Enter an array or string : ":
    gets(str);
    len = strlen(str);
    cout << "Length of the string is : " << len;
    return 0;
}
Like the <iostream> class library, the <string> library is part of the std namespace that is used by the C++ standard library classes. That means that a string object can be referred to as std::string, or more simply as string when using namespace std; again the directive must be at the start of the program.
Initializing Strings
A string “variable” can be declared in the same way as other variables. The declaration may optionally initialized the variable using the = assignment operator, or it may be initialized later in the program. Additionally a string variable may be initialized by including a text string between parentheses after the variable name.
Text strings in C++ must always be enclosed with double quotes(“”). Single quotes (‘’) are only used for character values of the char data type.
Any numeric values that are assigned to a string variable, are no longer a numeric data type, so attempting to add string values of “4” and “5” with the addition operator(+) would add up to “45” instead of 9.
Converting Strings to other Data Types
Arithmetic cannot be performed on numeric values assigned to string variables until they are converted to a numeric data type. Luckily, there is a C++ <sstream> library provides a “stringstream” object that acts as an intermediary to convert strings to other data types.
Other features of a string variable can be revealed by calling its size(), capacity(), and empty() functions. Written below is short summary of other features.
a string variable can be emptied by assigning it an empty string (=“”) or by calling its clear() function.
Multiple string values can be concatenated by the + operator
A string can be can be appended to another string by the += operator or by calling its append() function.
A string can be compared to another string by the == operator or by calling its append() function.
A string can be assigned to a stringvariable using the = operator or by calling its assign() function.
The swap() function swaps the values of two string variables.
Substrings of a string can be sought with the find() function, or specialized functions such as find_first_of(), and a character retrieved from a specified index position by the at() function.
Next we will be focusing more on control structure of the flow such as while loops, do-while loops, and for loops in addition to using the switch case for complex conditional tests.
A function is a group of statements that together perform a task. Every C++ program has at least one function, which is main(), and all the most trivial programs can define additional functions.
You can divide up your code into separate functions. How you divide up your code among different functions is up to you, but logically the division usually is such that each function performs a specific task.
A function declaration tells the compiler about a function’s name, return type, and parameters. A function definition provides the actual body of the function.
The C++ standard library provides numerous built-in functions that your program can call. For example, function strcat() to concatenate two strings, function memcpy() to copy one memory location to another location and many more functions.
A function is known with various names like a method or a sub-routine or a procedure etc.
Defining a Function
The general form of a C++ function definition is as follows −
return_type function_name( parameter list ) {
   body of the function
}
A C++ function definition consists of a function header and a function body. Here are all the parts of a function −
Return Type − A function may return a value. The return_type is the data type of the value the function returns. Some functions perform the desired operations without returning a value. In this case, the return_type is the keyword void.
Function Name − This is the actual name of the function. The function name and the parameter list together constitute the function signature.
Parameters − A parameter is like a placeholder. When a function is invoked, you pass a value to the parameter. This value is referred to as actual parameter or argument. The parameter list refers to the type, order, and number of the parameters of a function. Parameters are optional; that is, a function may contain no parameters.
Function Body − The function body contains a collection of statements that define what the function does.
Example
Following is the source code for a function called max(). This function takes two parameters num1 and num2 and return the biggest of both −
// function returning the max between two numbers

int max(int num1, int num2) {
   // local variable declaration
   int result;

   if (num1 > num2)
      result = num1;
   else
      result = num2;

   return result;
}
Function Declarations
A function declaration tells the compiler about a function name and how to call the function. The actual body of the function can be defined separately.
A function declaration has the following parts −
return_type function_name( parameter list );
For the above defined function max(), following is the function declaration −
int max(int num1, int num2);
Parameter names are not important in function declaration only their type is required, so following is also valid declaration −
int max(int, int);
Function declaration is required when you define a function in one source file and you call that function in another file. In such case, you should declare the function at the top of the file calling the function.
Calling a Function
While creating a C++ function, you give a definition of what the function has to do. To use a function, you will have to call or invoke that function.
When a program calls a function, program control is transferred to the called function. A called function performs defined task and when it’s return statement is executed or when its function-ending closing brace is reached, it returns program control back to the main program.
To call a function, you simply need to pass the required parameters along with function name, and if function returns a value, then you can store returned value. For example −Live Demo
#include <iostream>
using namespace std;

// function declaration
int max(int num1, int num2);

int main () {
   // local variable declaration:
   int a = 100;
   int b = 200;
   int ret;

   // calling a function to get max value.
   ret = max(a, b);
   cout << "Max value is : " << ret << endl;

   return 0;
}

// function returning the max between two numbers
int max(int num1, int num2) {
   // local variable declaration
   int result;

   if (num1 > num2)
      result = num1;
   else
      result = num2;

   return result;
}
I kept max() function along with main() function and compiled the source code. While running final executable, it would produce the following result −
Max value is : 200
Function Arguments
If a function is to use arguments, it must declare variables that accept the values of the arguments. These variables are called the formal parameters of the function.
The formal parameters behave like other local variables inside the function and are created upon entry into the function and destroyed upon exit.
While calling a function, there are two ways that arguments can be passed to a function −
Sr.No
Call Type & Description
1
Call by ValueThis method copies the actual value of an argument into the formal parameter of the function. In this case, changes made to the parameter inside the function have no effect on the argument.
2
Call by PointerThis method copies the address of an argument into the formal parameter. Inside the function, the address is used to access the actual argument used in the call. This means that changes made to the parameter affect the argument.
3
Call by ReferenceThis method copies the reference of an argument into the formal parameter. Inside the function, the reference is used to access the actual argument used in the call. This means that changes made to the parameter affect the argument.
By default, C++ uses call by value to pass arguments. In general, this means that code within a function cannot alter the arguments used to call the function and above mentioned example while calling max() function used the same method.
Default Values for Parameters
When you define a function, you can specify a default value for each of the last parameters. This value will be used if the corresponding argument is left blank when calling to the function.
This is done by using the assignment operator and assigning values for the arguments in the function definition. If a value for that parameter is not passed when the function is called, the default given value is used, but if a value is specified, this default value is ignored and the passed value is used instead. Consider the following example −Live Demo
#include <iostream>
using namespace std;

int sum(int a, int b = 20) {
   int result;
   result = a + b;

   return (result);
}
int main () {
   // local variable declaration:
   int a = 100;
   int b = 200;
   int result;

   // calling a function to add the values.
   result = sum(a, b);
   cout << "Total value is :" << result << endl;

   // calling a function again as follows.
   result = sum(a);
   cout << "Total value is :" << result << endl;

   return 0;
}
When the above code is compiled and executed, it produces the following result −
Total value is :300
Total value is :120
Hàm trong C++
Một hàm là một nhóm các câu lệnh cùng nhau thực hiện một nhiệm vụ. Mỗi chương trình C++ có ít nhất một hàm, là hàm main().
Bạn có thể chia mã của bạn thành các hàm riêng biệt. Cách bạn phân chia mã của bạn giữa các hàm khác nhau tùy thuộc vào bạn, nhưng về mặt logic mỗi hàm thực hiện một tác vụ cụ thể.
Một khai báo hàm cho trình biên dịch biết về tên, kiểu trả về và các tham số của hàm. Định nghĩa hàm cung cấp phần thân thực của hàm.
Thư viện chuẩn C++ cung cấp nhiều hàm được tích hợp sẵn mà chương trình của bạn có thể gọi. Ví dụ, strcat() để nối hai chuỗi, memcpy() để sao chép một vị trí bộ nhớ sang một vị trí khác và nhiều hàm khác.
Hàm trong C++ còn được gọi là thủ tục hoặc chương trình con trong các ngôn ngữ lập trình khác.
Để thực hiện bất kỳ tác vụ nào, chúng ta có thể tạo ra các hàm. Một hàm có thể được gọi nhiều lần. Nó cung cấp tính mô đun và khả năng sử dụng lại mã. Hàm giúp phân chia vấn đề phức tạp thành các thành phần nhỏ giúp chương trình dễ hiểu và dễ sử dụng.
Lợi thế của các hàm trong C++
1. Tái sử dụng mã
Bằng cách tạo các hàm trong C++, bạn có thể gọi nó nhiều lần. Vì vậy, bạn không cần phải viết cùng một mã một hoặc nhiều lần nữa.
2. Tối ưu hóa mã
Nó làm cho mã được tối ưu hóa, chúng ta không cần phải viết nhiều mã.
Giả sử, bạn phải kiểm tra 3 số (531, 883 và 781) có phải là số nguyên tố hay không. Không sử dụng hàm, bạn cần viết logic số nguyên tố 3 lần. Vì vậy, có sự lặp lại của mã.
Nhưng nếu bạn sử dụng các hàm, bạn chỉ cần viết logic một lần và bạn có thể sử dụng lại nó nhiều lần.
Định nghĩa hàm trong lập trình C++ bao gồm tên hàm và phần thân hàm . Dưới đây là tất cả các phần của hàm:
Kiểu trả về: Một hàm có thể trả về một giá trị. Các return_type là kiểu dữ liệu của giá trị hàm trả về. Một số hàm thực hiện các hoạt động mong muốn mà không trả về một giá trị. Trong trường hợp này, return_type là từ khóa void.
Tham số: Một tham số giống như một trình giữ chỗ. Khi một hàm được gọi, bạn chuyển một giá trị cho tham số. Giá trị này được gọi là tham số hoặc đối số thực tế. Danh sách tham số tham chiếu đến loại, thứ tự và số tham số của hàm. Các tham số là tùy chọn; có nghĩa là, một hàm có thể không chứa tham số.
Thân hàm: Phần thân hàm chứa một tập hợp các câu lệnh xác định chức năng của hàm.
Ví dụ hàm trong C++
Ví dụ dưới đây là mã nguồn cho một hàm được gọi là max(). Hàm này truyền vào hai tham số num1 và num2 và trả về giá trị lớn nhất giữa hai tham số:
/* hàm trả về giá trị lớn nhất giữa 2 số */
int max(int num1, int num2) {

   /* khai báo biến local */
   int result;

   if (num1 > num2)
      result = num1;
   else
      result = num2;

   return result;
}
Khai báo hàm trong C++
Một khai báo hàm cho trình biên dịch biết về tên hàm và cách gọi hàm. Cơ thể thực tế của hàm có thể được định nghĩa riêng.
Một khai báo hàm có các phần sau:
return_type function_name(parameter list);
Đối với hàm được định nghĩa ở trên max (), khai báo hàm như sau:
int max(int num1, int num2);
Tên tham số không quan trọng trong khai báo hàm chỉ loại của chúng là bắt buộc, vì vậy sau đây cũng là khai báo hợp lệ:
int max(int, int);
Khai báo hàm là bắt buộc khi bạn định nghĩa một hàm trong một tệp nguồn và bạn gọi hàm đó trong một tệp khác. Trong trường hợp này, bạn nên khai báo hàm ở đầu tệp gọi hàm.
Gọi một hàm trong C++
Hàm trong lập trình C++ hoạt động như thế nào? Hình ảnh sau đây mô tả gọi một hàm do người dùng định nghĩa bên trong hàm main():
Trong khi tạo một hàm C, bạn đưa ra một định nghĩa về chức năng của hàm. Để sử dụng một hàm, bạn sẽ phải gọi hàm đó để thực hiện tác vụ được xác định.
Khi một chương trình gọi một hàm, điều khiển chương trình được chuyển đến hàm được gọi. Một hàm được gọi thực hiện một nhiệm vụ đã định nghĩa và khi câu lệnh trả về của nó được thực hiện hoặc khi nó kết thúc bằng hàm đóng, nó sẽ trả về chương trình điều khiển quay trở lại chương trình chính.
Để gọi một hàm, bạn chỉ cần chuyển các tham số bắt buộc cùng với tên hàm và nếu hàm trả về một giá trị, thì bạn có thể lưu trữ giá trị trả về. Ví dụ:
#include <iostream>

using namespace std;

/* khai bao ham */
int max(int num1, int num2);

int main () {

   /* dinh nghia bien local */
   int a = 100;
   int b = 200;
   int ret;

   /* goi mot ham de lay gia tri lon nhat */
   ret = max(a, b);

   cout << "Max value is: " << ret << endl;

   return 0;
}

/* ham tra ve gia tri lon nhat giua hai so */
int max(int num1, int num2) {

   /* dinh nghia bien local */
   int result;

   if (num1 > num2)
      result = num1;
   else
      result = num2;

   return result;
}
This will be a very brief tutorial on Docker: we’ll take a “nginx” docker image and build a simple web server on Docker container. In that process, we can get a quick taste of how Docker is working.
We’ll learn:
How to get an official image.
How to use the files on host machine from our container.
How to copy the files from our host to the container.
How to make our own image – in this tutorial, we’ll make a Dockerfile with a page for render.
Getting Nginx official docker image
To create an instance of Nginx in a Docker container, we need to search for and pull the Nginx official image from Docker Hub. Use the following command to launch an instance of Nginx running in a container and using the default configuration:
$ docker container run --name my-nginx-1 -P -d nginx
f0cea39a8bc38b38613a3a4abe948d0d1b055eefe86d026a56c783cfe0141610
The command creates a container named “my-nginx-1” based on the Nginx image and runs it in “detached” mode, meaning the container is started and stays running until stopped but does not listen to the command line. We will talk about this later how to interact with the container.
The Nginx image exposes ports 80 and 443 in the container and the -P option tells Docker to map those ports to ports on the Docker host that are randomly selected from the range between 49153 and 65535.
We do this because if we create multiple Nginx containers on the same Docker host, we may induce conflicts on ports 80 and 443. The port mappings are dynamic and are set each time the container is started or restarted.
If we want the port mappings to be static, set them manually with the -p option. The long form of the “Container Id” will be returned.
We can run docker ps to verify that the container was created and is running, and to see the port mappings:
$ docker container ps
CONTAINER ID IMAGE COMMAND                 CREATED       STATUS       PORTS                                        NAMES
f0cea39a8bc3 nginx "nginx -g 'daemon off"  5 minutes ago Up 5 minutes 0.0.0.0:32769->80/tcp   my-nginx-1
We can verify that Nginx is running by making an HTTP request to port 32769 (reported in the output from the preceding command as the port on the Docker host that is mapped to port 80 in the container), the default Nginx welcome page appears:
$ docker container stop f0cea39a8bc3
f0cea39a8bc3

$ docker container ps
CONTAINER ID        IMAGE               COMMAND             CREATED             STATUS              PORTS               NAMES

$ docker container rm f0cea39a8bc3
If we want to map the container’s port 80 to a specific port of the host, we can use -p with host_port:docker_port:
$ docker container run --name my-nginx-1 -p8088:80 -d nginx
bd39cc4ed6dbba92e85437b0ab595e92c5ca2e4a87ee3e724a0cf04aa9726044

$ docker container ps
CONTAINER ID  IMAGE  COMMAND                 CREATED         STATUS         PORTS                  NAMES
bd39cc4ed6db  nginx  "nginx -g 'daemon of…"  18 seconds ago  Up 18 seconds  0.0.0.0:8088->80/tcp   my-nginx-1
More work on the Nginx Docker Container
Now that we have a working Nginx Docker container, how do we manage the content and the configuration? What about logging?
It is common to have SSH access to Nginx instances, but Docker containers are generally intended to be for a single purpose (in this case running Nginx) so the Nginx image does not have OpenSSH installed and for normal operations there is no need to get shell access directly to the Nginx container. We will use other methods supported by Docker rather than using SSH.
Keep the Content and Configuration on the Docker Host
When the container is created, we can tell Docker to mount a local directory on the Docker host to a directory in the container.
The Nginx image uses the default Nginx configuration, so the root directory for the container is /usr/share/nginx/html. If the content on the Docker host is in the local directory /tmp/nginx/html, we run the command:
$ docker container run --name my-nginx-2 \
-v /tmp/nginx/html:/usr/share/nginx/html:ro -P -d nginx

$ docker container ps
CONTAINER ID  IMAGE  COMMAND                CREATED       STATUS       PORTS                   NAMES
35a4c74ff073  nginx  "nginx -g 'daemon off" 7 seconds ago Up 2 seconds 0.0.0.0:32770->80/tcp   my-nginx-2
Now any change made to the files in the local directory, /tmp/nginx/html on the Docker host are reflected in the directories /usr/share/nginx/html in the container. The :ro option causes these directors to be read only inside the container.
Copying files from the Docker host
Rather than using the files that kept in the host machine, another option is to have Docker copy the content and configuration files from a local directory on the Docker host when a container is created.
Once a container is created, the files are maintained by creating a new container when the files change or by modifying the files in the container.
A simple way to copy the files is to create a Dockerfile to generate a new Docker image, based on the Nginx image from Docker Hub. When copying files in the Dockerfile, the path to the local directory is relative to the build context where the Dockerfile is located. For this example, the content is in the MyFiles directory under the same directory as the Dockerfile.
Here is the Dockerfile:
FROM nginx
COPY MyFiles /usr/share/nginx/html
We can then create our own Nginx image by running the following command from the directory where the Dockerfile is located:
Note the period (“.”) at the end of the command. This tells Docker that the build context is the current directory. The build context contains the Dockerfile and the directories to be copied.
Now we can create a container using the image by running the command:
$ docker container run --name my-nginx-3 -P -d my-nginx-image-1
150fe5eddb31acde7dd432bed73f8daba2a7eec3760eb272cb64bfdd2809152d

$ docker container ps
CONTAINER ID  IMAGE             COMMAND                  CREATED        STATUS        PORTS                   NAMES
150fe5eddb31  my-nginx-image-1  "nginx -g 'daemon of…"   7 seconds ago  Up 7 seconds  0.0.0.0:32772->80/tcp   my-nginx-3
Editing (Sharing) files in Docker container : volumes
Actually, the volume of Docker belongs to an advanced level. So, in this section, we only touch the topic briefly.
As we know, we are not able to get SSH access to the Nginx container, so if we want to edit the container files directly we can use a helper container that has shell access.
In order for the helper container to have access to the files, we must create a new image that has the proper volumes specified for the image.
Assuming we want to copy the files as in the example above, while also specifying volumes for the content and configuration files, we use the following Dockerfile:
FROM nginx
COPY content /usr/share/nginx/html
VOLUME /myVolume-1
We then create the new Nginx image (my-nginx-image-2) by running the following command:
Now we create an Nginx container (my-nginx-4) using the image by running the command:
$ docker container run --name my-nginx-4 -P -d my-nginx-image-2
8c84cf08dc08a0b00bd04c9b7047ff65f1ec5c910aa6b096a743b18652e128f9
We then start a helper container with a shell and access the content and configuration directories of the Nginx container we created in the previous example by running the command:
This creates an interactive container named my-nginx-4-with-volume that runs in the foreground with a persistent standard input (-i) and a tty (-t) and mounts all the volumes defined in the container my-nginx-4 as local directories in the my-nginx-4-with-volume container.
After the container is created, it runs the bash shell, which presents a shell prompt for the container that we can use to modify the files as needed.
Now, we can check the volume has been mounted:
root@64052ed5e1b3:/# ls
bin  boot  dev	etc  home  lib	lib64  media  mnt  myVolume-1  opt  proc  root	run  sbin  srv	sys  tmp  usr  var
root@64052ed5e1b3:/#
To check the volume on local machine we can go to /var/lib/docker/volumes. On Mac system, we need to take an additional step to:
The problem with Virtual Machines built using VirtualBox or VMWare is that we have to run entire OS for every VM. That’s where Docker comes in. Docker virtualizes on top of one OS so that we can run Linux using technology known as LinuX Containers (LXC). LXC combines cgroups and namespace support to provide an isolated environment for applications. Docker can also use LXC as one of its execution drivers, enabling image management and providing deployment services.
Docker allows us to run applications inside containers. Running an application inside a container takes a single command: docker run.
Docker Registry – Repositories of Docker Images
We need to have a disk image to make the virtualization work. The disk image represents the system we’re running on and they are the basis of containers.
Docker registry is a registry of already existing images that we can use to run and create containerized applications.
There are lots of communities and works already been done to build the system. Docker company supports and maintains its registry and the community around it.
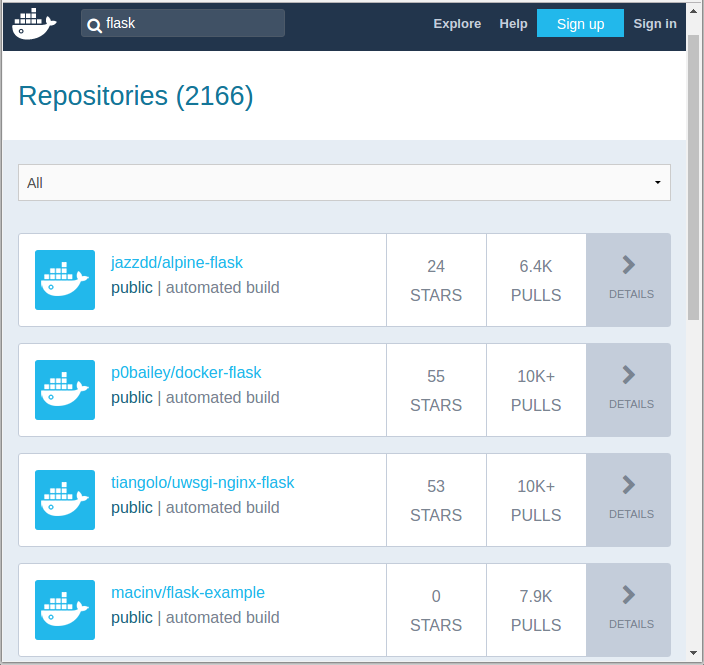
We can search images within the registry hub, for example, the sample picture is the result from searching “flask”.
Docker search
The Docker search command allows us to go and look at the registry in search for the images that we want.
$ docker search --help

Usage: docker search [OPTIONS] TERM

Search the Docker Hub for images

  --automated=false    Only show automated builds
  --no-trunc=false     Don't truncate output
  -s, --stars=0        Only displays with at least x stars
If we do the same search, Jenkins, we get exactly the same result as we got from the web:
$ docker search ubuntu
NAME                      DESCRIPTION                                    STARS  OFFICIAL   AUTOMATED
ubuntu                    Ubuntu is a Debian-based Linux operating s...  5969     [OK]
rastasheep/ubuntu-sshd    Dockerized SSH service, built on top of of...  83                   [OK]
ubuntu-upstart            Upstart is an event-based replacement for ...  71       [OK]
ubuntu-debootstrap        debootstrap --variant=minbase --components...  30       [OK]
torusware/speedus-ubuntu  Always updated official Ubuntu docker imag...  27                   [OK]
nuagebec/ubuntu           Simple always updated Ubuntu docker images...  20                   [OK]
...
We got too many outputs, so we need to filter it out items with more than 10 stars:
$ docker search --filter=stars=20 ubuntu
NAME                      DESCRIPTION                                    STARS   OFFICIAL   AUTOMATED
ubuntu                    Ubuntu is a Debian-based Linux operating s...  5969      [OK]
rastasheep/ubuntu-sshd    Dockerized SSH service, built on top of of...  83                   [OK]
ubuntu-upstart            Upstart is an event-based replacement for ...  71        [OK]
ubuntu-debootstrap        debootstrap --variant=minbase --components...  30        [OK]
torusware/speedus-ubuntu  Always updated official Ubuntu docker imag...  27                   [OK]
nuagebec/ubuntu           Simple always updated Ubuntu docker images...  20                   [OK]
Docker pull
Once we found the image we like to use it, we can use Docker’s pull command:
$ docker pull --help

Usage:	docker pull [OPTIONS] NAME[:TAG|@DIGEST]

Pull an image or a repository from a registry

Options:
  -a, --all-tags                Download all tagged images in the repository
      --disable-content-trust   Skip image verification (default true)
      --help                    Print usage
The pull command will go up to the web site and grab the image and download it to our local machine.
The pull command without any tag will download all Ubuntu images though I’ve already done it. To see what Docker images are available on our machine, we use docker images:
$ docker images
REPOSITORY          TAG                 IMAGE ID            CREATED             VIRTUAL SIZE
ubuntu              latest              5506de2b643b        4 weeks ago         199.3 MB
So, the output indicates only one image is currently on my local machine. We also see the image has a TAG inside of it.
As we can see from the command below, docker pull centos:latest, we can also be more specific, and download only the version we need. In Docker, versions are marked with tags.
$ docker pull centos:latest
centos:latest: The image you are pulling has been verified
5b12ef8fd570: Pull complete
ae0c2d0bdc10: Pull complete
511136ea3c5a: Already exists
Status: Downloaded newer image for centos:latest
Here is the images on our local machine.
$ docker images
REPOSITORY          TAG                 IMAGE ID            CREATED             VIRTUAL SIZE
centos              latest              ae0c2d0bdc10        2 weeks ago         224 MB
ubuntu              latest              5506de2b643b        4 weeks ago         199.3 MB
The command, docker images, returns the following columns:
REPOSITORY: The name of the repository, which in this case is “ubuntu”.
TAG: Tags represent a specific set point in the repositories’ commit history. As we can see from the list, we’ve pulled down different versions of linux. Each of these versions is tagged with a version number, a name, and there’s even a special tag called “latest” which represents the latest version.
IMAGE ID: This is like the primary key for the image. Sometimes, such as when we commit a container without specifying a name or tag, the repository or the tag is <NONE>, but we can always refer to a specific image or container using its ID.
CREATED: The date the repository was created, as opposed to when it was pulled. This can help us assess how “fresh” a particular build is. Docker appears to update their master images on a fairly frequent basis.
VIRTUAL SIZE: The size of the image.
Docker run
Now we have images on our local machine. What do we do with them? This is where docker run command comes in.
$ docker run  --help

Usage: docker run [OPTIONS] IMAGE [COMMAND] [ARG...]

Run a command in a new container

  -a, --attach=[]            Attach to STDIN, STDOUT or STDERR.
  --add-host=[]              Add a custom host-to-IP mapping (host:ip)
  -c, --cpu-shares=0         CPU shares (relative weight)
  --cap-add=[]               Add Linux capabilities
  --cap-drop=[]              Drop Linux capabilities
  --cidfile=""               Write the container ID to the file
  --cpuset=""                CPUs in which to allow execution (0-3, 0,1)
  -d, --detach=false         Detached mode: run the container in the background and print the new container ID
  --device=[]                Add a host device to the container (e.g. --device=/dev/sdc:/dev/xvdc)
  --dns=[]                   Set custom DNS servers
  --dns-search=[]            Set custom DNS search domains
  -e, --env=[]               Set environment variables
  --entrypoint=""            Overwrite the default ENTRYPOINT of the image
  --env-file=[]              Read in a line delimited file of environment variables
  --expose=[]                Expose a port from the container without publishing it to your host
  -h, --hostname=""          Container host name
  -i, --interactive=false    Keep STDIN open even if not attached
  --link=[]                  Add link to another container in the form of name:alias
  --lxc-conf=[]              (lxc exec-driver only) Add custom lxc options --lxc-conf="lxc.cgroup.cpuset.cpus = 0,1"
  -m, --memory=""            Memory limit (format: <number><optional unit>, where unit = b, k, m or g)
  --name=""                  Assign a name to the container
  --net="bridge"             Set the Network mode for the container
                               'bridge': creates a new network stack for the container on the docker bridge
                               'none': no networking for this container
                               'container:<name|id>': reuses another container network stack
                               'host': use the host network stack inside the container.  Note: the host mode gives the container full access to local system services such as D-bus and is therefore considered insecure.
  -P, --publish-all=false    Publish all exposed ports to the host interfaces
  -p, --publish=[]           Publish a container's port to the host
                               format: ip:hostPort:containerPort | ip::containerPort | hostPort:containerPort | containerPort
                               (use 'docker port' to see the actual mapping)
</name|id></optional></number>
docker run --help is a rather big help, and we have more:
  --privileged=false         Give extended privileges to this container
  --restart=""               Restart policy to apply when a container exits (no, on-failure[:max-retry], always)
  --rm=false                 Automatically remove the container when it exits (incompatible with -d)
  --security-opt=[]          Security Options
  --sig-proxy=true           Proxy received signals to the process (even in non-TTY mode). SIGCHLD, SIGSTOP, and SIGKILL are not proxied.
  -t, --tty=false            Allocate a pseudo-TTY
  -u, --user=""              Username or UID
  -v, --volume=[]            Bind mount a volume (e.g., from the host: -v /host:/container, from Docker: -v /container)
  --volumes-from=[]          Mount volumes from the specified container(s)
  -w, --workdir=""           Working directory inside the container
Currently we are on Ubuntu 14.04.1 LTS machine (local):
$ cat /etc/issue
Ubuntu 14.04.1 LTS \n \l
Now we’re going to Docker run centos image. This will create container based upon the image and execute the bin/bash command. Then it will take us into a shell on that machine that can continue to do things:
$ docker run -it centos:latest /bin/bash
[root@98f52715ecfa /]#
By executing it, we’re now on a bash. If we look at /etc/redhat-release:
[root@98f52715ecfa /]# cat /etc/redhat-release
CentOS Linux release 7.0.1406 (Core)
We’re now on CentOS 7.0 on top of my Ubuntu 14.04 machine. We have an access to yum:
[root@98f52715ecfa /]# yum
Loaded plugins: fastestmirror
You need to give some command
Usage: yum [options] COMMAND

List of Commands:

check          Check for problems in the rpmdb
check-update   Check for available package updates
...
Let’s make a new file in our home directory:
[root@98f52715ecfa /]# ls
bin  dev  etc  home  lib  lib64  lost+found  media  mnt  opt  proc  root  run  sbin  selinux  srv  sys  tmp  usr  var
[root@98f52715ecfa /]# cd /home
[root@98f52715ecfa home]# ls
[root@98f52715ecfa home]# touch bogotobogo.txt
[root@98f52715ecfa home]# ls
bogotobogo.txt
[root@98f52715ecfa home]# exit
exit
k@laptop:~$
Docker ps – list containers
After making a new file on our Docker container, we exited from there, and we’re back to our local machine with Ubuntu system.
$ docker ps
CONTAINER ID        IMAGE               COMMAND             CREATED             STATUS              PORTS               NAMES
The docker ps lists containers but currently we do not have any. That’s because nothing is running. It shows only running containers.
We can list all containers using -a option:
$ docker ps -a
CONTAINER ID        IMAGE               COMMAND             CREATED             STATUS                     PORTS               NAMES
98f52715ecfa        centos:latest       "/bin/bash"         12 minutes ago      Exited (0) 5 minutes ago                       goofy_yonath
f8c5951db6f5        ubuntu:latest       "/bin/bash"         4 hours ago         Exited (0) 4 hours ago                         furious_almeida
Docker restart
How can we restart Docker container?
$ docker restart --help

Usage: docker restart [OPTIONS] CONTAINER [CONTAINER...]

Restart a running container

  -t, --time=10      Number of seconds to try to stop for before killing the container. Once killed it will then be restarted. Default is 10 seconds.
We can restart the container that’s already created:
$ docker restart 98f52715ecfa
98f52715ecfa

$ docker ps
CONTAINER ID        IMAGE               COMMAND             CREATED             STATUS              PORTS               NAMES
98f52715ecfa        centos:latest       "/bin/bash"         20 minutes ago      Up 10 seconds                           goofy_yonath
Now we have one active running container, and it already executed the /bin/bash command.
Docker attach
The docker attach command allows us to attach to a running container using the container’s ID or name, either to view its ongoing output or to control it interactively. We can attach to the same contained process multiple times simultaneously, screen sharing style, or quickly view the progress of our daemonized process.
$ docker attach --help

Usage: docker attach [OPTIONS] CONTAINER

Attach to a running container

  --no-stdin=false    Do not attach STDIN
  --sig-proxy=true    Proxy all received signals to the process (even in non-TTY mode). SIGCHLD, SIGKILL, and SIGSTOP are not proxied.
We can attach to a running container:
$ docker attach 98f52715ecfa
[root@98f52715ecfa /]#

[root@98f52715ecfa /]# cd /home
[root@98f52715ecfa home]# ls
bogotobogo.txt
Now we’re back to the CentOS container we’ve created, and the file we made is still there in our home directory.
Docker rm
We can delete the container:
[root@98f52715ecfa home]# exit
exit

$ docker ps -a
CONTAINER ID        IMAGE               COMMAND             CREATED             STATUS                      PORTS               NAMES
98f52715ecfa        centos:latest       "/bin/bash"         30 minutes ago      Exited (0) 14 seconds ago                       goofy_yonath
f8c5951db6f5        ubuntu:latest       "/bin/bash"         5 hours ago         Exited (0) 5 hours ago                          furious_almeida

$ docker rm f8c5951db6f5
f8c5951db6f5

$ docker ps -a
CONTAINER ID        IMAGE               COMMAND             CREATED             STATUS                     PORTS               NAMES
98f52715ecfa        centos:latest       "/bin/bash"         32 minutes ago      Exited (0) 2 minutes ago                       goofy_yonath
We deleted the Ubuntu container and now we have only one container, CentOS.
Remove all images and containers
We use Docker, but working with it creates lots of images and containers. So, we may want to remove all of them to save disk space.
To delete all containers:
$ docker rm $(docker ps -a -q)
To delete all images:
$ docker rmi $(docker images -q)
Here the -a and -q do this:
-a: Show all containers (default shows just running)
Kibana can be quickly started and connected to a local Elasticsearch container for development or testing use with the following command:
$ docker ps
CONTAINER ID        IMAGE                                                 COMMAND                  CREATED             STATUS              PORTS                                            NAMES
e49fee1e070a        docker.elastic.co/logstash/logstash:7.6.2             "/usr/local/bin/dock…"   12 minutes ago      Up 12 minutes                                                        friendly_antonelli
addeb5426f0a        docker.elastic.co/beats/filebeat:7.6.2                "/usr/local/bin/dock…"   11 hours ago        Up 11 hours                                                          filebeat
caa1097bc4af        docker.elastic.co/elasticsearch/elasticsearch:7.6.2   "/usr/local/bin/dock…"   2 days ago          Up 2 days           0.0.0.0:9200->9200/tcp, 0.0.0.0:9300->9300/tcp   nifty_mayer

$ docker run --link caa1097bc4af:elasticsearch -p 5601:5601 docker.elastic.co/kibana/kibana:7.6.2
...
{"type":"log","@timestamp":"2020-03-31T16:33:14Z","tags":["listening","info"],"pid":6,"message":"Server running at http://0:5601"}
{"type":"log","@timestamp":"2020-03-31T16:33:14Z","tags":["info","http","server","Kibana"],"pid":6,"message":"http server running at http://0:5601"}


$ docker ps
CONTAINER ID        IMAGE                                                 COMMAND                  CREATED             STATUS              PORTS                                            NAMES
620c39470d7f        docker.elastic.co/kibana/kibana:7.6.2                 "/usr/local/bin/dumb…"   2 hours ago         Up 2 hours          0.0.0.0:5601->5601/tcp                           dazzling_chatterjee
e49fee1e070a        docker.elastic.co/logstash/logstash:7.6.2             "/usr/local/bin/dock…"   3 hours ago         Up 3 hours                                                           friendly_antonelli
addeb5426f0a        docker.elastic.co/beats/filebeat:7.6.2                "/usr/local/bin/dock…"   14 hours ago        Up 14 hours                                                          filebeat
caa1097bc4af        docker.elastic.co/elasticsearch/elasticsearch:7.6.2   "/usr/local/bin/dock…"   2 days ago          Up 2 days           0.0.0.0:9200->9200/tcp, 0.0.0.0:9300->9300/tcp   nifty_mayer
Accessing_Kibana
Kibana is a web application that we can access through port 5601. All we need to do is point our web browser at the machine where Kibana is running and specify the port number. For example, localhost:5601 or http://YOURDOMAIN.com:5601. If we want to allow remote users to connect, set the parameter server.host in kibana.yml to a non-loopback address.
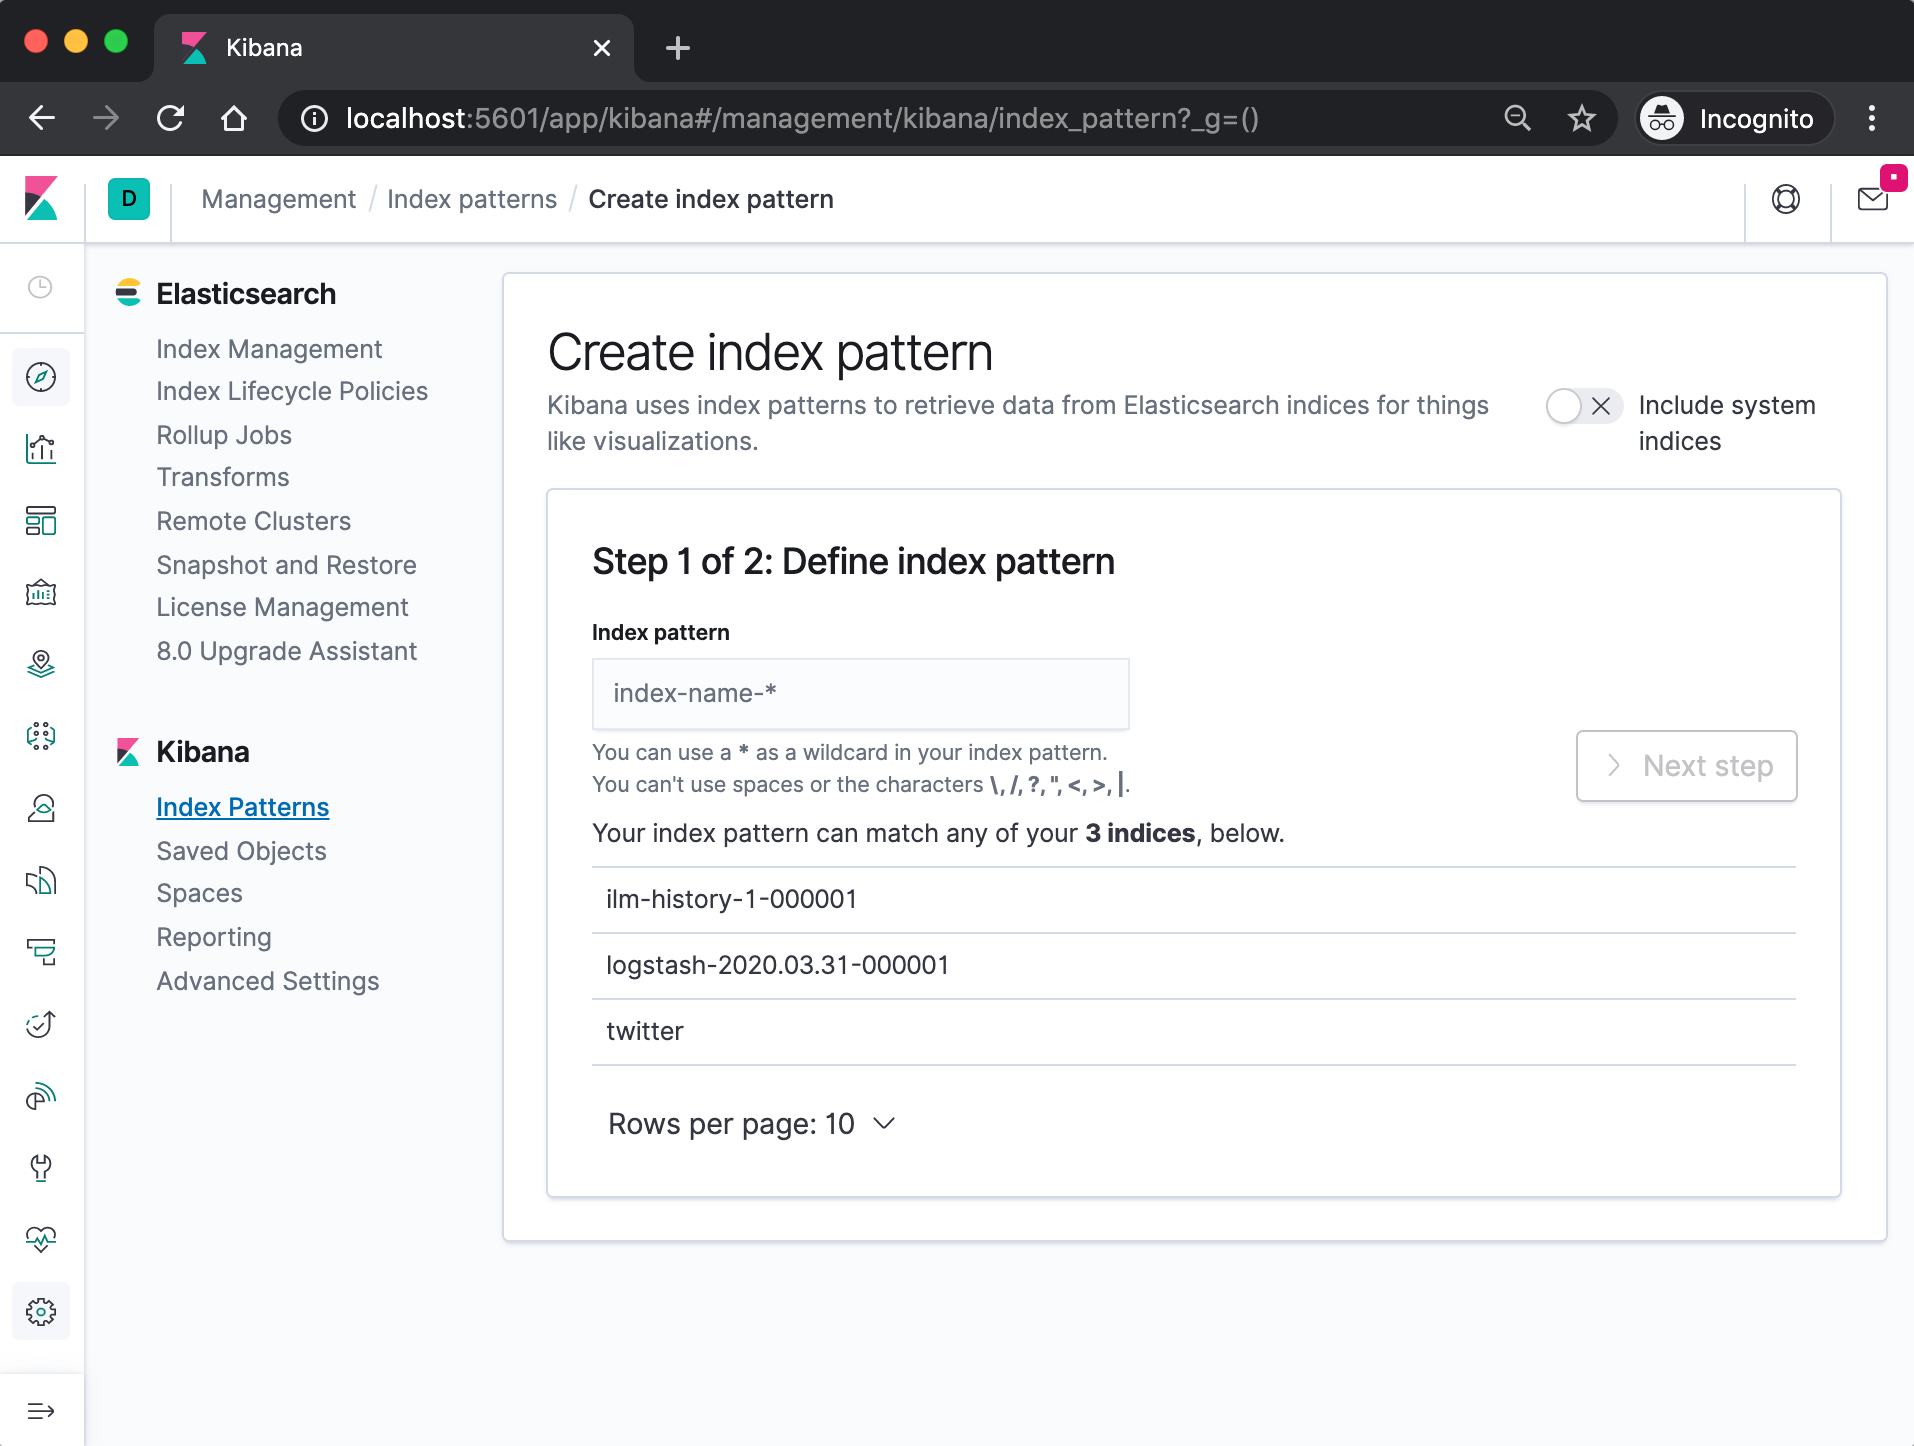
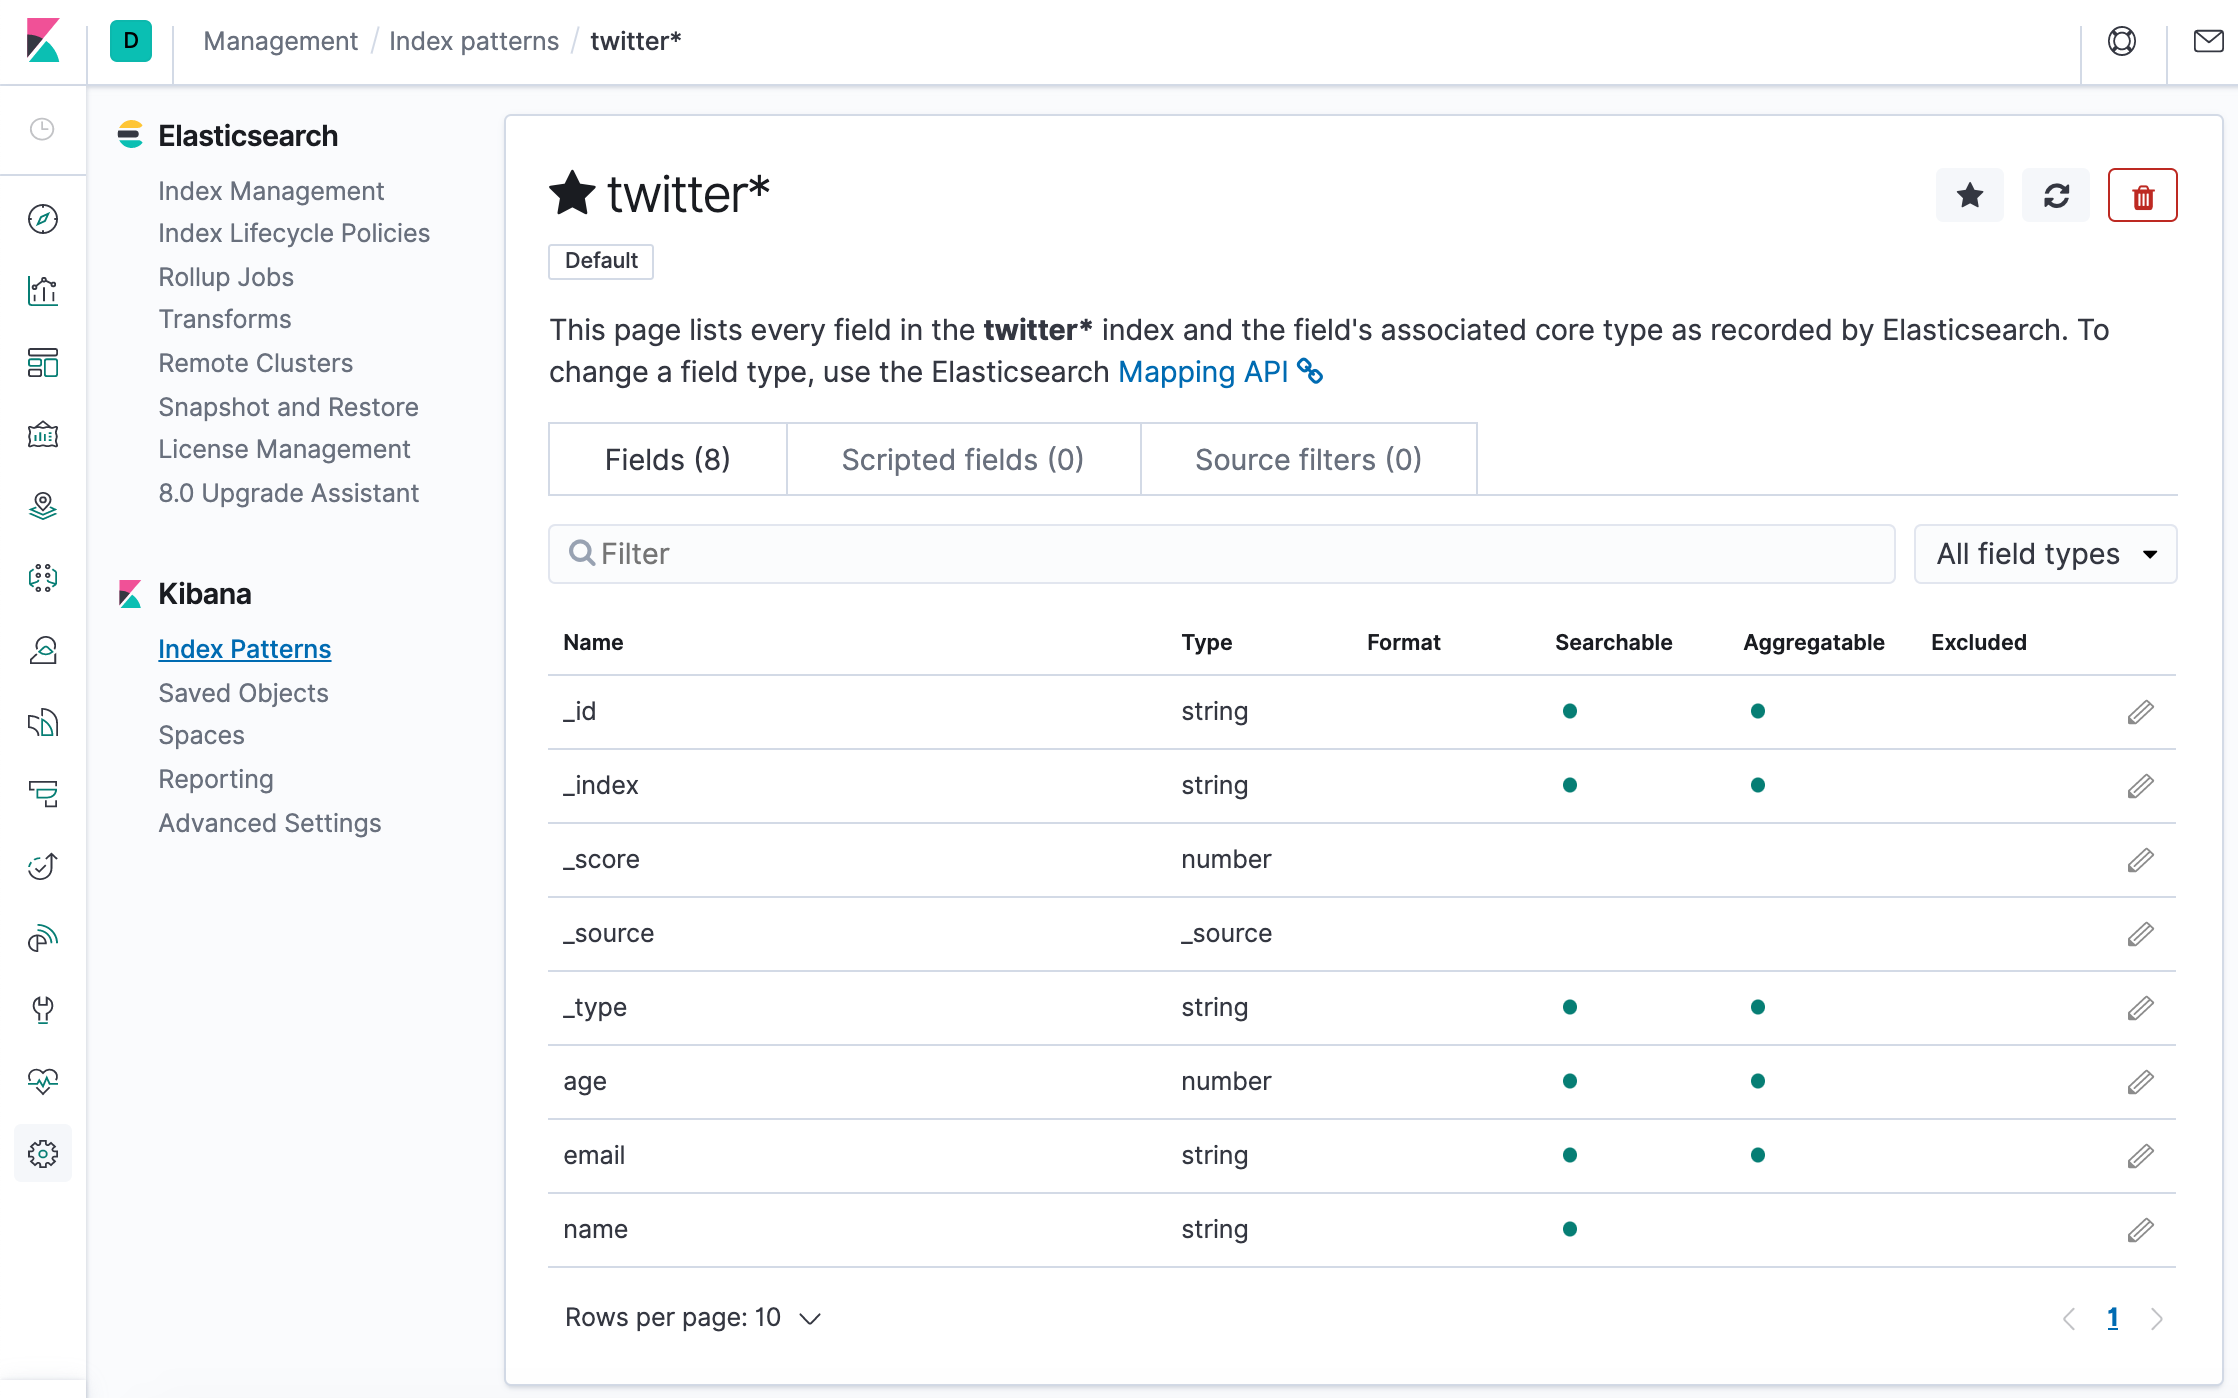
When we access Kibana, the Discover page loads by default with the default index pattern selected. The time filter is set to the last 15 minutes and the search query is set to match-all (\*).
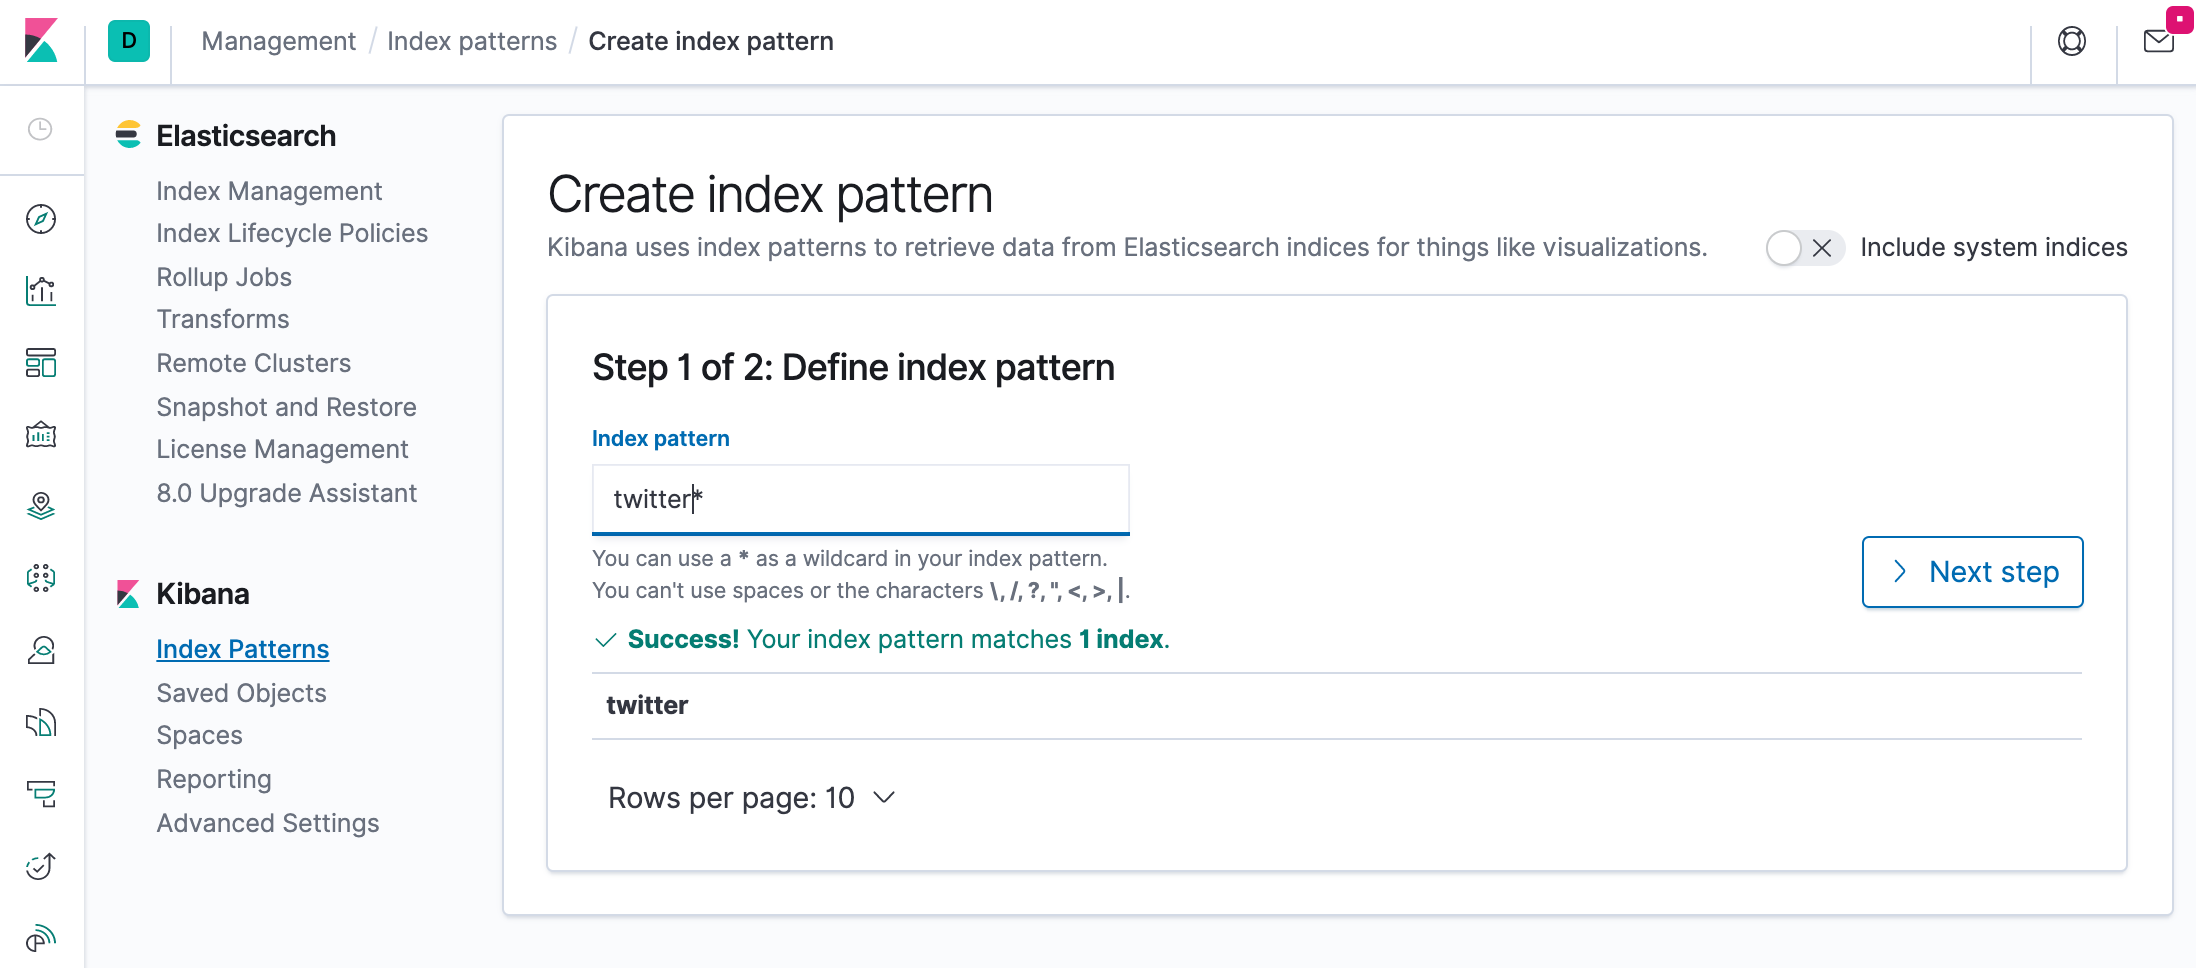
Specify an index pattern that matches the name of one or more of our Elasticsearch indices. The pattern can include an asterisk (*) to matches zero or more characters in an index’s name. When filling out our index pattern, any matched indices will be displayed.
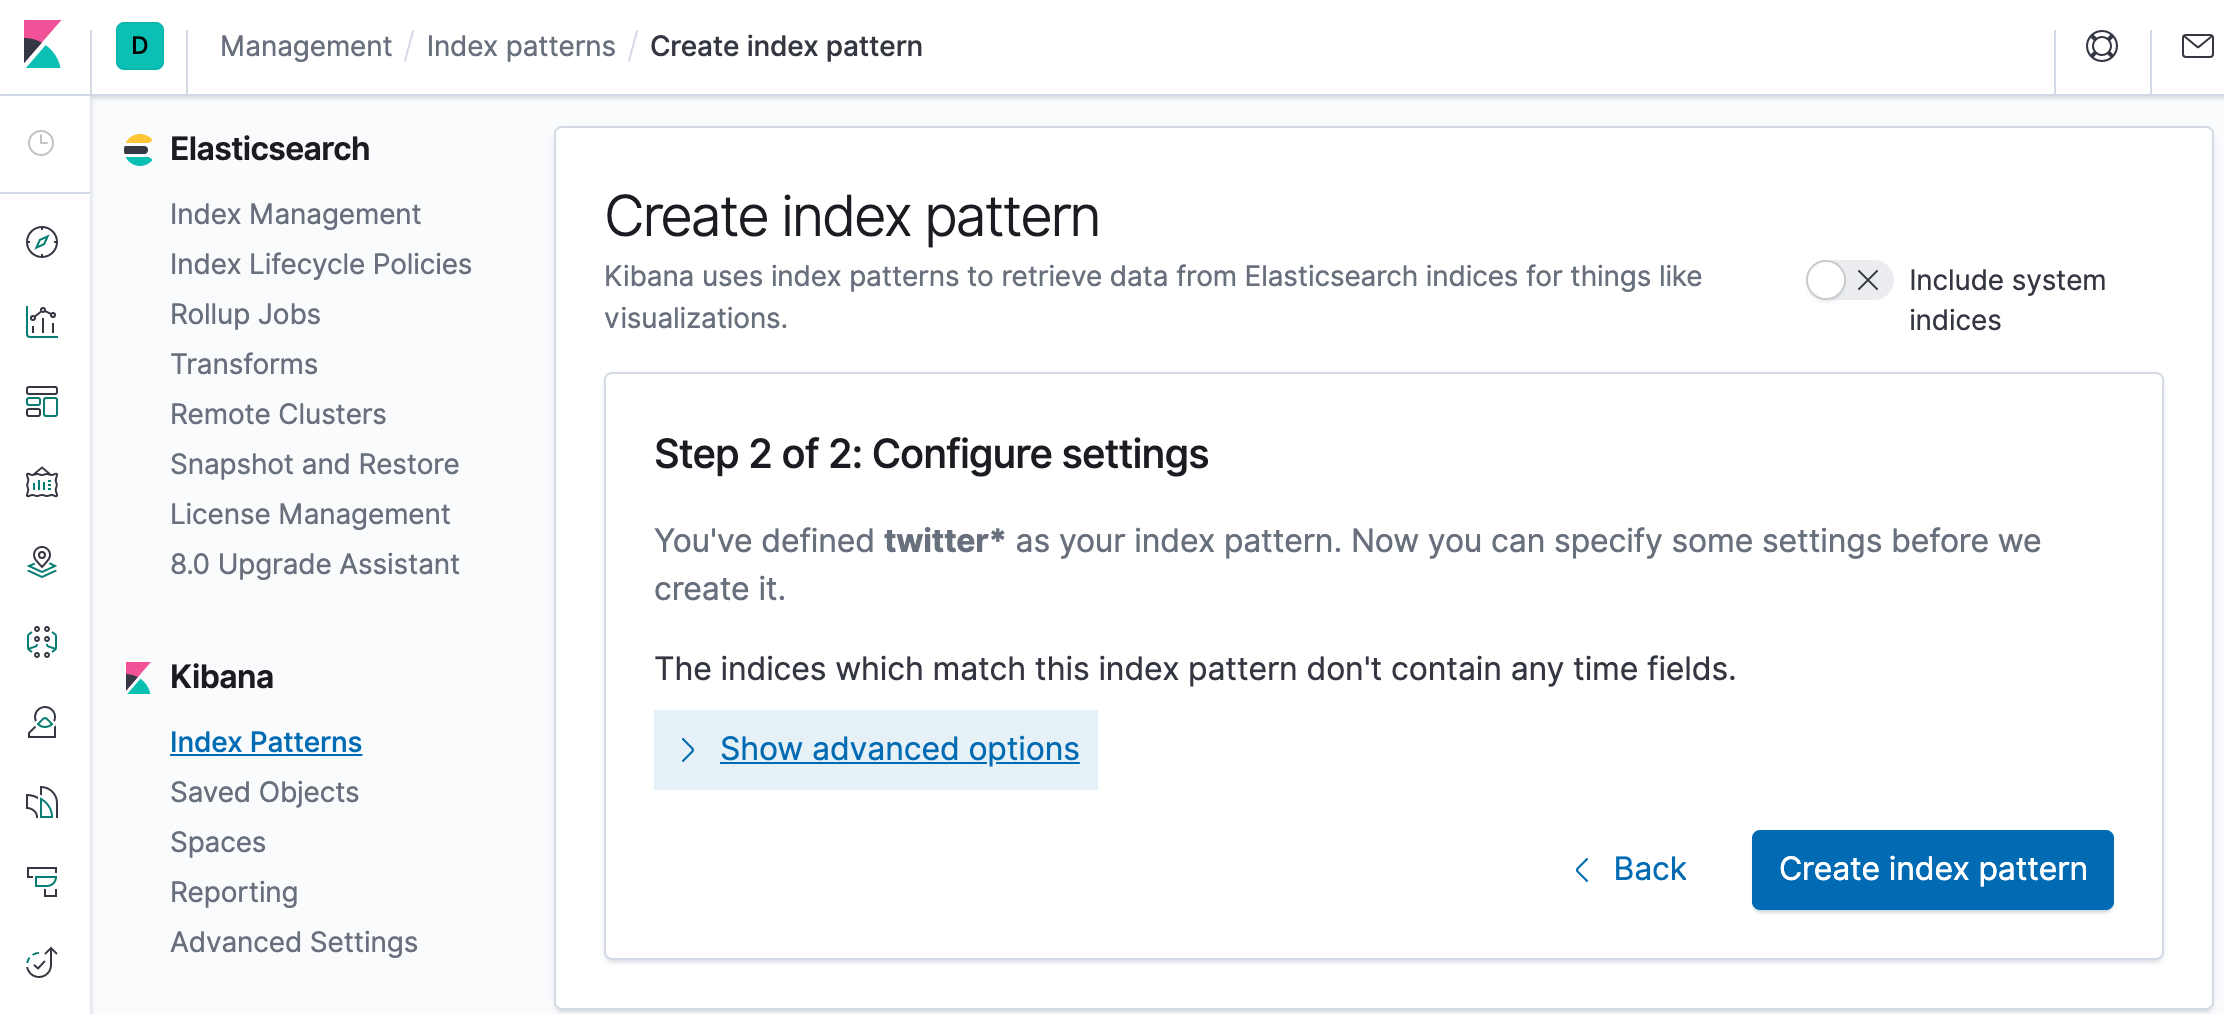
Click “Create index pattern” to add the index pattern. This first pattern is automatically configured as the default. When you have more than one index pattern, we can designate which one to use as the default by clicking on the star icon above the index pattern title from Management > Index Patterns.
All done! Kibana is now connected to our Elasticsearch data. Kibana displays a read-only list of fields configured for the matching index.
Before we do that, let’s modify the setup for xpack in “elasticsearch/config/elasticsearch.yml” to set “xpack.security.enabled: true”. Otherwise, we may the following error:
{"error":{"root_cause":[{"type":"security_exception","reason":"missing authentication credentials for REST request [/]","header":{"WWW-Authenticate":"Basic realm=\"security\" charset=\"UTF-8\""}}],"type":"security_exception","reason":"missing authentication credentials for REST request [/]","header":{"WWW-Authenticate":"Basic realm=\"security\" charset=\"UTF-8\""}},"status":401}
$ docker-compose up -d
Creating network "einsteinish-elk-stack-with-docker-compose_elk" with driver "bridge"
Creating einsteinish-elk-stack-with-docker-compose_elasticsearch_1 ... done
Creating einsteinish-elk-stack-with-docker-compose_kibana_1        ... done
Creating einsteinish-elk-stack-with-docker-compose_logstash_1      ... done

$ docker-compose ps
                          Name                                         Command               State                                        Ports
-------------------------------------------------------------------------------------------------------------------------------------------------------------------------------------
einsteinish-elk-stack-with-docker-compose_elasticsearch_1   /usr/local/bin/docker-entr ...   Up      0.0.0.0:9200->9200/tcp, 0.0.0.0:9300->9300/tcp
einsteinish-elk-stack-with-docker-compose_kibana_1          /usr/local/bin/dumb-init - ...   Up      0.0.0.0:5601->5601/tcp
einsteinish-elk-stack-with-docker-compose_logstash_1        /usr/local/bin/docker-entr ...   Up      0.0.0.0:5000->5000/tcp, 0.0.0.0:5000->5000/udp, 5044/tcp, 0.0.0.0:9600->9600/tcp
$
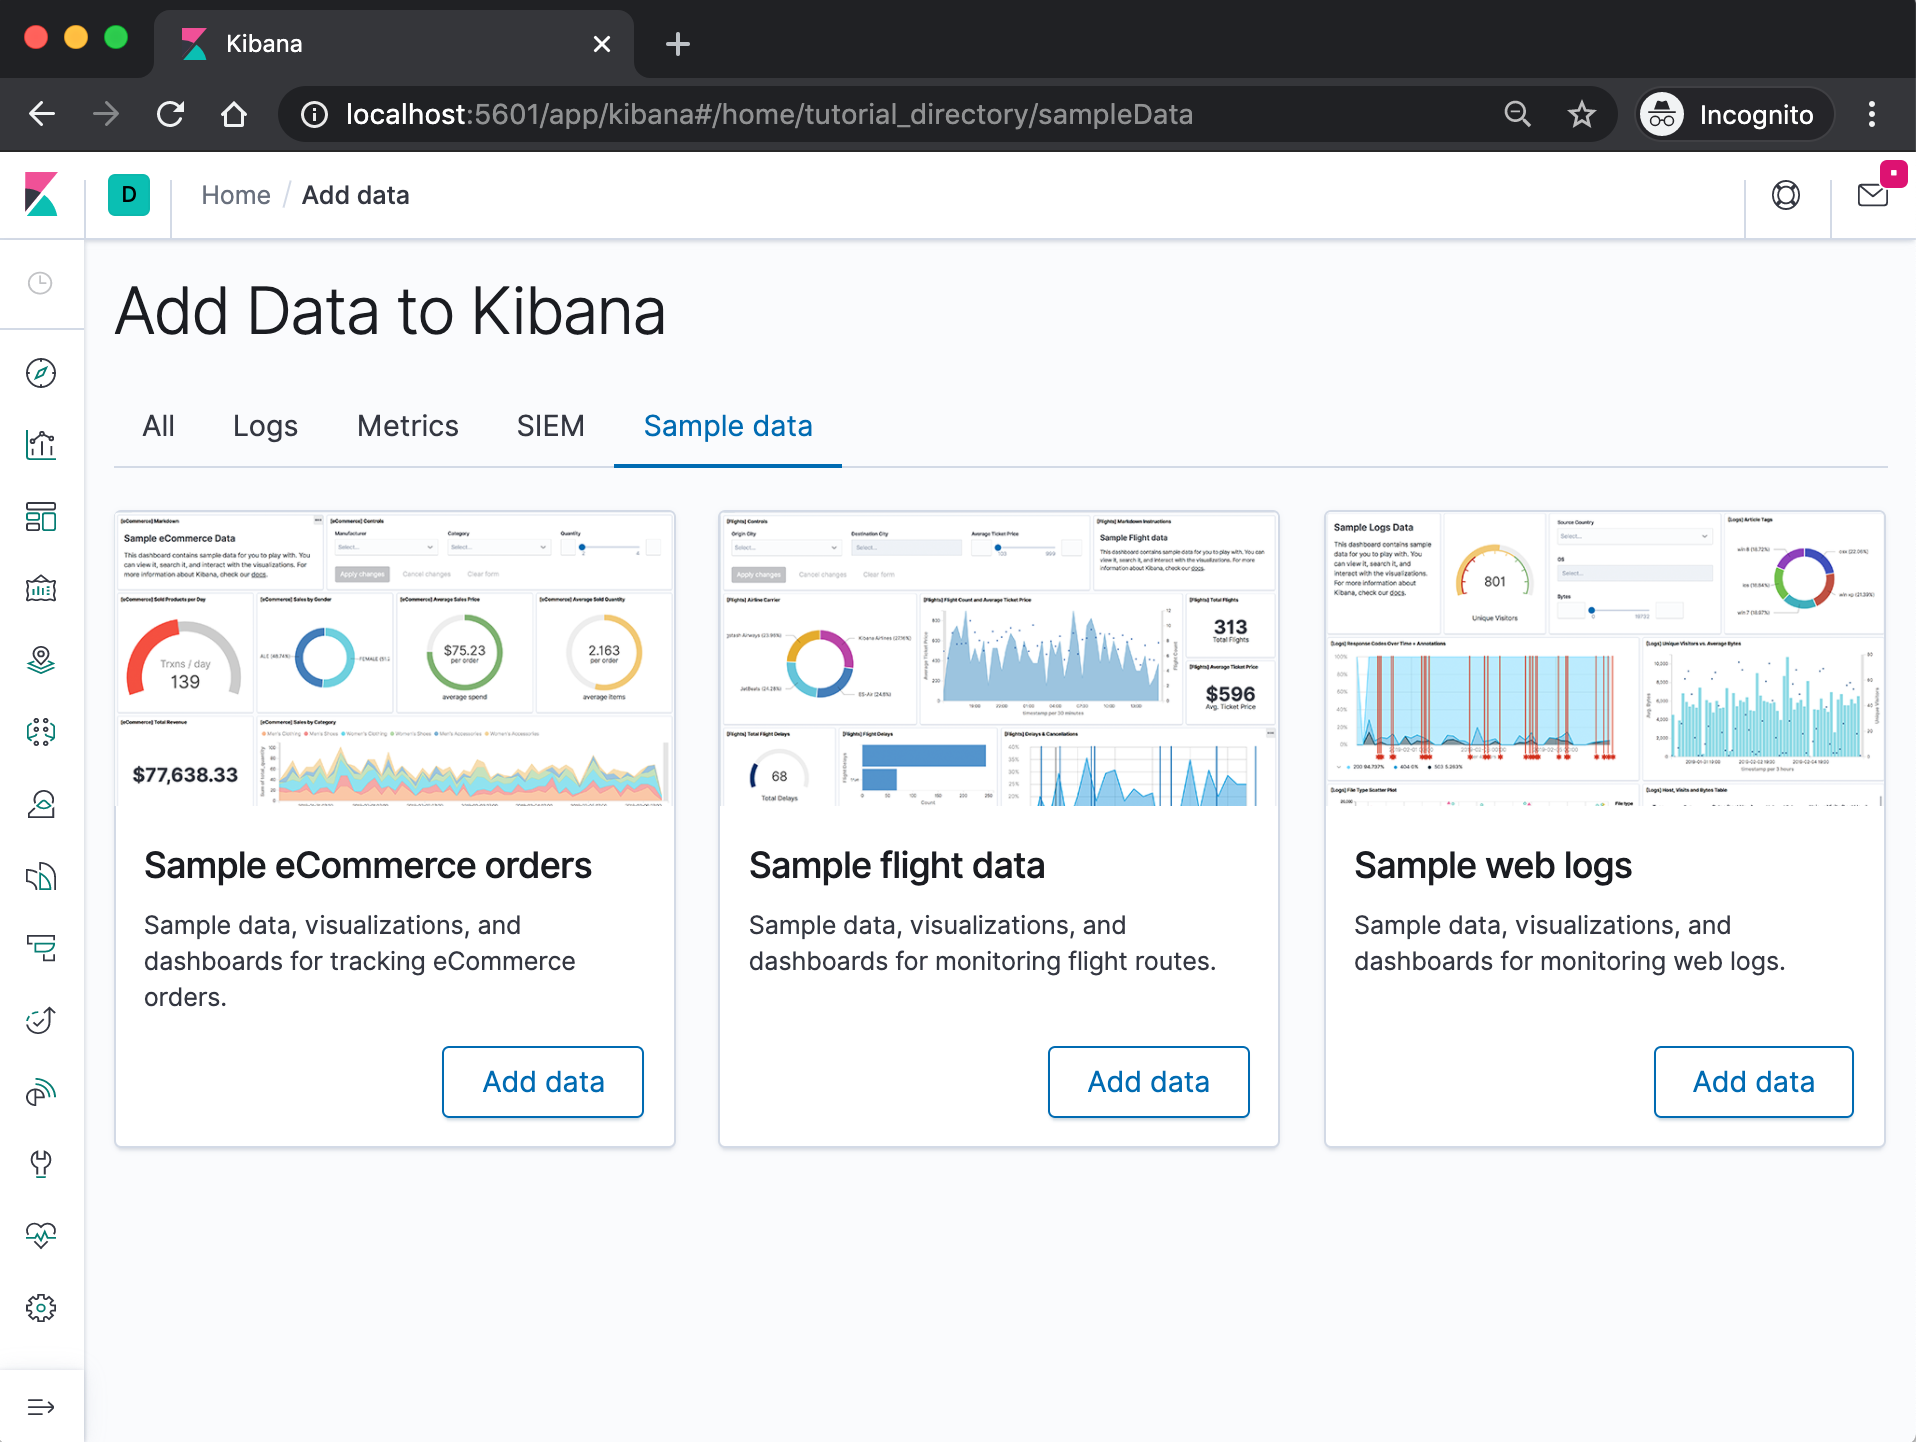
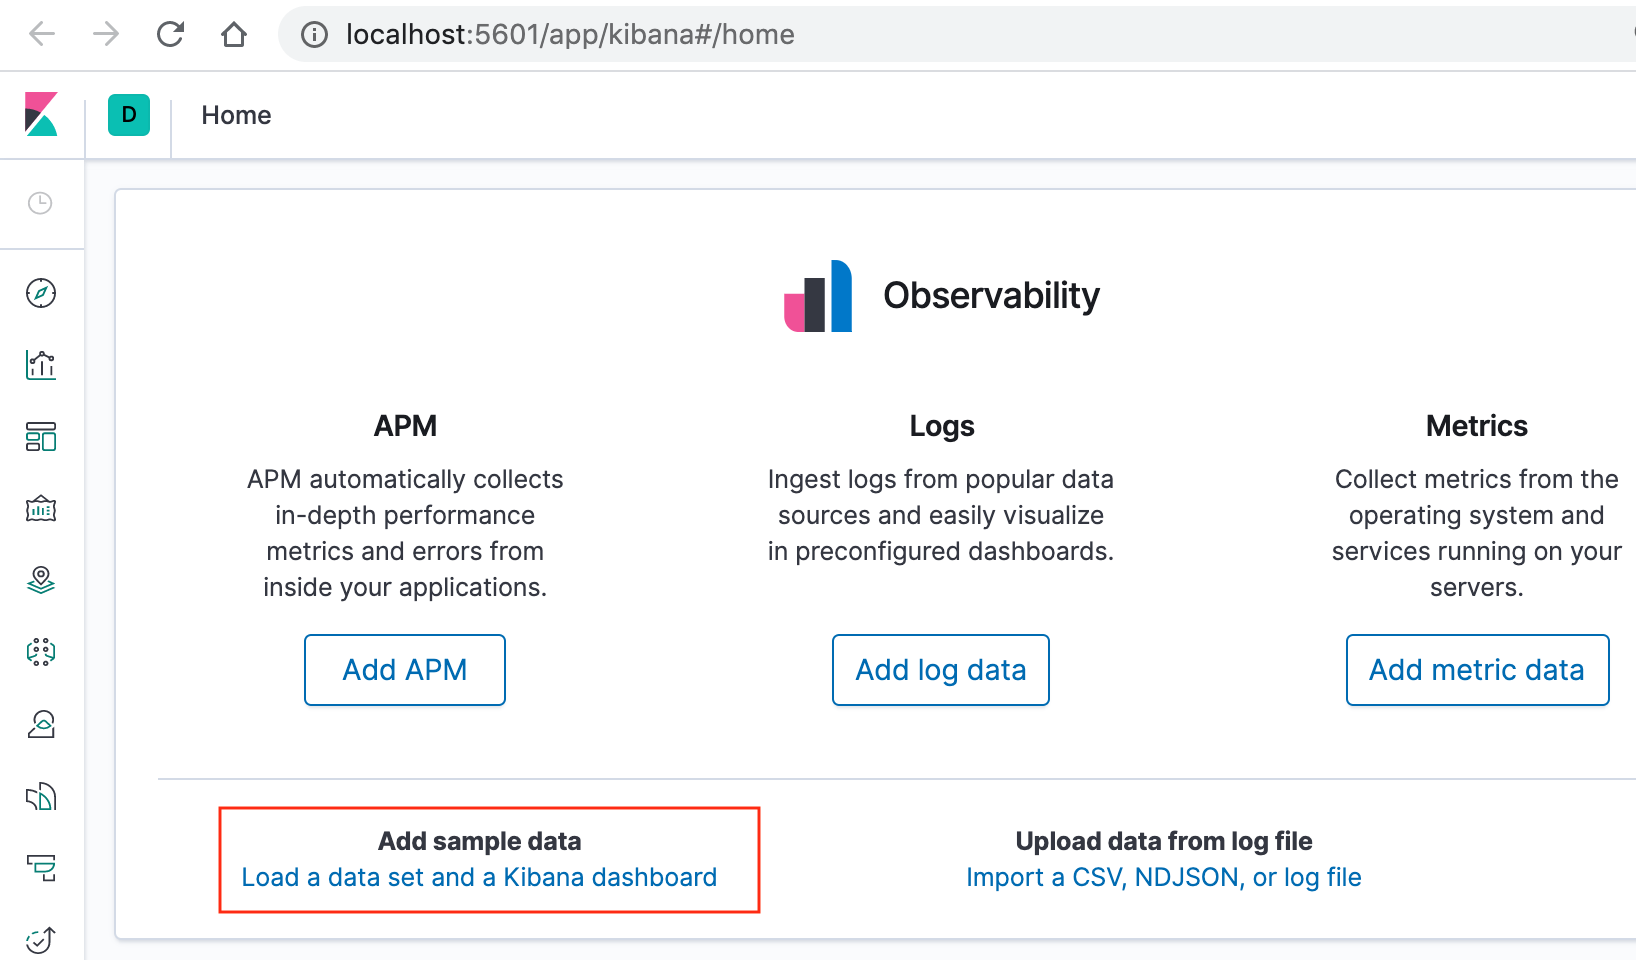
On the Kibana home page, click the link underneath Add sample data.
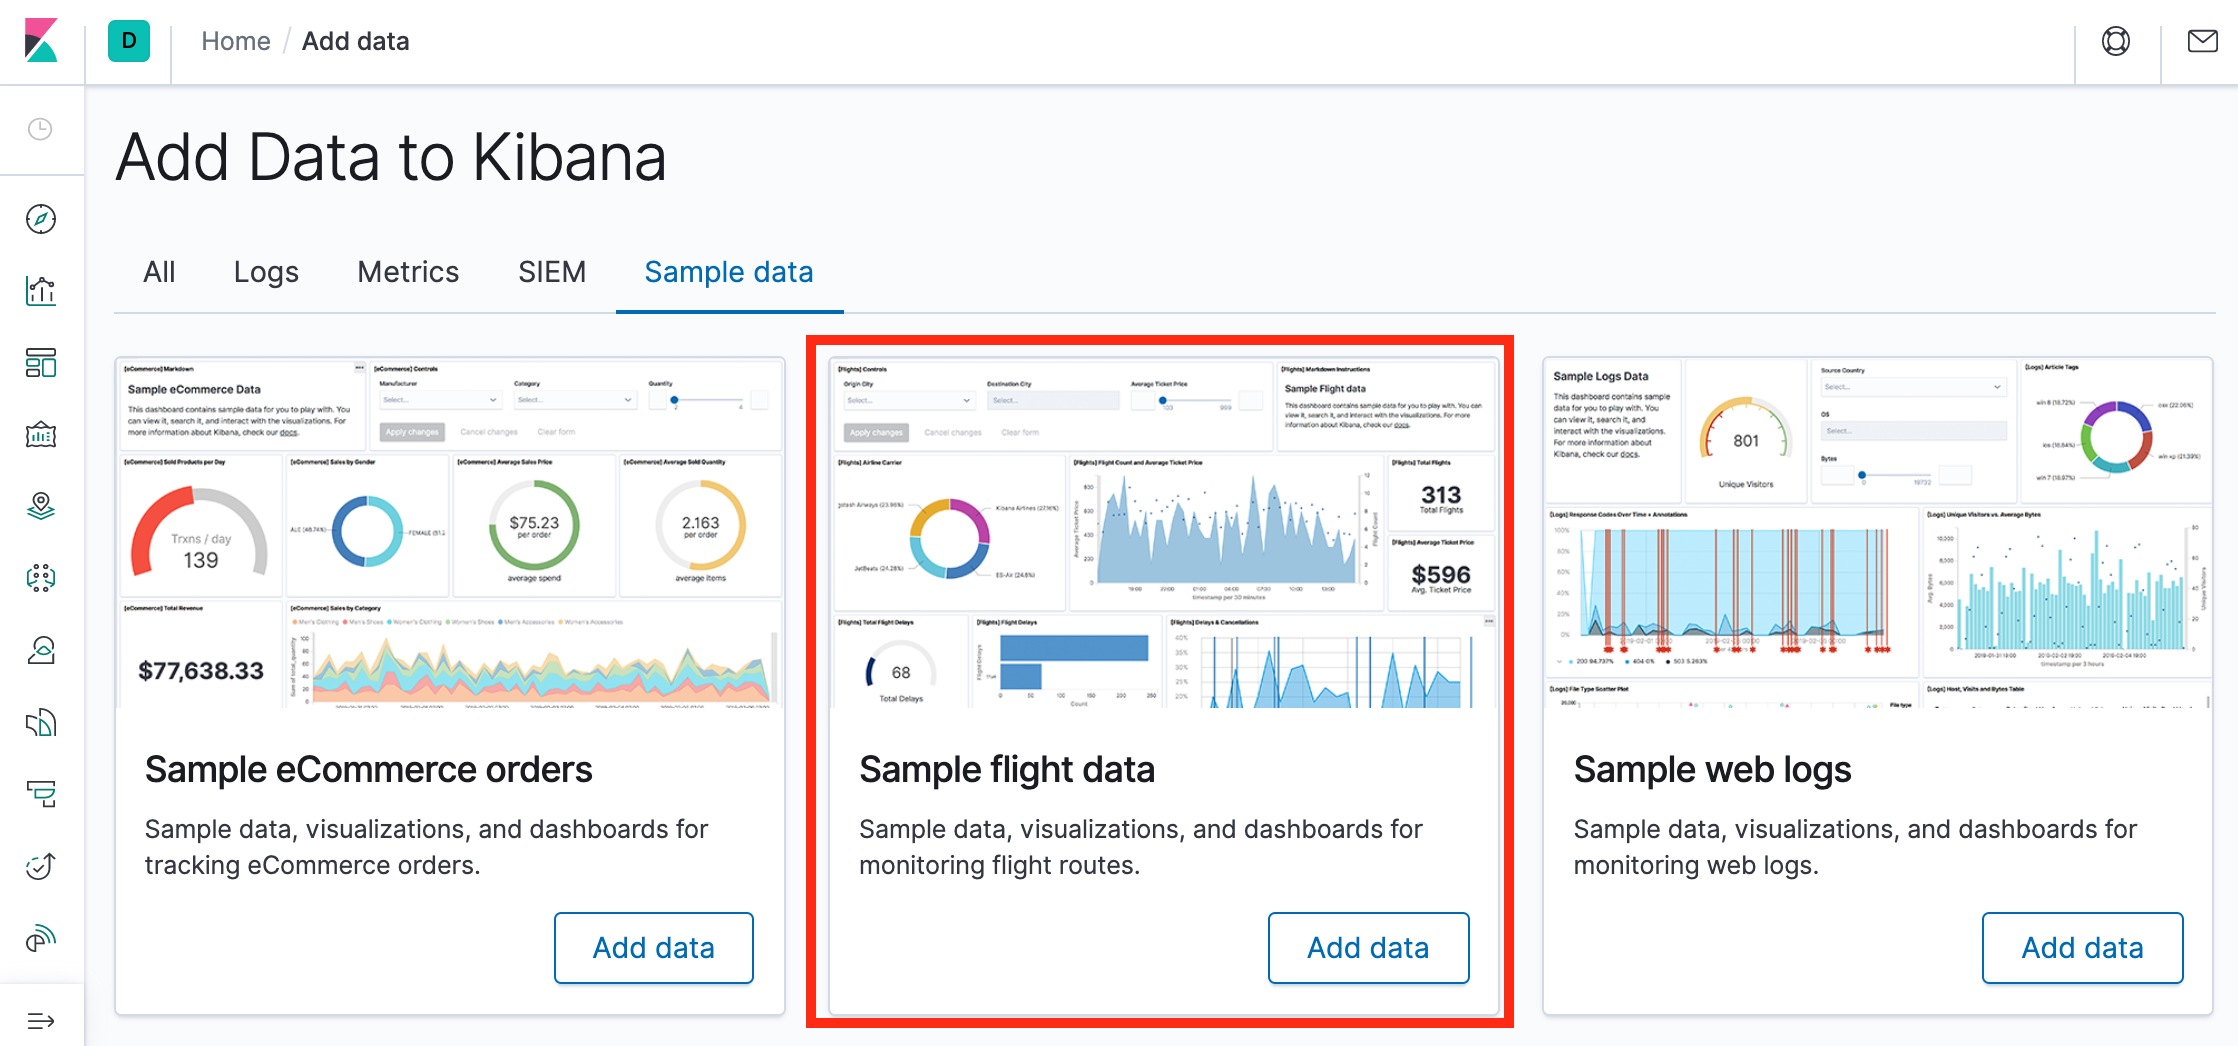
On the Sample flight data card, click Add data.
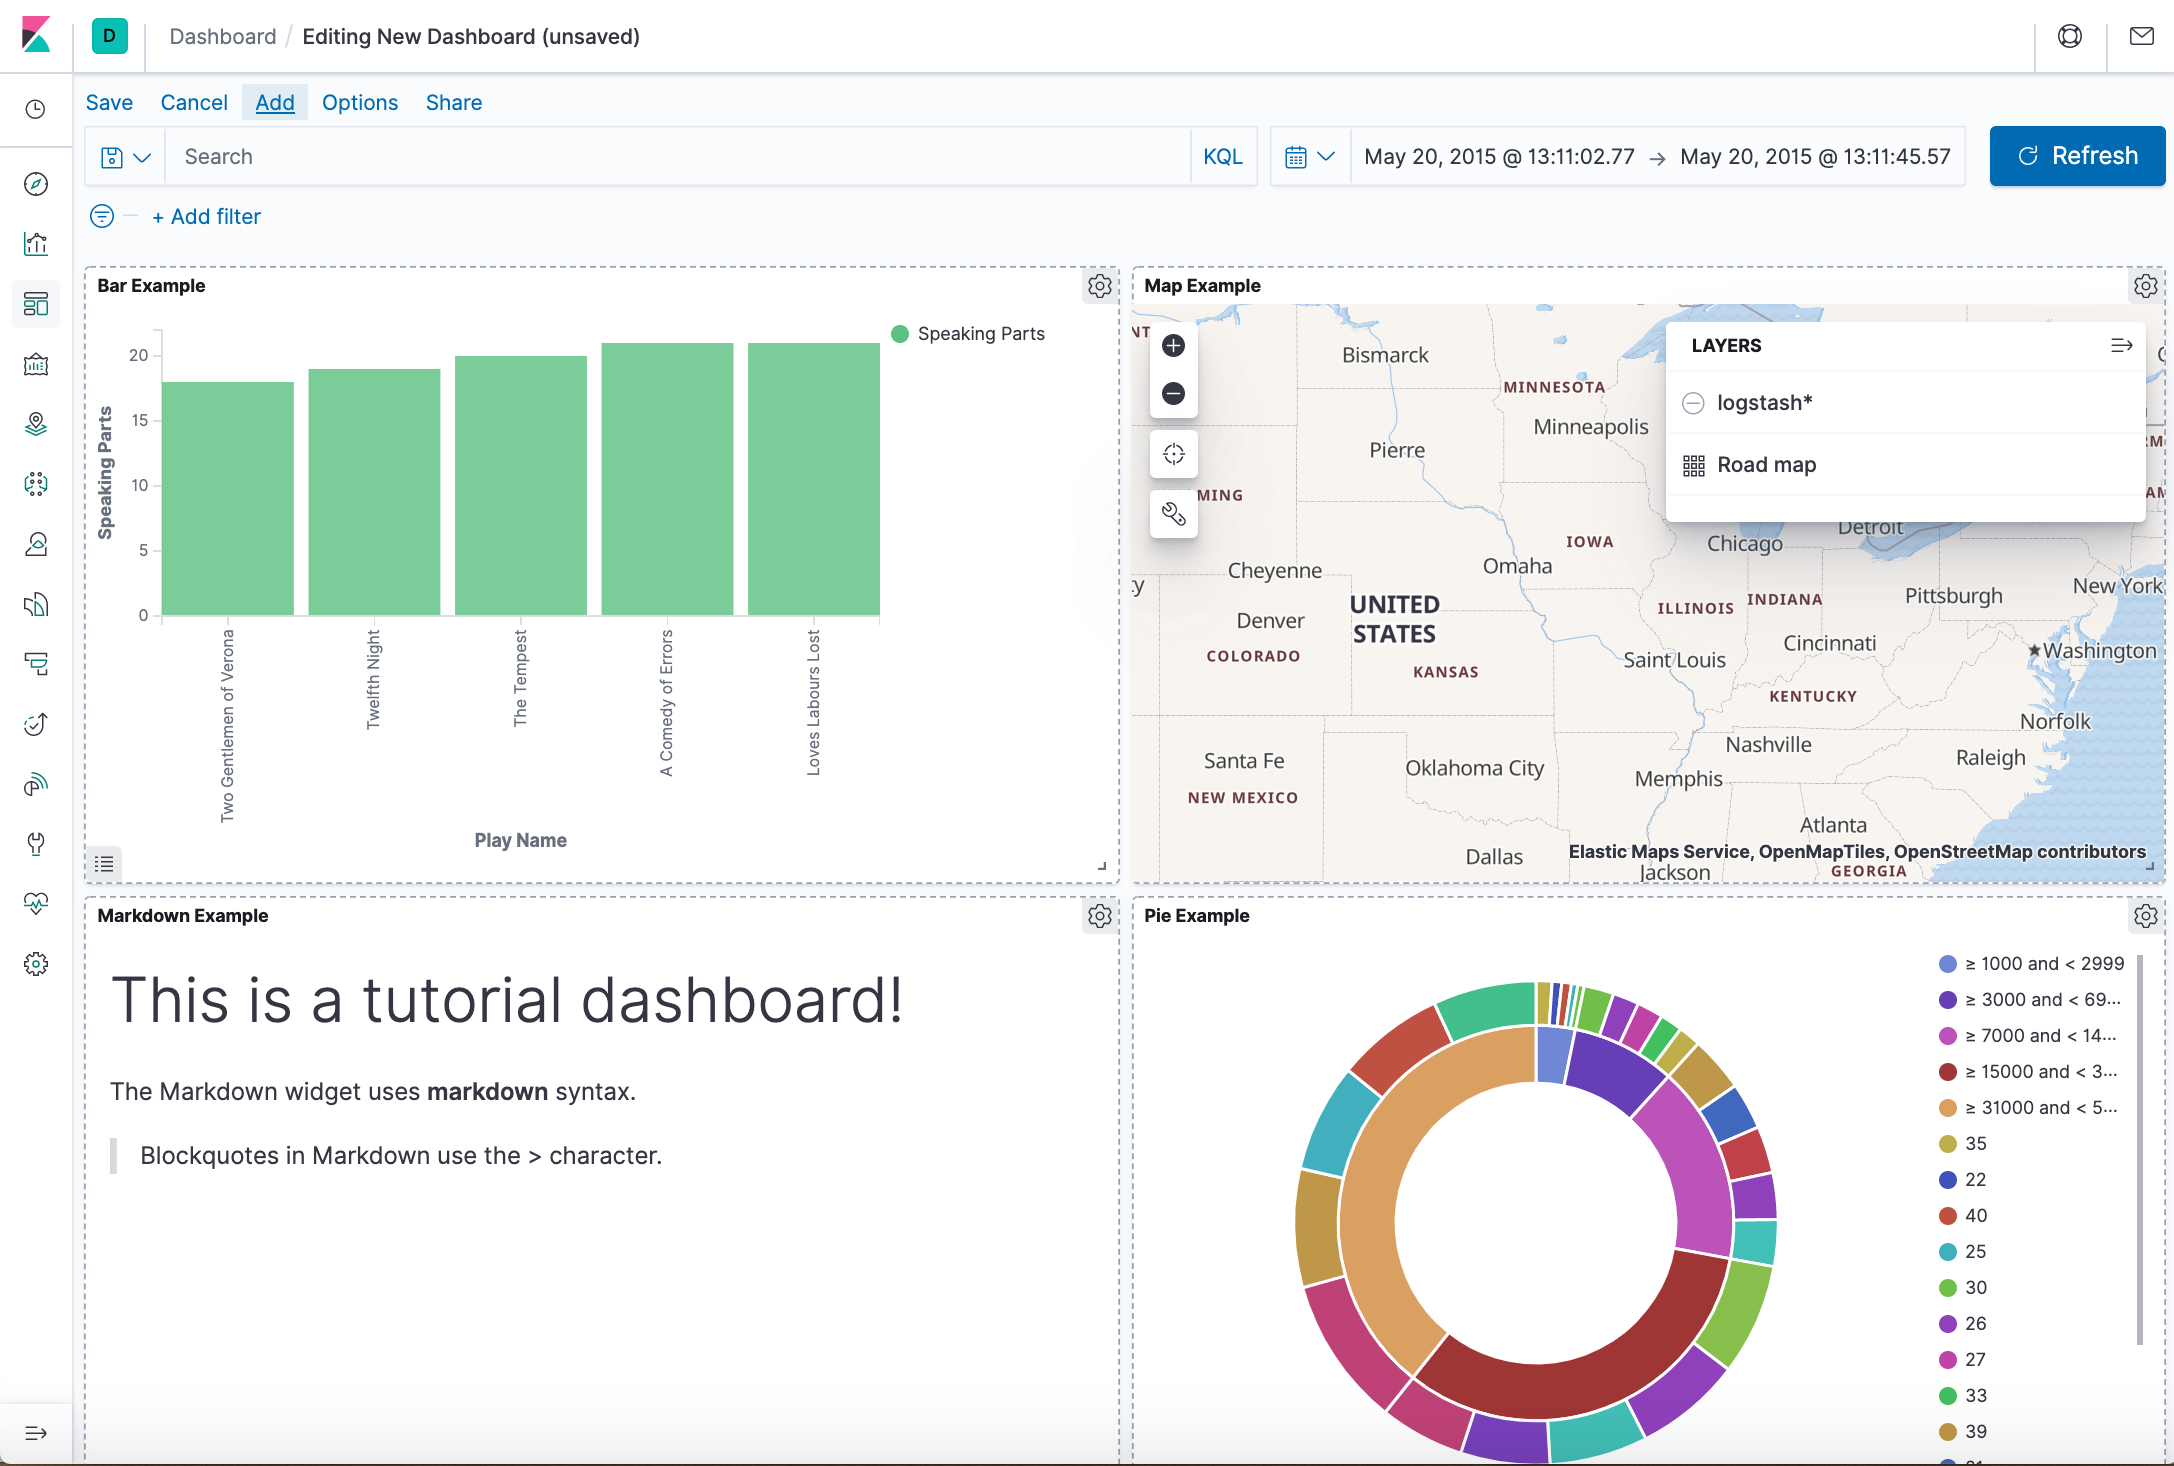
Once the data is added, click View data > Dashboard.
Now, we are on the Global Flight dashboard, a collection of charts, graphs, maps, and other visualizations of the the data in the kibana_sample_data_flights index.
Filtering the Sample Data
In the Controls visualization, set an Origin City and a Destination City.
Click Apply changes. The OriginCityName and the DestCityName fields are filtered to match the data we specified. For example, this dashboard shows the data for flights from London to Oslo.
To add a filter manually, click Add filter in the filter bar, and specify the data we want to view.
When we are finished experimenting, remove all filters.
Querying the Data
To find all flights out of Rome, enter this query in the query bar and click Update:OriginCityName:Rome
For a more complex query with AND and OR, try this: OriginCityName:Rome AND (Carrier:JetBeats OR “Kibana Airlines”)
When finished exploring the dashboard, remove the query by clearing the contents in the query bar and clicking Update.
Discovering the Data
In Discover, we have access to every document in every index that matches the selected index pattern. The index pattern tells Kibana which Elasticsearch index we are currently exploring. We can submit search queries, filter the search results, and view document data.
In the side navigation, click Discover.
Ensure kibana_sample_data_flights is the current index pattern. We might need to click New in the menu bar to refresh the data.
To choose which fields to display, hover the pointer over the list of Available fields, and then click add next to each field we want include as a column in the table. For example, if we add the DestAirportID and DestWeather fields, the display includes columns for those two fields.
Editing Visualization
We have edit permissions for the Global Flight dashboard, so we can change the appearance and behavior of the visualizations. For example, we might want to see which airline has the lowest average fares.
In the side navigation, click Recently viewed and open the Global Flight Dashboard.
In the menu bar, click Edit.
In the Average Ticket Price visualization, click the gear icon in the upper right.
From the Options menu, select Edit visualization.
Create a bucket aggregation
In the Buckets pane, select Add > Split group.
In the Aggregation dropdown, select Terms.
In the Field dropdown, select Carrier.
Set Descending to 4.
Click Apply changes apply changes button.
Save the Visualization
In the menu bar, click Save.
Leave the visualization name as is and confirm the save.
Go to the Global Flight dashboard and scroll the Average Ticket Price visualization to see the four prices.
Optionally, edit the dashboard. Resize the panel for the Average Ticket Price visualization by dragging the handle in the lower right. We can also rearrange the visualizations by clicking the header and dragging. Be sure to save the dashboard.
Inspect the data
Seeing visualizations of our data is great, but sometimes we need to look at the actual data to understand what’s really going on. We can inspect the data behind any visualization and view the Elasticsearch query used to retrieve it.
In the dashboard, hover the pointer over the pie chart, and then click the icon in the upper right.
From the Options menu, select Inspect. The initial view shows the document count.
To look at the query used to fetch the data for the visualization, select View > Requests in the upper right of the Inspect pane.
Remove the sample data set
When we’re done experimenting with the sample data set, we can remove it.
Kafka is an open source software for streaming data, which you can get more infomation about it here: https://kafka.apache.org
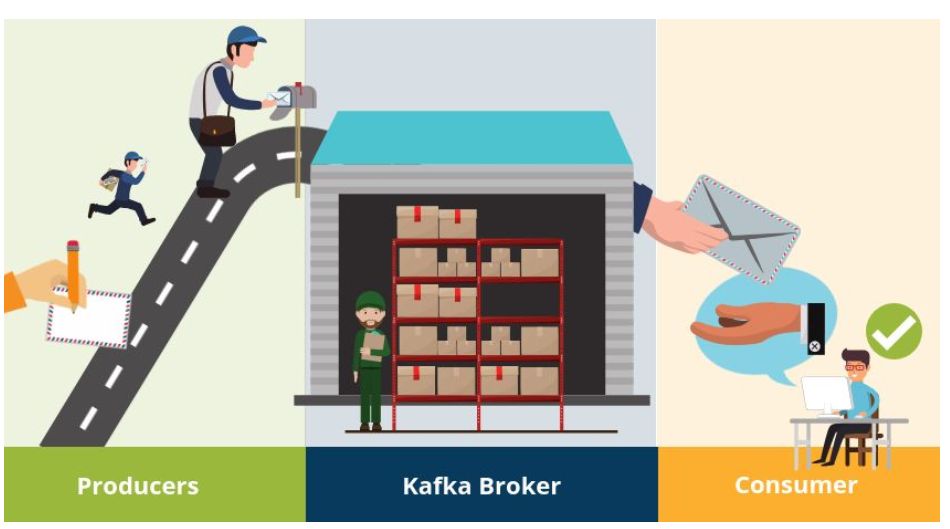
Apache Kafka is a publish-subscribe (pub-sub) message system that allows messages (also called records) to be sent between processes, applications, and servers. Simply said – Kafka stores streams of records. A record can include any kind of information. It could, for example, have information about an event that has happened on a website or could be a simple text message that triggers an event so another application may connect to the system and process or reprocess it. Unlike most messaging systems, the message queue in Kafka (also called a log) is persistent. The data sent is stored until a specified retention period has passed by. Noticeable for Apache Kafka is that records are not deleted when consumed. An Apache Kafka cluster consists of a chosen number of brokers/servers (also called nodes). Apache Kafka itself is storing streams of records. A record is data containing a key, value and timestamp sent from a producer. The producer publishes records on one or more topics. You can think of a topic as a category to where, applications can add, process and reprocess records (data). Consumers can then subscribe to one or more topics and process the stream of records. Kafka is often used when building applications and systems in need of real-time streaming.
Topics and Data Streams
All Kafka records are organized into topics. Topics are the categories in the Apache Kafka broker to where records are published. Data within a record can be of various types, such as String or JSON. The records are written to a specific topic by a producer and subscribed from a specific topic by a consumer. All Kafka records are organized into topics. Topics are the categories in the Apache Kafka broker where records are published. Data within a record can consist of various types, such as String or JSON. The records are written to a specific topic by a producer and subscribed from a specific topic by a consumer. When the record gets consumed by the consumer, the consumer will start processing it. Consumers can consume records at a different pace, all depending on how they are configured. Topics are configured with a retention policy, either a period of time or a size limit. The record remains in the topic until the retention period/size limit is exceeded. Partition Kafka topics are divided into partitions which contain records in an unchangeable sequence. A partition is also known as a commit log. Partitions allow you to parallelize a topic by splitting the data into a topic across multiple nodes. Each record in a partition is assigned and identified by its unique offset . This offset points to the record in a partition. Incoming records are appended at the end of a partition. The consumer then maintains the offset to keep track of the next record to read. Kafka can maintain durability by replicating the messages to different brokers (nodes). A topic can have multiple partitions. This allows multiple consumers to read from a topic in parallel. The producer decides which topic and partition the message should be placed on.
PRACTICLE INSTALL KAFKA:
Installation
In this article, I am going to explain how to install Kafka on Ubuntu. To install Kafka, Java must be installed on your system. It is a must to set up ZooKeeper for Kafka. ZooKeeper performs many tasks for Kafka but in short, we can say that ZooKeeper manages the Kafka cluster state.
Unzip the file. Inside the conf directory, rename the file zoo_sample.cfgas zoo.cfg.
The zoo.cfg file keeps configuration for ZooKeeper, i.e. on which port the ZooKeeper instance will listen, data directory, etc.
The default listen port is 2181. You can change this port by changing clientPort.
The default data directory is /tmp/data. Change this, as you will not want ZooKeeper’s data to be deleted after some random timeframe. Createa folder with the name datain the ZooKeeper directory and change the dataDirin zoo.cfg.
Go to the bin directory.
Start ZooKeeper by executing the command ./zkServer.sh start.
Stop ZooKeeper by stopping the command ./zkServer.sh stop.
Kafka Setup
Download the latest stable version of Kafka from here.
Unzip this file. The Kafka instance (Broker) configurations are kept in the config directory.
Go to the config directory. Open the file server.properties.
Remove the comment from listeners property, i.e. listeners=PLAINTEXT://:9092. The Kafka broker will listen on port 9092.
Change log.dirs to /kafka_home_directory/kafka-logs.
Check the zookeeper.connect property and change it as per your needs. The Kafka broker will connect to this ZooKeeper instance.
Go to the Kafka home directory and execute the command ./bin/kafka-server-start.sh config/server.properties.
Stop the Kafka broker through the command ./bin/kafka-server-stop.sh.
Kafka Broker Properties
For beginners, the default configurations of the Kafka broker are good enough, but for production-level setup, one must understand each configuration. I am going to explain some of these configurations.
broker.id: The ID of the broker instance in a cluster.
zookeeper.connect: The ZooKeeper address (can list multiple addresses comma-separated for the ZooKeeper cluster). Example: localhost:2181,localhost:2182.
zookeeper.connection.timeout.ms: Time to wait before going down if, for some reason, the broker is not able to connect.
Socket Server Properties
socket.send.buffer.bytes: The send buffer used by the socket server.
socket.receive.buffer.bytes: The socket server receives a buffer for network requests.
socket.request.max.bytes: The maximum request size the server will allow. This prevents the server from running out of memory.
Flush Properties
Each arriving message at the Kafka broker is written into a segment file. The catch here is that this data is not written to the disk directly. It is buffered first. The below two properties define when data will be flushed to disk. Very large flush intervals may lead to latency spikes when the flush happens and a very small flush interval may lead to excessive seeks.
log.flush.interval.messages: Threshold for message count that is once reached all messages are flushed to the disk.
log.flush.interval.ms: Periodic time interval after which all messages will be flushed into the disk.
Log Retention
As discussed above, messages are written into a segment file. The following policies define when these files will be removed.
log.retention.hours: The minimum age of the segment file to be eligible for deletion due to age.
log.retention.bytes: A size-based retention policy for logs. Segments are pruned from the log unless the remaining segments drop below log.retention.bytes.
log.segment.bytes: Size of the segment after which a new segment will be created.
log.retention.check.interval.ms: Periodic time interval after which log segments are checked for deletion as per the retention policy. If both retention policies are set, then segments are deleted when either criterion is met.