In this post I will share experience using linux command, and was we can do and play with a operating system for Developer, or shorter is Linux. You don’t need to know more about this, I will show you how you can create funny program with some Linux command, what you can’t do in Windows.
1. Linux updates and upgrades do not require you to reboot
Re-booting after every software installation or update is very annoying in Windows. I keep wondering why this is not necessary in Linux, but on Windows is rule of tumb – every installation is asking you to re-boot, or after you download the Upgrades annoying window pop up and say – will reboot in 10 minutes, save your work. This is really annoying.
With Linux all you need to do is run : sudo apt update
Then have a cup of coffee until it update your computer.
2. No need to install drivers every time you plug in your computer USB device
OK, I understand that there are custom devices which use uncommon drivers like printers, cameras, etc, but why on earth every time you plug in Windows simple mass storage disk drive, or USB-Serial converter, or Mouse, or Keyboard – devices which are standard and are embedded in every Windows OS after W98 it ALWAYS ask for drivers which are already there? Why on Linux I plug the external HHD or Flash drive and it automatically mounts on my computer and I can work with it, while Windows is asking me for drivers and several minutes scans and show me different windows with warnings and Continue buttons like I’m doing something scaring which may ruin my OS?
3. You can move image/boot-able drive between machines without need for reinstall
Yes! this is something windows users can’t imagine is possible! I do remember back in the dark ages Windows asked me to re-install after I have upgraded the RAM memory size! Now imagine you get your Windows boot-able HDD and plug it on other computer, will it boot? no way!
4. system config in files not registers mess
Now this is one of the most annoying WIndows features – after several months of installing and removing software your registers and windows/system directory becomes so bloated with shared DLLs and mess that some people start making money by writing registry cleaning software!
5. You can’t boot windows from USB Stick
Probably they didn’t find a way to ask you for registration and to collect your money every time they sense this USB is plug to other computer??
Hello again! Today’s class is metal as a service MAAS so we’ve been doing a number of classes lately on these different services, we’ve talked about software as a service we’ve talked about infrastructure as a service, and we have talked about platform as a service. Now when you’re talking about these services by far the most popular solution out there is software as a service that is where you basically you go out and you lease software from companies and the software is all run on their server so we’re talking about software as a service think about things like Google Docs think about things like Salesforce the software is not installed on your local computer.
Its installed on their servers and you access that somehow these are either through a web browser or through some type of a terminal connection something like that tied by the infrastructure as a service basically when your your infrastructure all those things that you would buy and install in your premises you no longer actually own anymore.
So think about your telephone systems companies you should spend $50 thousand on their telephone system and that telephone system was installed in their premises and they owned it now you can get hosted voice over IP solutions such as on sip you get hosted firewall solutions you can have hosted server rooms why have your own servers when you can go to Amazon Web Services and simply spin up a number of virtual services on their platform so that is infrastructure as a service.
We then talked about platform as a service platform as a service is where you create your web apps and then you are looking for some place to host them so the basic idea is think about a shared hosting web plan you create your web site you create your web application and then you simply upload that to GoDaddy or one in one servers their servers have PHP installed their servers have my sequel installed their servers have Ruby or Perl or any of these other scripting languages that you need all that you have to worry about is your application of course that gets much more complicated once you go over to Google App Engine and some of the more and more advanced things but that’s the the basic concept so now we’re getting to basically probably the last service that I will be talking about is metal as a service now this is one of those really really really cool ideas that actually it is pretty cutting-edge I’m not sure if it’s bleeding edge but it’s pretty cutting edge so some of you guys looking to create businesses out there really should listen to what I’m talking about right now because it really is a good business opportunity right now because not very many people actually offer this service so when we’re talking about metal as a service what we are literally talking about is providing the server hardware as a service to clients so this is not the same thing as what you would normally think about with cloud computing or virtualization where you install a hypervisor onto a server and then they spin up some kind of a instance of a server and this isn’t the same thing as a dedicated server so for thanhguyensite.net and a couple of other things that I do we rent a dedicated server from a company called one and one comm with that I get a specific server 12 gigs of ram quad core processor blah blah blah.
With a certain version of Linux on it and then from that point I can configure up but with that when you are purchasing something like a dedicated server you have to use whatever operating systems are provided by the provider so with one and one com if you go with them you can use like Server 2008 or Server 2012 Fedora sent OS if you wanted to use something else tough luck if you wanted to use freebsd on one of these services that you couldn’t do it if you wanted to install a hypervisor on Twenties dedicated services servers you couldn’t do it the reason is is because although you’re renting the dedicated server it has to have a bare minimum installation on it before you are actually able to get access to it the cool thing with metal as a service it is the concept is that you are literally renting the physical box with nothing else on it so this is where you would go to a provider and you would literally rent it would be a quad-core xeon processor with so much RAM so much hard drive and that’s it there would not necessarily be sent OS on it there were not necessarily be windows on it there wouldn’t necessarily be anything on it.
You are literally renting the metal as a service so basically now instead of having to have your own server rooms with your own equipment your own server racks your own HVAC you’re all redundant to power supply and your ups and all of that kind of stuff you can have the same thing sitting in somebody else’s server room so they are renting to you the metal as a service now that you may be wondering why why would you bother with that if you can get virtual servers if you can use infrastructure as a service if you can even get dedicated servers why would you run want to rent or lease the bare metal as a service well as you go through with your companies.
If you have a startup company or if you have a technology company and you start growing what, you are going to find is no matter what operating system distribution you use. It is probably not going to be optimized for whatever it is you’re doing so you know we all know with Windows we all know with Windows. Windows hogs up a lot of extra resources to do things most of us really truly don’t care about it we’ll be happy if it did it but a lot of people don’t realize is even with Linux.
Even with Linux there are resources that are used there are security vulnerabilities that are opened up simply because when you install the default installation of whatever Linux you’re going to be using it installs a base level of applications and services and a lot of times you don’t need that so imagine if you were a company where you want to spin out a lot of database servers and you want those database servers to run at the absolute optimum the fastest they can possibly run well you may want to go in to a distribution of an operating system and literally rip out all the crap that you don’t want you don’t need notepad you don’t need tar you don’t need a lot of these these things you just need that server to run as fast as possible to do a specific task possibly do something like a database server because this becomes very important especially when you start dealing with larger companies that are dealing with a larger load on their servers because when you rip out all of the crap you don’t need on it on a servers operating system.
You can gain efficiencies now this is not you’re not going to probably speed up the server by 200% or 500% or a thousand percent right that’s not what what the target you’re going to hit you may be able to actually speed up the server though by something like five percent now for you especially if you haven’t dealt with real server rooms if you haven’t dealt with real loads on servers optimizing an operating system we get five percent improvement probably doesn’t sound like a big deal but with companies if you if you have 20 servers up and running or 40 servers up and running a five percent increase in speed can be very very very very very very very significant so with these companies they may be looking to optimize the things like I say the operating systems that will be installed how all this will be configured how all this will be managed and so all they want is the bare metal they want the server they want the hard drives they want the RAM.
They want the CPU but they don’t want anybody else to mess with the rest of it they want to be able to build this thing from the ground up and again there can be a lot of reasons for this nowadays things like again efficiency making sure that the resources on the server are optimized but also issues such as compliance so compliance is becoming a bigger and bigger deal within the the corporate world what compliance means is that you are running your IT systems to certain specifications for security and reliability so as more and more companies start using cloud computers and servers and all that to run the infrastructure of their business they have to make sure that that infrastructure is reliable enough for their industry now one of the problems if you go out and you use a standard instance of an operating system or you use a standard load of an operating system from one of these providers is you don’t necessarily know all the security flaws you haven’t necessarily been able to sit down and do penetration test and do hardening testing and do all of those things so when you when you are leasing let’s say from 1 + 1 , dedicated server you can’t guarantee that this is that the the server operating system that has been installed is as hardened as it should be.
Now again for somebody like me I don’t care again do good backups and you should be fine for and this is one of the things you have to think about for 98% of the business population this type of concept doesn’t matter but for that 2% it is very very very important it is very important that they know that whatever operating system and software that’s going to be installed in that server it lives up to certain specifications so that’s why they would want to be able to rent that that bare metal as a service so metal as a service now one of the questions that you’re going to be coming up in with thanh’s you’re gonna be saying work and got me saying.
Well Thanh uh I don’t understand how you would interact with metal as a service then because you know when we think about dealing with these virtual computers when we think about dealing with it with cloud computers and all that we have a basic interface to deal with so basically again if you get a dedicated server you get a virtual private server they spin up the operating system and then they give you the login credentials so basically the company that you’re buying the service from they have already installed the instance of the operating system they’ve already created the first user account they then give you that information for that first user account and then you can figure it out.
However it is you want so the question you may be asking say well I don’t I don’t understand that because if you’re literally renting the metal and the metal let’s say five states away well wait a minute but there’s no operating system to interact with and the metals five states away so you don’t want to drive there so so I don’t understand how you would configure it or work with it well one of the cool things and not really new but but they’re they’re coming too more into vogue is something called IPP KVM switches so kate.
KVM switches been around for forever long far longer than i’ve been in the computer industry keyboard video mouse switches so what these are generally when you’re dealing with a server rack is you plug all the servers in the rack into one KVM switch and then you can press a button then when you press that button that gives you access to the server from one keyboard video and mouse combination so you have a monitor you have a keyboard and mouse and you say oh I need to deal with the wit server – and you just hit the server – button and server – pops up oh I need to deal with server 10 you click the server 10 button and the server 10 pops up well with KVM they now have IP k via what this means is that you can deal with that server from the basic input/output so the basic video keyboard and mouse and you can do that over an IP connection so you can either open that up through a web browser and be able to log in or you can open it up through some kind of terminal session or or some kind of application so basically you can be sitting in your in your office five states away from this bare metal the company that you’re dealing with will plug in the KVM switch and whatever else and then basically you can hit the on there.
They can hit the on button or you may have some kind of remote wait at the on button and from there it will literally load into a BIOS screen then from there depending on what the the service provider has for you you can go and you can install your your your your operating system and do all of your configurations but literally you have remote access to the lowest level of that server so you could literally reboot that server and go into the BIOS and change BIOS configuration settings you literally have that ability whether you’re five states away or you know on an entirely different continent now especially with PDUs so the the power distribution units basically what most people will call surge protectors even those have remote access so that you can do things like power cycle the server because again the question where you’re like well Thanh I don’t understand if if you have metal as a service.
If you have that metal and you do something wrong and it freezes up how do you force it to restart because again you know you’re installing operating systems you’re doing all kind of wacky stuff sometimes it’ll freeze and if you have access to the metal what are you going to do well with these surge protectors these power distribution units you can actually power cycle them again remotely so this is the cool stuff with metal as a service I think this is going to become a much more prominent thing right now this is one of those things that it is offered by companies you don’t see it around a lot but it is something that you should be looking at and you should be thinking about because again this way you can have you you can have your own custom servers that have been hardened up to your specifications but they are sitting in somebody else’s data center you don’t have to worry about it just like with all these commoditized items it is less expensive for you to be able to rent this service from somebody else that can have a thousand or five thousand or twenty thousand of these servers up and running basically they can have five or ten technicians running around making sure all the metal is doing with metal supposed to do versus if you had servers in each one of your individual offices and having people run around and deal with that kind of stuff so that’s the basic concept of metal as a service again all it is at the end of the day is you are literally leasing or renting that bare metal so you’ve got a server with absolutely no operating system on it.
That is what you’re leasing that allows you to do a lot of really cool sexy amazing cool stuff um and with the modern technology like I say it’s actually very very very doable today it’s one of those things when you got to start thinking we think about the cloud I mean that’s a whole one of the problems with us old technicians right is we’re used to touching stuff we like you know when we work on computers we’re used to keyboards we’re used to like plugging away and we’ve got the server in front of us and we got the router in front of us we got all this stuff in front of us so like mentally we think about all this equipment like being in our server room being in our office being in our facility and so what you have to realize is in this modern world that we’re in you can have the exact same functionality that you would have if the equipment was in your building but it can be somewhere else it can be provisioned given to you very quickly it can be given to you very inexpensively and you can be provided as securely or more securely than what you could do yourself again a lot of people you know I’m starting to talk you know talking about things like metal as a service and everybody gets worried about security everybody’s like oh how do I how do I know Thanh.
How do I know my servers are going to be secure how do I know that data center is going to be secure well one you do something called due diligence you you actually make sure that the company that you’re dealing with is a legitimate company you probably if you’re going to be running your business office stuff you should fly out to their data center at least once to actually take a look at it make sure they’ve got all the security stuff and all that but beyond that what a lot of people don’t realize is how in secure their facilities actually are they always worry about how insecure the cloud provider is and they somehow completely ignore just the crappy crappy crappy crappy crappy security that they have on their facility again I’m here in Baltimore Maryland in the Baltimore City.
We have an incredibly high crime rate and so one of the real problems that you have is you can have antivirus on your servers you can have your firewalls on your servers you can of your intrusion detection on the servers you can have your ups on the servers and some crackhead could break into your building literally rip the server out of server rack and walk away with it and try to sell for 25 bucks to the local pawn shop and when they can’t sell it at the local pawn shop then they’ll get pissed and they’ll just throw it in a ditch and keep walking again that’s the nice thing with these data centers at least with that kind of physical security you would be surprised many times they have much much much much better physical security in the rest of this then then you have take a real honest hard look at the security in your facility and if you’re honest about it you probably know that it’s it’s probably pretty bad it’s probably probably probably your servers would be better off in some kind of hosted solution so that’s all there is for from metal as a service.
I enjoy taking this class and look forward to see you the next one you.
We have two sorted lists, and we want to write a function to merge the two lists into one sorted list:
a = [3, 4, 6, 10, 11, 18]
b = [1, 5, 7, 12, 13, 19, 21]
Here is our code:
a = [3, 4, 6, 10, 11, 18]
b = [1, 5, 7, 12, 13, 19, 21]
c = []

while a and b:
    if a[0] < b[0]:
        c.append(a.pop(0))
    else:
        c.append(b.pop(0))

# either a or b could still be non-empty
print c + a + b
The output:
[1, 3, 4, 5, 6, 7, 10, 11, 12, 13, 18, 19, 21]
A little bit more compact version using list.extend():
a = [3, 4, 6, 10, 11, 18]
b = [1, 5, 7, 12, 13, 19, 21]

a.extend(b)
c = sorted(a)
print c
Note that the list.extend() is different from list.append():
We’ll see two ways of initializing dictionary by solving word frequency problem.
#!/usr/bin/python
ss = """Nory was a Catholic because her mother was a Catholic,
and Nory's mother was a Catholic because her father was a Catholic,
and her father was a Catholic because his mother was a Catholic,
or had been."""

words = ss.split()
d = {}.fromkeys(words,0)

# or we can use this to initialize a dict
d = {x:0 for x in words}

for w in words:
    d[w] += 1
print d

ds = sorted(d.items(), key=lambda x:x[1], reverse=True)
print(ds)

# or we can use this for the key
import operator
ds2 = sorted(d.items(), key=operator.itemgetter(1), reverse=True)
print(ds2)
We initialized the dictionary with 0 using fromkeys(), and the output should look like this:
L = [1,2,4,8,16,32,64,128,256,512,1024,32768,65536,4294967296]

from collections import defaultdict
d = defaultdict(list)
for i in L:
    d[len(str(i))].append(i)
print d
print {k:v for k,v in d.items()}
Using map, filter, reduce, write a code that create a list of (n)**2 for range(10) for even integers:
l = [x for x in range(10) if x % 2 == 0]
print l

m = filter(lambda x:x % 2 == 0, [x for x in range(10)] )
# m = list( filter(lambda x:x % 2 == 0, [x for x in range(10)] ) ) # python3
print m

o = map(lambda x: x**2, m)
# o = list( map(lambda x: x**2, m) ) # python3
print o


p = reduce(lambda x,y:x+y, o)
# import functools . # python3
# p = functools.reduce(lambda x,y:x+y, o) # python3
print p
Q: We have the following code with unknown function f(). In f(), we do not want to use return, instead, we may want to use generator.
for x in f(5):
    print x,
The output looks like this:
0 1 8 27 64
Write a function f() so that we can have the output above.
We may use the following f() to get the same output:
def f(n):
   return [x**3 for x in range(5)]
But we want to use generator not using return.
So, the answer should look like this:
def f(n):
    for x in range(n):
        yield x**3
The yield enables a function to comeback where it left off when it is called again. This is the critical difference from a regular function. A regular function cannot comes back where it left off. The yield keyword helps a function to remember its state.
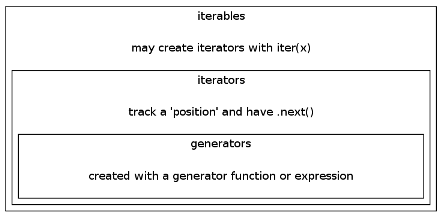
A generator function is a way to create an iterator. A new generator object is created and returned each time we call a generator function. A generator yields the values one at a time, which requires less memory and allows the caller to get started processing the first few values immediately.
Another example of using yield:
Let’s build the primes() function so that I fills the n one at a time, and comes back to primes() function until n > 100.
def isPrime(n):
   if n == 1:
      return False
   for t in range(2,n):
      if n % t == 0:
         return False
   return True

for n in primes():
   print n,
The print out from the for-loop should look like this:
2 3 5 7 11 ... 83 89 97
Here is the primes() function:
def primes(n=1):
   while n < 100:
      # yields n instead of returns n
      if isPrime(n): yield n
      # next call it will increment n by 1
      n += 1
Here is a more practical sample of code which I used for Natural Language Processing(NLP).
Suppose we have a huge data file that has hundred millions of lines. So, it may well exceed our computer’s memory. In this case, we may want to take so called out-of-core approach: we process data in batch (partially, one by one) rather than process it at once. This saves us from the memory issue when we deal with big data set.
So, we want to use yield command. In the following sample, we do process three lines at a time.
Here is the code:
def stream_docs(path):
    with open(path, 'rb') as lines:
        for line in lines:
            text, label = line[:-3], line[-3:-1]
            yield text, label

def get_minibatch(doc_stream, size):
    docs, y = [], []
    try:
        for _ in range(size):
            text, label = next(doc_stream)
            docs.append(text)
            y.append(label)
    except StopIteration:
        return None, None
    return docs, y

doc_stream = stream_docs(path='./test.txt')

for _ in range(100):
    X_train, y_train = get_minibatch(doc_stream, size=3)
    if not X_train:
        break
    print 'X_train, y_train=', X_train, y_train
The yield makes the stream_docs() to return a generator which is always an iterator:
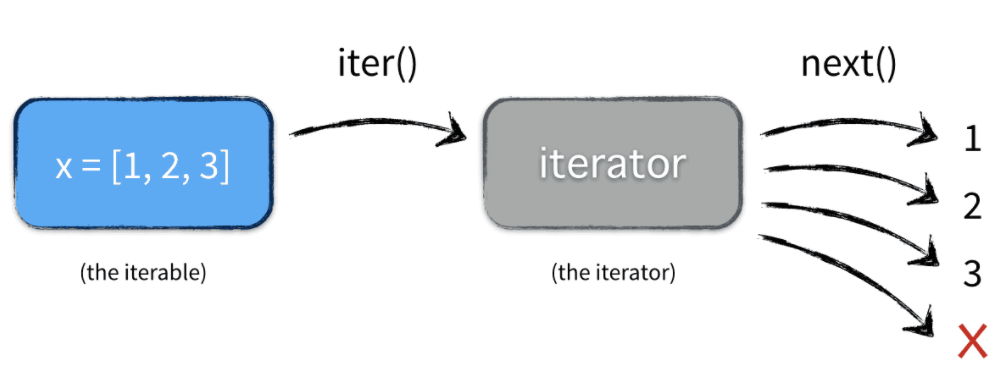
(note) – iterable: strings, lists, tuples, dictionaries, and sets are all iterable objects (containers) which we can get an iterator from. A range() functiuon also returns iterable object. All these objects have an iter() method which is used to get an iterator.
If we comment out the “yield” line, we get “TypeError: NoneType object is not an iterator” at the next(doc_stream) in “get_minibatch()” function.
It is used to import a module in a directory, which is called package import.
If we have a module, dir1/dir2/mod.py, we put __init__.py in each directories so that we can import the mod like this:
import dir1.dir2.mod
The __init__.py is usually an empty py file. The hierarchy gives us a convenient way of organizing the files in a large system.
Build a string with the numbers from 0 to 100, “0123456789101112…”
We may want to use str.join rather than appending a number every time.
>>> ''.join([`x` for x in xrange(101)])
'0123456789101112131415161718192021222324252627282930313233343536373839404142434445464748495051525354555657585960616263646566676869707172737475767778798081828384858687888990919293949596979899100'
>>>
Note that the (`) is a backquote not a regiular single quote (‘):
Note that we cannot use double quote(“) or single quote(‘) to make n a string:
>>> type("1")
<type 'str'>

>>> ''.join(["n" for n in range(10)])
'nnnnnnnnnn'
>>> ''.join(['n' for n in range(10)])
'nnnnnnnnnn'

>>> n = 1
>>> print `n`
1
>>> print "n"
n
Note: join() returns a string in which the string elements of sequence have been joined by string separator.
We can use str(x) instead:
>>> ''.join([str(x) for x in range(10)])
'0123456789'
Also, since the xrange() is replaced with range in Python 3.x, we should use range() instead for compatibility.
Basic file processing: Printing contents of a file.
try:
    with open('filename','r') as f:
        print f.read()
except IOError:
    print "No such file exists"
How can we get home directory using ‘~’ in Python?
We need to import os module, and add just one line:
import os
print os.path.expanduser('~')
Output:
/home/k
The usage of os.path.dirname() & os.path.basename()
For example, we have the path like this, /home/k/TEST/PYTHON/p.py:
We should be able to answer the questions about the standard library. Such as “Do you know if there’s a standard library for recursive file renaming?”, or “In which library would you use for regular expression?”
os: operating system support os.path: Common pathname manipulations: >>> import os >>> print(os.getcwd()) C:\Python32 >>> cur_dir = os.curdir >>> print(cur_dir) . >>> scripts_dir = os.path.join(os.curdir, ‘Tools\Scripts’) >>> print(scripts_dir) .\Tools\Scripts >>> diff_py = os.path.join(scripts_dir, ‘diff.py’) >>> print(diff_py) .\Tools\Scripts\diff.py >>> os.path.basename(diff_py) ‘ diff.py’ >>> os.path.splitext(diff_py) (‘.\\Tools\\Scripts\\diff’, ‘.py’) The os.path.join() function constructs a pathname out of one or more partial pathnames. In this case, it simply concatenates strings.Other convenient ones are: dirname() and basename(), which are the 1st and 2nd element of split(), respectively:>>> import os >>> print(os.getcwd()) C:\TEST\dirA\dirB\dirC >>> print(os.path.dirname(os.getcwd())) C:\TEST\dirA\dirB >>> print(os.path.basename(os.getcwd())) dirC >>> print(os.path.split(os.getcwd())) (‘C:\\TEST\\dirA\\dirB’, ‘dirC’) >>> pathname = os.path.join(os.getcwd(),’myfile.py’) >>> pathname ‘C:\\TEST\\dirA\\dirB\\dirC\\myfile.py’ >>> (dirname, filename) = os.path.split(pathname) >>> dirname ‘C:\\TEST\\dirA\\dirB\\dirC’ >>> filename ‘myfile.py’ The split function splits a full pathname and returns a tuple containing the path and filename. We could use multi-variable assignment to return multiple values from a function. The os.path.split() function does exactly that. We assign the return value of the split function into a tuple of two variables. Each variable receives the value of the corresponding element of the returned tuple.The first variable, dirname, receives the value of the first element of the tuple returned from the os.path.split() function, the file path. The second variable, filename, receives the value of the second element of the tuple returned from the os.path.split() function, the filename.os.path also contains the os.path.splitext() function, which splits a filename and returns a tuple containing the filename and the file extension.The os.path.expanduser() function :>>> print(os.path.expanduser(‘~’)) C:\Users\KHong will expand a pathname that uses ~ to represent the current user’s home directory. This works on any platform where users have a home directory, including Linux, Mac OS X, and Windows. The returned path does not have a trailing slash, but the os.path.join() function doesn’t mind:
range() returns a list to the sum function containing all the numbers from 1 to 100. But xrange() returns an iterator rather than a list, which makes it more lighter in terms of memory use as shown below.
Note: Since the xrange() is replaced with range in Python 3.x, we should use range() instead for compatibility. The range() in Python 3.x just returns iterator. That means it does not produce the results in memory any more, and if we want to get list from range(), we need to force it to do so: list(range(…)).
Iterators
Python defines several iterator objects to support iteration over general and specific sequence types, dictionaries.
Any object with a __next__() method to advance to a next result is considered iterator. Note that if an object has __iter__() method, we call the object iterable.
Generators allow us to declare a function that behaves like an iterator, i.e. it can be used in a for loop. It’s a function type generator, but there is another type of generator that may be more familiar to us – expression type generator used in list comprehension:
>>> # List comprehension makes a list
>>> [ x ** 3 for x in range(5)]
[0, 1, 8, 27, 64]
>>>
>>> # Generator expression makes an iterable
>>> (x ** 3 for x in range(5))
<generator object <genexpr> at 0x000000000315F678>
With the generator expression, we can just wrap it with list() call:
>>> list(x ** 3 for x in range(5))
[0, 1, 8, 27, 64]
Since every generator is an iterator, we can use next() to get the values:
>>> generator = (x ** 3 for x in range(5))
>>> generator.next()
0
>>> generator.next()
1
>>> generator.next()
8
>>> generator.next()
27
Functions as first-class objects? That means we can pass them around as objects and can manipulate them. In other words, most of the times, this just means we can pass these first-class citizens as arguments to functions, or return them from functions. Everything in Python is a proper object. Even things that are “primitive types” in other languages:
Functions have attributes and can be referenced and assigned to variables.
>>> def one(arg):
	'''I am a function returning arg I received.'''
	return arg

>>> one(1)
1
>>> one
<function one at 0x0284AA70>
>>> One = one
>>> One
<function one at 0x0284AA70>
>>> one.__doc__
'I am a function returning arg I received.'
>>>
docstrings vs comments
A docstring is the documentation string for a function. We use it as shown below:
function_name.__doc__
We can declare it like this:
def my_function():
    """our docstring"""
or:
def my_function():
    '''our docstring'''
Everything between the triple quotes (with double quotes, “”” or with single quotes,”’) is the function’s docstring, which documents what the function does. A docstring, if it exists, must be the first thing defined in a function. In other words, it should appear on the next line after the function declaration. We don’t technically need to give our function a docstring, but we always should. The docstring will be available at runtime as an attribute of the function.
Writing documentation for our program this way makes the code more readable. We can also use comments for clarification of what the code is doing. In general, docstrings are for documentation, comments are for a code reader.
Monkey-patching
The origin of monkey-patch according to wiki is : “The term monkey patch seems to have come from an earlier term, guerrilla patch, which referred to changing code sneakily at runtime. The word guerrilla, homophonous with gorilla, became monkey, possibly to make the patch sound less intimidating.”
In Python, the term monkey patch only refers to dynamic modifications of a class or module at runtime, motivated by the intent to patch existing third-party code as a workaround to a bug or feature which does not act as we desire.
We have a module called m.py like this:
# m.py
class MyClass:
    def f(self):
        print "f()"
Then, if we run the monkey-patch testing like this:
As we can see, we did make some changes in the behavior of f() in MyClass using the function we defined, monkey_f(), outside of the module m.
It is a risky thing to do, but sometimes we need this trick, such as testing.
pdb – The Python Debugger
The module pdb defines an interactive source code debugger for Python programs. It supports setting (conditional) breakpoints and single stepping at the source line level, inspection of stack frames, source code listing, and evaluation of arbitrary Python code in the context of any stack frame. It also supports post-mortem debugging and can be called under program control.
Python supports the creation of anonymous functions (i.e. functions that are not bound to a name) at runtime, using a construct called lambda. This is not exactly the same as lambda in functional programming languages such as Lisp, but it is a very powerful concept that’s well integrated into Python and is often used in conjunction with typical functional concepts like filter(), map() and reduce().
The following code shows the difference between a normal function definition, func and a lambda function, lamb:
As we can see, func() and lamb() do exactly the same and can be used in the same ways. Note that the lambda definition does not include a return statement — it always contains an expression which is returned. Also note that we can put a lambda definition anywhere a function is expected, and we don’t have to assign it to a variable at all.
The lambda‘s general form is :
lambda arg1, arg2, ...argN : expression using arguments
Function objects returned by running lambda expressions work exactly the same as those created and assigned by defs. However, there are a few differences that make lambda useful in specialized roles:
lambda is an expression, not a statement. Because of this, a lambda can appear in places a def is not allowed. For example, places like inside a list literal, or a function call’s arguments. As an expression, lambda returns a value that can optionally be assigned a name. In contrast, the def statement always assigns the new function to the name in the header, instead of returning is as a result.
lambda’s body is a single expression, not a block of statements. The lambda‘s body is similar to what we’d put in a def body’s return statement. We simply type the result as an expression instead of explicitly returning it. Because it is limited to an expression, a lambda is less general that a def. We can only squeeze design, to limit program nesting. lambda is designed for coding simple functions, and def handles larger tasks.
>>>
>>> def f(x, y, z): return x + y + z

>>> f(2, 30, 400)
432
We can achieve the same effect with lambda expression by explicitly assigning its result to a name through which we can call the function later:
>>>
>>> f = lambda x, y, z: x + y + z
>>> f(2, 30, 400)
432
>>>
Here, the function object the lambda expression creates is assigned to f. This is how def works, too. But in def, its assignment is an automatic must.
In general, properties are more flexible than attributes. That’s because we can define functions that describe what is supposed to happen when we need setting, getting or deleting them. If we don’t need this additional flexibility, we may just use attributes since they are easier to declare and faster.
However, when we convert an attribute into a property, we just define some getter and setter that we attach to it, that will hook the data access. Then, we don’t need to rewrite the rest of our code, the way for accessing the data is the same, whatever our attribute is a property or not.
classmethod(function)
    Return a class method for function.

    A class method receives the class as implicit first argument,
    just like an instance method receives the instance.
    To declare a class method, use this idiom:

class C:
    @classmethod
    def f(cls, arg1, arg2, ...): ...

The @classmethod form is a function decorator.
It can be called either on the class (such as C.f()) or on an instance (such as C().f()).
The instance is ignored except for its class. If a class method is called for a derived class,
the derived class object is passed as the implied first argument.
And for the @staticmethod, the python doc describes it as below:
staticmethod(function)
    Return a static method for function.

    A static method does not receive an implicit first argument.
    To declare a static method, use this idiom:

class C:
    @staticmethod
    def f(arg1, arg2, ...): ...

The @staticmethod form is a function decorator.
It can be called either on the class (such as C.f()) or on an instance (such as C().f()).
The instance is ignored except for its class.
Static methods in Python are similar to those found in Java or C++.
For more info on static vs class methods, please visit:
Name the functional approach that Python is taking.
Python provides the following:
map(aFunction, aSequence)
filter(aFunction, aSequence)
reduce(aFunction, aSequence)
lambda
list comprehension
These functions are all convenience features in that they can be written in Python fairly easily. Functional programming is all about expressions. We may say that the Functional programming is an expression oriented programming.
The first argument is a function to be executed for all the elements of the iterable given as the second argument. If the function given takes in more than 1 arguments, then many iterables are given.
>>> def cubic(x):
	return x*x*x

>>> items = [x for x in range(11) if x % 2 == 0]
>>> list(map(cubic, items))
[0, 8, 64, 216, 512, 1000]
>>>
>>> list(map(lambda x,y: x*y, [1,2,3], [4,5,6]))
[4, 10, 18]
>>>
map is similar to list comprehension but is more limited because it requires a function instead of an arbitrary expression.
What is filter and reduce?
Just for comparison purpose, in the following example, we will include map as well.
>>> integers = [ x for x in range(11)]
>>> filter(lambda x: x % 2 == 0, integers)
[0, 2, 4, 6, 8, 10]
>>> map(lambda x: x**2, integers)
[0, 1, 4, 9, 16, 25, 36, 49, 64, 81, 100]
>>> reduce(lambda x, y: x + y, integers)
55
>>>
In the above example, we defined a simple list of integer values, then we use the standard functions filter(), map() and reduce() to do various things with that list. All of the three functions expect two arguments: A function and a list. In the first example, filter() calls our lambda function for each element of the list, and returns a new list that contains only those elements for which the function returned “True”. In this case, we get a list of all even numbers. In the second example, map() is used to convert our list. The given function is called for every element in the original list, and a new list is created which contains the return values from our lambda function. In this case, it computes x^2 for every element. Finally, reduce() is somewhat special. The function for this one must accept two arguments (x and y), not just one. The function is called with the first two elements from the list, then with the result of that call and the third element, and so on, until all of the list elements have been handled. This means that our function is called n-1 times if the list contains n elements. The return value of the last call is the result of the reduce() construct. In the above example, it simply adds the arguments, so we get the sum of all elements.
*args and **kwargs
Putting *args and/or **kwargs as the last items in our function definition’s argument list allows that function to accept an arbitrary number of anonymous and/or keyword arguments. Those arguments are called Keyword Arguments. Actually, they are place holders for multiple arguments, and they are useful especially when we need to pass a different number of arguments each time we call the function.
We may want to use *args when we’re not sure how many arguments might be passed to our function, i.e. it allows us to pass an arbitrary number of arguments to your function as shown in the example below:
Let’s make a function that sums of all numbers. It should work for bo the inputs: 1,2,3,4,5 as separate args and as a list [1,2,3,4,5]:
def fn(<strong>*</strong>args):
	ans = 0
	for x in args:
		ans += x
	return ans

print(fn(1,2,3,4,5))
print(fn(<strong>*</strong>[1, 2, 3, 4, 5]))
print(fn(<strong>*</strong>range(1,6)))
The keyword arguments is a special name=value syntax in function calls that specifies passing by name. It is often used to provide configuration options.
The content of objects of immutable types cannot be changed after they are created.
immutable
mutable
tuple, frozen set, int, float, str
list, set, dict, byte array
Difference between remove, del and pop on lists
To remove a list element, we can use either the del statement if we know exactly which element(s) we are deleting or the remove() method if we do not know.
list.remove(element), del list(index), list.pop(index)
remove() removes the first matching value, not a specific index:
>>> a = [5,6,7,7,8]
>>> a.remove(7)
>>> a
[5, 6, 7, 8]
Both del and pop work on index:
>>> a = [5,6,7,7,8]
>>> del a[1]
>>> a
[5, 7, 7, 8]

>>> a = [5,6,7,7,8]
>>> a.pop(1)
6
>>> a
[5, 7, 7, 8]

>>> a = [5,6,7,7,8]
>>> a.pop(a.index(6)) # get the index for 6
6
>>> a
[5, 7, 7, 8]
Join with new line
Given a list of string, [‘Black’, ‘holes’, ‘are’, ‘where’, ‘God’, ‘divided’, ‘by’, ‘zero’], print each word in a new line:
>>> s = ['Black', 'holes', 'are', 'where', 'God', 'divided', 'by', 'zero']
>>> print '\n'.join(s)
Black
holes
are
where
God
divided
by
zero
Graphical User Interface(GUI) is a form of user interface which allows users to interact with computers through visual indicators using items such as icons, menus, windows, etc. It has advantages over the Command Line Interface(CLI) where users interact with computers by writing commands using keyboard only and whose usage is more difficult than GUI.
What is Tkinter?
Tkinter is the inbuilt python module that is used to create GUI applications. It is one of the most commonly used modules for creating GUI applications in Python as it is simple and easy to work with. You don’t need to worry about the installation of the Tkinter module separately as it comes with Python already. It gives an object-oriented interface to the Tk GUI toolkit.
Some other Python Libraries available for creating our own GUI applications areKivyPython QtwxPython
Among all Tkinter is most widely used
What are Widgets?
Widgets in Tkinter are the elements of GUI application which provides various controls (such as Labels, Buttons, ComboBoxes, CheckBoxes, MenuBars, RadioButtons and many more) to users to interact with the application.
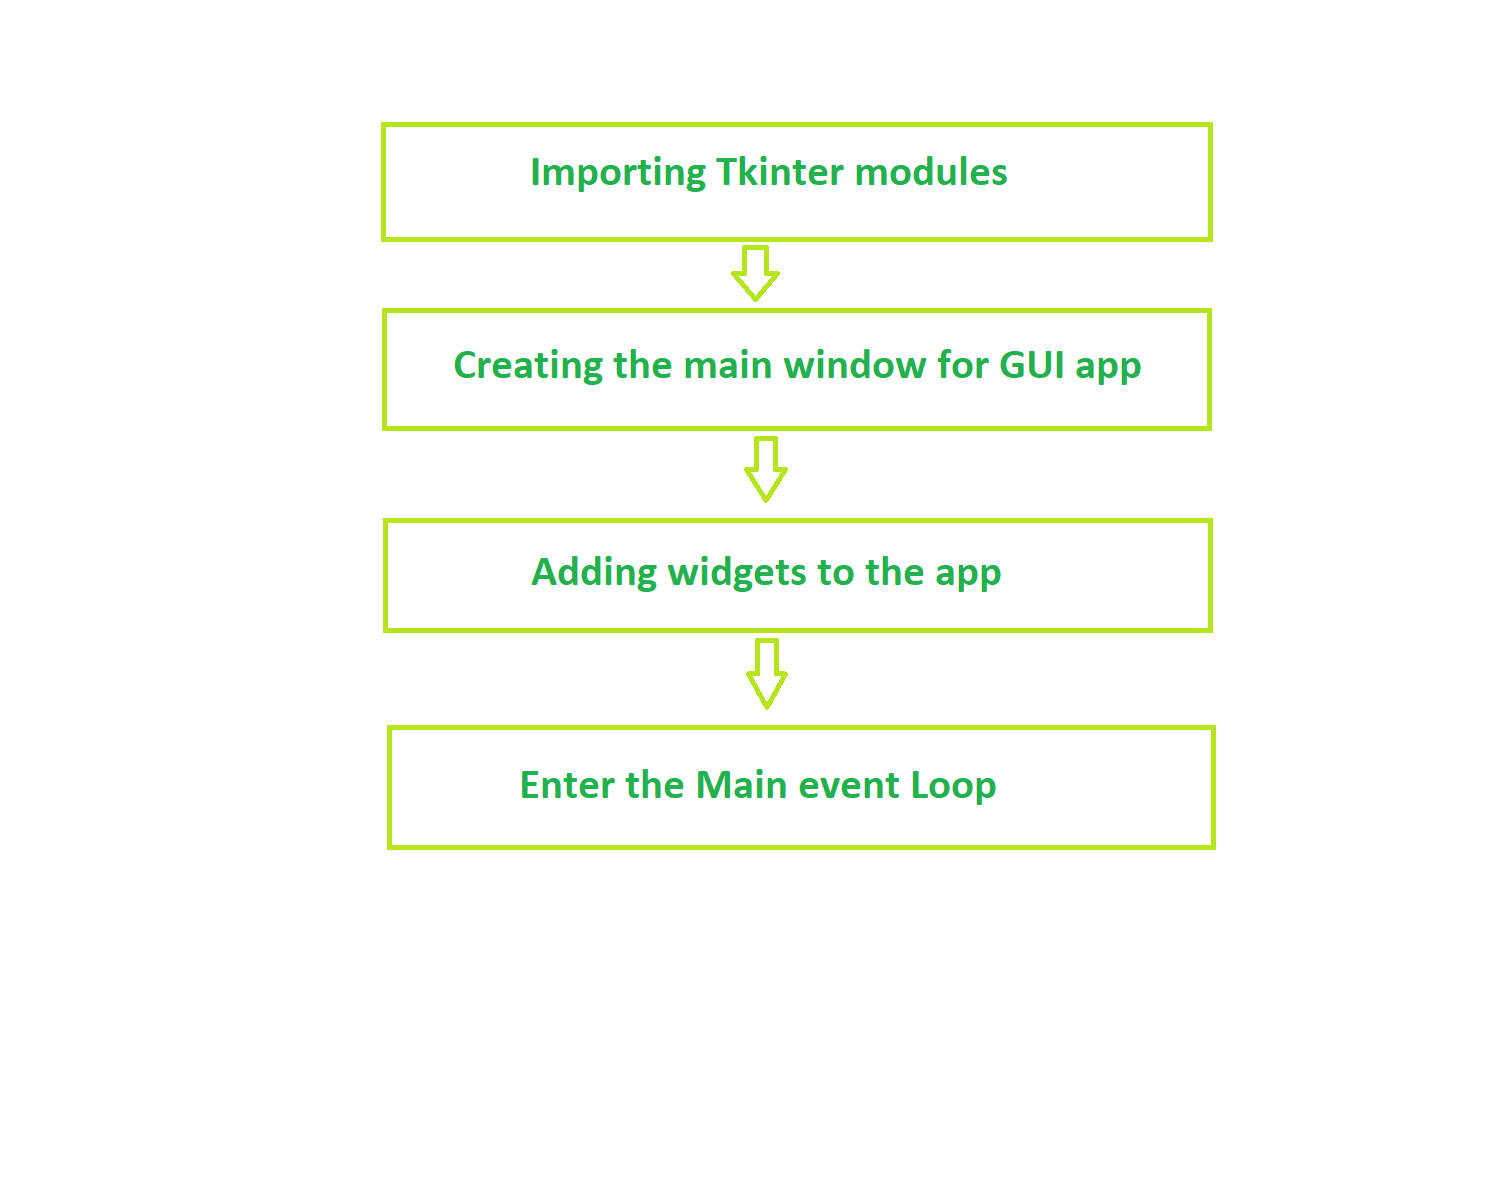
Fundamental structure of tkinter program
Basic Tkinter Widgets:
WIDGETS
DESCRIPTION
Label
It is used to display text or image on the screen
Button
It is used to add buttons to your application
Canvas
It is used to draw pictures and others layouts like texts, graphics etc.
ComboBox
It contains a down arrow to select from list of available options
CheckButton
It displays a number of options to the user as toggle buttons from which user can select any number of options.
RadiButton
It is used to implement one-of-many selection as it allows only one option to be selected
Entry
It is used to input single line text entry from user
Frame
It is used as container to hold and organize the widgets
Message
It works same as that of label and refers to multi-line and non-editable text
Scale
It is used to provide a graphical slider which allows to select any value from that scale
Scrollbar
It is used to scroll down the contents. It provides a slide controller.
SpinBox
It is allows user to select from given set of values
Text
It allows user to edit multiline text and format the way it has to be displayed
Menu
It is used to create all kinds of menu used by an application
Selenium is a powerful tool for controlling web browser through program. It is functional for all browsers, works on all major OS and its scripts are written in various languages i.e Python, Java, C#, etc, we will be working with Python. Selenium has four major components – Selenium IDE, Selenium RC, Selenium Web driver, Selenium GRID.
Selenium Basics
Components
Features
Applications
Limitations
Components
Selenium has been in the industry for a long time and used by automation testers all around the globe. Let’s check the four major components of Selenium
Selenium IDE (Integrated Development Environment) is the major tool in the Selenium Suite. It is a complete integrated development environment (IDE) for Selenium tests. It is implemented as a Firefox Add-On and as a Chrome Extension. It allows for recording, editing and debugging of functional tests. It was previously known as Selenium Recorder. Selenium-IDE was originally created by Shinya Kasatani and donated to the Selenium project in 2006. Selenium IDE was previously little-maintained. Selenium IDE began being actively maintained in 2018.
Scripts may be automatically recorded and edited manually providing autocompletion support and the ability to move commands around quickly. Scripts are recorded in Selenese, a special test scripting language for Selenium. Selenese provides commands for performing actions in a browser (click a link, select an option) and for retrieving data from the resulting pages.
Selenium RC (Remote control)
Selenium Remote Control (RC) is a server, written in Java, that accepts commands for the browser via HTTP. RC makes it possible to write automated tests for a web application in any programming language, which allows for better integration of Selenium in existing unit test frameworks. To make writing tests easier, Selenium project currently provides client drivers for PHP, Python, Ruby, .NET, Perl and Java. The Java driver can also be used with JavaScript (via the Rhino engine). An instance of selenium RC server is needed to launch html test case – which means that the port should be different for each parallel run. However, for Java/PHP test case only one Selenium RC instance needs to be running continuously.
Selenium Web Driver
Selenium WebDriver is the successor to Selenium RC. Selenium WebDriver accepts commands (sent in Selenese, or via a Client API) and sends them to a browser. This is implemented through a browser-specific browser driver, which sends commands to a browser and retrieves results. Most browser drivers actually launch and access a browser application (such as Firefox, Google Chrome, Internet Explorer, Safari, or Microsoft Edge); there is also an HtmlUnit browser driver, which simulates a browser using the headless browser HtmlUnit.
Selenium WebDriver does not need a special server to execute tests. Instead, the WebDriver directly starts a browser instance and controls it. However, Selenium Grid can be used with WebDriver to execute tests on remote systems (see below). Where possible, WebDriver uses native operating system level functionality rather than browser-based JavaScript commands to drive the browser. This bypasses problems with subtle differences between native and JavaScript commands, including security restrictions.
Selenium GRID
Selenium Grid is a server that allows tests to use web browser instances running on remote machines. With Selenium Grid, one server acts as the hub. Tests contact the hub to obtain access to browser instances. The hub has a list of servers that provide access to browser instances (WebDriver nodes), and lets tests use these instances. Selenium Grid allows running tests in parallel on multiple machines and to manage different browser versions and browser configurations centrally (instead of in each individual test).
The ability to run tests on remote browser instances is useful to spread the load of testing across several machines and to run tests in browsers running on different platforms or operating systems. The latter is particularly useful in cases where not all browsers to be used for testing can run on the same platform.
OpenCV is one of the most popular computer vision libraries. If you want to start your journey in the field of computer vision, then a thorough understanding of the concepts of OpenCV is of paramount importance. In this article, I will try to introduce the most basic and important concepts of OpenCV in an intuitive manner. This article will cover the following topics:
Reading an image
Extracting the RGB values of a pixel
Extracting the Region of Interest (ROI)
Resizing the Image
Rotating the Image
Drawing a Rectangle
Displaying text
This is the original image that we will manipulate throughout the course of this article.
Let’s start with the simple task of reading an image using OpenCV.
Reading an image
Importing the OpenCV library
 import cv2
 Reading the image using imread() function
 image = cv2.imread('image.png')
 Extracting the height and width of an image
 h, w = image.shape[:2]
 Displaying the height and width
 print("Height = {}, Width = {}".format(h, w))
Now we will focus on extracting the RGB values of an individual pixel. Note – OpenCV arranges the channels in BGR order. So the 0th value will correspond to Blue pixel and not Red.
Extracting the RGB values of a pixel
Extracting RGB values.
 Here we have randomly chosen a pixel
 by passing in 100, 100 for height and width.
 (B, G, R) = image[100, 100]
 Displaying the pixel values
 print("R = {}, G = {}, B = {}".format(R, G, B))
 We can also pass the channel to extract
 the value for a specific channel
 B = image[100, 100, 0]
 print("B = {}".format(B))
Prerequisites : MongoDB Python Basics We would first understand how to insert a document/entry in a collection of a database. Then we would work on how to update an existing document in MongoDB using pymongo library in python. The update commands helps us to update the query data inserted already in MongoDB database collection.
Insert data
We would first insert data in MongoDB.
Step 1 – Establishing Connection: Port number Default: 27017conn = MongoClient(‘localhost’, port-number)If using default port-number i.e. 27017. Alternate connection method:conn = MongoClient()
Step 2 – Create Database or Switch to Existing Database:db = conn.dabasenameCreate a collection or Switch to existing collection:
collection = db.collection_name
Step 3 – Insert : To Insert Data create a dictionary object and insert data in database. Method used to insert data: insert_one() or insert_many()After insert to find the documents inside a collection we use find() command. The find() method issues a query to retrieve data from a collection in MongoDB. All queries in MongoDB have the scope of a single collection. Note : ObjectId is different for every entry in database collection. Let us understand insert of data with help on code:
# Python code to illustrate
# inserting data in MongoDB
from pymongo import MongoClient

try:
    conn = MongoClient()
    print("Connected successfully!!!")
except:
    print("Could not connect to MongoDB")

# database
db = conn.database

# Created or Switched to collection names: my_gfg_collection
collection = db.my_gfg_collection

emp_rec1 = {
        "name":"Mr.Geek",
        "eid":24,
        "location":"delhi"
        }
emp_rec2 = {
        "name":"Mr.Shaurya",
        "eid":14,
        "location":"delhi"
        }

# Insert Data
rec_id1 = collection.insert_one(emp_rec1)
rec_id2 = collection.insert_one(emp_rec2)

print("Data inserted with record ids",rec_id1," ",rec_id2)

# Printing the data inserted
cursor = collection.find()
for record in cursor:
    print(record)
Connected successfully!!!
Data inserted with record ids
{'_id': ObjectId('5a02227b37b8552becf5ed2a'),
'name': 'Mr.Geek', 'eid': 24, 'location': 'delhi'}
{'_id': ObjectId('5a02227c37b8552becf5ed2b'), 'name':
'Mr.Shaurya', 'eid': 14, 'location': 'delhi'}
Updating data in MongoDB
Methods used: update_one() and update_many() Parameters passed: + a filter document to match the documents to update + an update document to specify the modification to perform + an optional upsert parameter
# Python code to illustrate
# updating data in MongoDB
# with Data of employee with id:24
from pymongo import MongoClient

try:
    conn = MongoClient()
    print("Connected successfully!!!")
except:
    print("Could not connect to MongoDB")

# database
db = conn.database

# Created or Switched to collection names: my_gfg_collection
collection = db.my_gfg_collection

# update all the employee data whose eid is 24
result = collection.update_many(
        {"eid":24},
        {
                "$set":{
                        "name":"Mr.Geeksforgeeks"
                        },
                "$currentDate":{"lastModified":True}

                }
        )


print("Data updated with id",result)

# Print the new record
cursor = collection.find()
for record in cursor:
    print(record)
Output:
Connected successfully!!!
Data updated with id
{'_id': ObjectId('5a02227b37b8552becf5ed2a'),
'name': 'Mr.Geeksforgeeks', 'eid': 24, 'location':
'delhi', 'lastModified': datetime.datetime(2017, 11, 7, 21, 19, 9, 698000)}
{'_id': ObjectId('5a02227c37b8552becf5ed2b'), 'name':
'Mr.Shaurya', 'eid': 14, 'location': 'delhi'}
To find number of documents or entries in collection the are updated use.
Python Database API ( Application Program Interface ) is the Database interface for the standard Python. This standard is adhered to by most Python Database interfaces. There are various Database servers supported by Python Database such as MySQL, GadFly, mSQL, PostgreSQL, Microsoft SQL Server 2000, Informix, Interbase, Oracle, Sybase etc. To connect with MySQL database server from Python, we need to import the mysql.connector interface.
The above program illustrates the creation of MySQL database geeks4geeks in which host-name is localhost, the username is user and password is gfg.
Let’s suppose we want to create a table in the database, then we need to connect to a database. Below is a program to create a table in the geeks4geeks database which was created in the above program.
importing required library
 import mysql.connector
 connecting to the database
 dataBase = mysql.connector.connect(
                     host = "localhost",
                     user = "user",
                     passwd = "gfg",
                     database = "geeks4geeks" )
 preparing a cursor object
 cursorObject = dataBase.cursor()
 creating table
 studentRecord = """CREATE TABLE STUDENT (
                 NAME VARCHAR(20) NOT NULL,
                 BRANCH VARCHAR(50),
                 ROLL INT NOT NULL,
                 SECTION VARCHAR(5),
                 AGE INT,
                 )"""
 table created
 cursorObject.execute(studentRecord)
 disconnecting from server
 dataBase.close()
This article explains how to load and parse a CSV file in Python.
First of all, what is a CSV ? CSV (Comma Separated Values) is a simple fileformat used to store tabular data, such as a spreadsheet or database. A CSV file stores tabular data (numbers and text) in plain text. Each line of the file is a data record. Each record consists of one or more fields, separated by commas. The use of the comma as a field separator is the source of the name for this file format.
For working CSV files in python, there is an inbuilt module called csv.
Reading a CSV file
# importing csv module
import csv

# csv file name
filename = "aapl.csv"

# initializing the titles and rows list
fields = []
rows = []

# reading csv file
with open(filename, 'r') as csvfile:
	# creating a csv reader object
	csvreader = csv.reader(csvfile)

	# extracting field names through first row
	fields = next(csvreader)

	# extracting each data row one by one
	for row in csvreader:
		rows.append(row)

	# get total number of rows
	print("Total no. of rows: %d"%(csvreader.line_num))

# printing the field names
print('Field names are:' + ', '.join(field for field in fields))

# printing first 5 rows
print('\nFirst 5 rows are:\n')
for row in rows[:5]:
	# parsing each column of a row
	for col in row:
		print("%10s"%col),
	print('\n')
The output of above program looks like this:
The above example uses a CSV file aapl.csv which can be downloaded from here. Run this program with the aapl.csv file in same directory.
Let us try to understand this piece of code.
with open(filename, ‘r’) as csvfile: csvreader = csv.reader(csvfile)Here, we first open the CSV file in READ mode. The file object is named as csvfile. The file object is converted to csv.reader object. We save the csv.reader object as csvreader.
fields = csvreader.next()csvreader is an iterable object. Hence, .next() method returns the current row and advances the iterator to the next row. Since the first row of our csv file contains the headers (or field names), we save them in a list called fields.
for row in csvreader: rows.append(row)Now, we iterate through remaining rows using a for loop. Each row is appended to a list called rows. If you try to print each row, one can find that row is nothing but a list containing all the field values.
print(“Total no. of rows: %d”%(csvreader.line_num))csvreader.line_num is nothing but a counter which returns the number of rows which have been iterated.
Writing to a CSV file
# importing the csv module
import csv

# field names
fields = ['Name', 'Branch', 'Year', 'CGPA']

# data rows of csv file
rows = [ ['Nikhil', 'COE', '2', '9.0'],
		['Sanchit', 'COE', '2', '9.1'],
		['Aditya', 'IT', '2', '9.3'],
		['Sagar', 'SE', '1', '9.5'],
		['Prateek', 'MCE', '3', '7.8'],
		['Sahil', 'EP', '2', '9.1']]

# name of csv file
filename = "university_records.csv"

# writing to csv file
with open(filename, 'w') as csvfile:
	# creating a csv writer object
	csvwriter = csv.writer(csvfile)

	# writing the fields
	csvwriter.writerow(fields)

	# writing the data rows
	csvwriter.writerows(rows)
Let us try to understand the above code in pieces.
fields and rows have been already defined. fields is a list containing all the field names. rows is a list of lists. Each row is a list containing the field values of that row.
with open(filename, ‘w’) as csvfile: csvwriter = csv.writer(csvfile)Here, we first open the CSV file in WRITE mode. The file object is named as csvfile. The file object is converted to csv.writer object. We save the csv.writer object as csvwriter.
csvwriter.writerow(fields)Now we use writerow method to write the first row which is nothing but the field names.
csvwriter.writerows(rows)We use writerows method to write multiple rows at once.
Writing a dictionary to a CSV file
# importing the csv module
import csv

# my data rows as dictionary objects
mydict =[{'branch': 'COE', 'cgpa': '9.0', 'name': 'Nikhil', 'year': '2'},
		{'branch': 'COE', 'cgpa': '9.1', 'name': 'Sanchit', 'year': '2'},
		{'branch': 'IT', 'cgpa': '9.3', 'name': 'Aditya', 'year': '2'},
		{'branch': 'SE', 'cgpa': '9.5', 'name': 'Sagar', 'year': '1'},
		{'branch': 'MCE', 'cgpa': '7.8', 'name': 'Prateek', 'year': '3'},
		{'branch': 'EP', 'cgpa': '9.1', 'name': 'Sahil', 'year': '2'}]

# field names
fields = ['name', 'branch', 'year', 'cgpa']

# name of csv file
filename = "university_records.csv"

# writing to csv file
with open(filename, 'w') as csvfile:
	# creating a csv dict writer object
	writer = csv.DictWriter(csvfile, fieldnames = fields)

	# writing headers (field names)
	writer.writeheader()

	# writing data rows
	writer.writerows(mydict)
In this example, we write a dictionary mydict to a CSV file.
with open(filename, ‘w’) as csvfile: writer = csv.DictWriter(csvfile, fieldnames = fields)Here, the file object (csvfile) is converted to a DictWriter object. Here, we specify the fieldnames as an argument.
writer.writeheader()writeheader method simply writes the first row of your csv file using the pre-specified fieldnames.
writer.writerows(mydict)writerows method simply writes all the rows but in each row, it writes only the values(not keys).
So, in the end, our CSV file looks like this:
Important Points:
In csv modules, an optional dialect parameter can be given which is used to define a set of parameters specific to a particular CSV format. By default, csv module uses excel dialect which makes them compatible with excel spreadsheets. You can define your own dialect using register_dialect method. Here is an example:
Now, consider that a CSV file looks like this in plain-text: We notice that the delimiter is not a comma but a semi-colon. Also, the rows are separated by two newlines instead of one. In such cases, we can specify the delimiter and line terminator as follows:csvreader = csv.reader(csvfile, delimiter = ';', lineterminator = '\n\n')